Tag Archives for " learn to paint portraits "

How To Varnish Your LARGE Acrylic Painting
How do you achieve long-lasting protection for your large acrylic portrait?
Introduction
Varnishing your acrylic painting is an essential step to protect it and give it a professional finish. In this guide, we’ll cover how to varnish a large acrylic painting, ensuring your artwork looks its best and remains protected for years to come.
Why is varnishing your large acrylic portrait important?
Varnishing your painting not only enhances its appearance by evening out the sheen but also protects it from UV rays, dust, and scratches. It adds a professional touch, making your artwork look polished and complete.

Supplies You’ll Need
Before you start varnishing, gather the following supplies:
- Varnishing Brush: A large 10-inch brush is ideal for covering large areas quickly and evenly.
- Matte Varnish: Opt for a high-quality matte varnish. A satin finish can provide a subtle shine without being too glossy.
- Container: Use a clean container for your varnish. An old yogurt container works well.
- Stir Stick: Ensure the varnish is well-mixed before application.
- Rag: Keep a rag handy for wiping off any drips.
- Pipe Wrench: This might be necessary to open a stuck varnish container.
Preparation Steps
- Stir the Varnish: Over time, varnish can separate. Stir it thoroughly with a stir stick to ensure it’s well-mixed. If stirring isn’t an option, gently shake the container.
- Clean Your Canvas: Wipe off any dust or debris from your painting using a clean rag. This step is crucial to avoid trapping particles under the varnish.
- Lay the Canvas Flat: Position your painting flat on a table to prevent drips and ensure an even application.
Applying the Varnish
- Start Far Away: Begin varnishing from the farthest point on the painting and work your way towards yourself. This method helps avoid drips and ensures a smooth application.
- Dip and Brush: Dip your brush into the varnish container, ensuring both sides are evenly coated. Start about a quarter of the way from the edge and brush across the canvas.
- Smooth Strokes: Use long, smooth strokes to apply the varnish. Avoid overbrushing, which can cause streakiness.
- Overlap Strokes: Slightly overlap each stroke to ensure even coverage. Reload your brush as needed.
- Wipe Drips: Wipe off any drips that occur on the sides of the painting using a rag.
Tips and Techniques
- Don’t Overbrush: Overbrushing can lead to cloudiness and streakiness. Apply the varnish in one or two smooth strokes and leave it to dry.
- Keep a Wet Edge: Maintain a wet edge as you work to prevent the varnish from drying too quickly and causing streaks.
- Check for Streaks: Pay extra attention to dark areas of the painting, where streaks are more visible.
- Drying Time: Allow the varnish to dry for a few hours. It should be dry to the touch within an hour and fully dry within four hours, depending on the temperature and humidity.
Common varnishing your large acrylic portraits mistakes to avoid
Varnishing can be a straightforward process, but there are common mistakes that can be easily avoided with a bit of caution:
- Skipping the Stirring: Always stir your varnish before application to avoid uneven sheen and consistency.
- Overbrushing: Applying too many strokes can cause the varnish to become cloudy. Less is more in this case.
- Incorrect Drying Position: Never dry your painting vertically. Always lay it flat to prevent drips and runs.
- Ignoring Dust: Ensure your work area and canvas are dust-free before starting to varnish. Dust particles can become trapped and ruin the smooth finish.
Frequently asked questions about varnishing large acrylic paintings
1. What kind of varnish do I use?
For varnishing large acrylic paintings, I recommend using a matte varnish, specifically one that dries to a satin finish. I use a matte varnish from Nova Color, which comes in gallon jugs that I transfer into quart-sized containers for easier use. This type of varnish not only enhances the appearance of your painting but also provides UV protection and a professional finish.
2. What kind of brush?
A large brush is essential for varnishing large paintings effectively. I use a 10-inch Liquitex varnishing brush. This brush covers a lot of ground quickly and ensures an even application of the varnish. It’s important to have a brush that’s wide enough to make long, smooth strokes across your canvas.
3. Should I use an isolation coat?
In my process, I do not use an isolation coat. Instead, I treat the varnish layer as another layer of acrylic. The reason behind this is the flexibility to restore or touch up the painting if needed. Since the matte varnish is essentially clear acrylic without pigment, it can be painted over if any issues arise over time.
4. How should I apply the varnish?
To apply the varnish, follow these steps:
- Start by wiping off any dust from the canvas with a clean brush or cloth.
- Lay your canvas flat on a table to prevent drips.
- Stir the varnish well to mix any separated components.
- Pour a small amount of varnish into a container.
- Dip your brush into the varnish and start applying it from the area farthest away from you, working your way inward.
- Use long, even strokes and avoid overbrushing to prevent streakiness and cloudiness.
- Overlap your strokes slightly and lift the brush at the end of each stroke to maintain a wet edge.
- Allow the varnish to dry completely, which usually takes a few hours for a large painting.
5. Why should I varnish a painting in the first place?
Varnishing your painting serves several important purposes:
- It enhances the overall appearance by evening out the sheen and bringing out the colors.
- It provides a protective layer against UV rays, dust, and other environmental factors.
- It gives your artwork a professional finish, making it more appealing to clients and viewers.
- It helps preserve the painting over time, ensuring it looks its best for years to come.
6. How often should I varnish my paintings?
Once varnished, your painting typically does not need to be re-varnished. However, if the varnish gets damaged or wears off over time, you can apply another coat after proper cleaning.
7. Can I use the same varnish for all my paintings?
It depends on the finish you desire. Matte varnish provides a non-reflective finish, while gloss varnish gives it a shiny appearance. Choose the varnish based on your preference for each artwork.
8. What if I make a mistake while varnishing?
If you notice a mistake while the varnish is still wet, you can carefully remove it with a damp cloth and reapply it. Once dry, mistakes can be challenging to fix, so it’s best to apply varnish carefully and avoid overbrushing.
Watch the full video tutorial below!
Varnishing your large acrylic painting is a crucial step in preserving and enhancing its beauty. By following these steps and tips, you can achieve a professional finish that protects your artwork and makes it shine. Remember to gather your supplies, prepare your canvas, and apply the varnish with care. Happy painting!
LEARN MORE
- Sketching Your Painting Accurately
- Beginning a Pet Portrait in Acrylic
- The Mystery of Realism in Painting
- Apply A Burnt Sienna Glaze to a Portrait
- Learn How to Sketch a Portrait Freehand in 45 Minutes
- Adding highlights to your acrylic painting
- 5 Excellent Reasons to Use Aluminum Foil
- Paint Realistic Wrinkles in Acrylic
- Painting Clothing in an Acrylic Portrait
- Paint a Cloudy Sky Acrylic
- How to add Semi-Opaque Highlights
- How to Enhance the Contrast in Your Acrylic
- How to Add Glaze to Your Acrylic Painting
- Paint Realistic Reflections on Eyeglasses in an Acrylic Portrait
- Build Up Depth on Your Acrylic Portrait Backgrounds
- How Do You Do Layers With the Glazing Technique?
- Learn How to Paint Wrinkles in Acrylic
Read more about how to paint a portrait that you can surely be proud of!
I’d love to hear your thoughts on this video. Please share it with your friends and family. Let me know if you have any further questions. I’ll greatly help you.
If you’d like to learn more, sign up for my free email tips and video class today.
Learn How to Paint Acrylic Portraits With My Free Mini-Video Course!
Thank you so much for taking the time to read this tutorial and watch the video. That means a lot to me. I hope you find it very helpful in your portrait painting.
Yours for Better Portraits,

P.S. Did you find this post helpful or encouraging? If so, send it in ahead! Let others know with the share buttons below. I’d love to hear your comments. Thank you so much! Also, do you have a question on acrylic portrait painting you’d like answered? Let me know, and I’d be happy to help!

How to Add Color Glazes in Acrylic to Your Grisaille
Learn how to enhance your grisaille with color glazes for a vibrant finish
Introduction
Adding color glazes to a grisaille painting is a transformative technique that can infuse your artwork with vibrant hues and rich textures. This process, rooted in historical painting methods, allows artists to achieve a remarkable depth of color and detail. In this guide, we’ll explore the step-by-step method for applying color glazes over a grisaille base, helping you bring your acrylic paintings to life with stunning results.
Understanding Grisaille
Grisaille is a monochromatic painting technique using shades of gray to create a value study. Historically, Old Masters employed this method to establish the tonal structure of their paintings before applying color. This monochromatic layer acts as a foundation, providing a strong value structure that guides the application of subsequent color layers.
Why Use Grisaille?
Using grisaille as a foundation that allows artists to focus on value and composition without being distracted by color. It’s an effective way to ensure that your painting has a strong structure before introducing color glazes.
Materials Needed
- Acrylic Paints: Titanium White, Raw Umber, Burnt Sienna, Indian Yellow, Ultramarine Blue, Phthalo Blue, Napthol Red
- Matte Medium: To mix with the paint for glazing
- Brushes: Flat and round brushes for different applications
- Palette: For mixing paints and mediums
- White Card: For testing glaze colors
Step-by-Step Guide to Adding Color Glazes
- Prepare Your Grisaille Base
Ensure your grisaille painting is fully dried before beginning the glazing process. The grisaille layer should have clear contrasts between light and dark areas, establishing a solid value foundation. - Mix Your Glaze
Glazing involves mixing a small amount of acrylic paint with a larger quantity of matte medium. The matte medium dilutes the paint, creating a translucent layer that allows the underlying grisaille to show through. For skin tones, mix Burnt Sienna with a touch of Organic Orange and Raw Sienna to create a warm, earthy color. For background elements, combine Raw Sienna and Indian Yellow for a warm, golden hue. - Apply the First Glaze Layer
Start by applying a thin glaze of the mixed color over specific areas, such as skin tones or clothing. Use a light brush with minimal pressure to ensure the glaze is even and translucent. For example, apply a faint Burnt Sienna glaze to the skin areas to introduce warmth and create subtle tonal variations. - Layering and Building Up Color
Allow each glaze layer to dry completely before applying subsequent layers. Build up color gradually, adjusting the intensity as needed. For example, apply additional layers of Raw Sienna to the background to deepen the color and create a more unified look. Incorporate cooler tones like Ultramarine Blue and Phthalo Blue for areas affected by the sky, adding a sense of atmosphere and depth. - Refining Details
Use a smaller brush to apply color glazes to specific details, such as shadows and highlights. For instance, use a mix of Napthol Red and Burnt Sienna for the sash, ensuring a warmer tone in the shadowed areas and a more vibrant color in the highlights. This approach helps to differentiate between various elements and adds richness to the painting. - Blending and Adjusting Colors
As you apply the glazes, step back frequently to assess the overall effect. Adjust colors as needed to ensure harmony and balance. For example, if the background appears too warm, tone it down with a cooler glaze. Conversely, enhance warm areas with additional glazes to achieve the desired effect. - Final Touches
After completing the glazing process, evaluate your painting for any final adjustments. Add finishing touches to enhance specific areas or correct any imbalances. Ensure that the color glazes blend seamlessly with the underlying grisaille, creating a cohesive and vibrant final piece.
Tips for Successful Glazing
- Test Glazes First: Use a white card to test glaze mixtures and ensure the desired color and transparency.
- Work in Thin Layers: Apply glazes in thin, translucent layers to maintain the depth and value of the grisaille layer.
- Allow Drying Time: Ensure each glaze layer is completely dry before applying the next to avoid muddying the colors.
- Use Appropriate Brushes: Choose brushes suitable for glazing to achieve smooth, even applications.
Incorporating color glazes into your grisaille paintings is a powerful technique that adds complexity and vibrancy to your artwork. By following these steps and employing careful color mixing and layering, you can achieve stunning results that bring your acrylic paintings to life. Experiment with different colors and glazes to discover unique effects and enhance your artistic skills.
LEARN MORE
- Sketching Your Painting Accurately
- Beginning a Pet Portrait in Acrylic
- The Mystery of Realism in Painting
- Apply A Burnt Sienna Glaze to a Portrait
- Learn How to Sketch a Portrait Freehand in 45 Minutes
- Adding highlights to your acrylic painting
- 5 Excellent Reasons to Use Aluminum Foil
- Paint Realistic Wrinkles in Acrylic
- Painting Clothing in an Acrylic Portrait
- Paint a Cloudy Sky Acrylic
- How to add Semi-Opaque Highlights
- How to Enhance the Contrast in Your Acrylic
- How to Add Glaze to Your Acrylic Painting
- Paint Realistic Reflections on Eyeglasses in an Acrylic Portrait
- Build Up Depth on Your Acrylic Portrait Backgrounds
- How Do You Do Layers With the Glazing Technique?
- Learn How to Paint Wrinkles in Acrylic
Read more about how to paint a portrait that you can surely be proud of!
I’d love to hear your thoughts on this video. Please share it with your friends and family. Let me know if you have any further questions. I’ll greatly help you.
If you’d like to learn more, sign up for my free email tips and video class today.
Learn How to Paint Acrylic Portraits With My Free Mini-Video Course!
Thank you so much for taking the time to read this tutorial and watch the video. That means a lot to me. I hope you find it very helpful in your portrait painting.
Yours for Better Portraits,

P.S. Did you find this post helpful or encouraging? If so, send it in ahead! Let others know with the share buttons below. I’d love to hear your comments. Thank you so much! Also, do you have a question on acrylic portrait painting you’d like answered? Let me know, and I’d be happy to help!

How To Add Dark Contrast: Acrylic Grisaille Painting
Learn the grisaille that enhances depth and dimension with dark contrast in acrylic painting
Adding dark contrast to your painting is essential for creating depth and dimension, especially in grisaille painting. Grisaille is a monochromatic painting technique that uses shades of gray to create a detailed underpainting, which can then be glazed with color.
This method, reminiscent of the techniques used by the old masters like Caravaggio, allows artists to achieve a high level of realism and tonal complexity. In this tutorial, we will explore how to effectively add dark tonal values to your acrylic grisaille painting, enhancing your portrait with rich contrast.
Understanding Grisaille Painting
Grisaille painting involves creating a detailed monochromatic underpainting that serves as a foundation for further color glazes. The technique is particularly useful for developing a strong value structure in your painting. When working with shades of gray, you can focus on the tonal values without the distraction of color, ensuring a solid foundation for your final piece.
Materials Needed
- Acrylic paints: raw umber, ultramarine blue, alizarine crimson, and titanium white
- Matte medium
- Brushes: Flat brushes (size 4), Round brushes (size 0 and 4)
- Palette
- Canvas or painting surface
Step-by-Step Guide on How to Add Darks to Your Acrylic Grisaille Painting
Step 1: Preparing the Underpainting
- Initial Sketch: Begin with a detailed sketch of your subject on your painting surface. This will serve as your guide for the underpainting.
- Ground Layer: Apply a thin, even layer of an earth-tone color (such as raw umber) to your canvas. This serves as the ground layer and helps unify the painting.
- Highlight Layer: Using titanium white, add highlights to your sketch. This step helps establish the lightest areas in your painting, creating a clear distinction between different tonal values.
Step 2: Mixing the Dark Glaze
- Palette Setup: On your palette, mix raw umber, ultramarine blue, and alizarine crimson. Use a larger amount of raw umber compared to the other two pigments.
- Adding Medium: Incorporate matte medium into your mixture. The matte medium helps create a transparent glaze that you can layer over your painting without losing the underlying details.
Step 3: Applying the Dark Glaze
- Glazing Technique: Start applying the dark glaze to the areas of your painting that you have designated as shadows. Use a flat brush for larger areas and a round brush for smaller, more detailed sections.
- Creating Contrast: Focus on building three main tonal values: highlights, midtones, and shadows. This triad simplifies the process and ensures a balanced composition.
- Detailing: Use a smaller round brush (size 0) for intricate details such as facial features, nostrils, and eyelids. This precision helps maintain the realism in your painting.
Step 4: Enhancing Shadows
- Depth in Shadows: Darken the eyes, mouth, and other deep shadow areas to add more depth. These elements create a focal point and enhance the three-dimensionality of your subject.
- Shading and Blending: Smoothly blend the dark glaze into the midtones to avoid harsh transitions. This creates a natural gradient and enhances the realism of your painting.
Step 5: Refining Details
- Facial Features: Continue to refine the details on the face, focusing on the beard, mustache, and hair. Treat these elements as shapes with specific tonal values rather than individual features.
- Clothing and Accessories: Add dark tonal values to the clothing and other accessories. This helps create a cohesive look and ensures that every part of your painting is harmonized in terms of contrast and depth.
Tips and Techniques
- Consistency in Glaze: Ensure that your glaze mixture is consistent throughout the painting process. This prevents unwanted streaks and uneven application.
- Layering: Apply multiple layers of glaze if necessary. Allow each layer to dry completely before adding another to achieve the desired depth.
- Value Shapes: Start on recognizing and painting value shapes rather than specific details. This approach helps maintain the overall structure and coherence of the painting.
- Patience and Precision: Take your time with the detailing process. Patience and precision are key to achieving a realistic and impactful final piece.
By learning this technique of adding dark contrast to acrylic grisaille paintings, you can significantly enhance the depth and dimension of your artwork. This method not only simplifies the painting process but also provides a solid foundation for further color glazes. With practice and attention to detail, you can create stunning, realistic paintings that capture the essence of your subject.
Read more about my additional resources, tutorials, to learn more and check my free courses designed to help you improve your portrait painting skills.
Happy painting, and God bless!.
LEARN MORE
- Sketching Your Painting Accurately
- Beginning a Pet Portrait in Acrylic
- The Mystery of Realism in Painting
- Apply A Burnt Sienna Glaze to a Portrait
- Learn How to Sketch a Portrait Freehand in 45 Minutes
- Adding highlights to your acrylic painting
- 5 Excellent Reasons to Use Aluminum Foil
- Paint Realistic Wrinkles in Acrylic
- Painting Clothing in an Acrylic Portrait
- Paint a Cloudy Sky Acrylic
- How to add Semi-Opaque Highlights
- How to Enhance the Contrast in Your Acrylic
- How to Add Glaze to Your Acrylic Painting
- Paint Realistic Reflections on Eyeglasses in an Acrylic Portrait
- Build Up Depth on Your Acrylic Portrait Backgrounds
- How Do You Do Layers With the Glazing Technique?
- Learn How to Paint Wrinkles in Acrylic
Read more about how to paint a portrait that you can surely be proud of!
I’d love to hear your thoughts on this video. Please share it with your friends and family. Let me know if you have any further questions. I’ll greatly help you.
If you’d like to learn more, sign up for my free email tips and video class today.
Learn How to Paint Acrylic Portraits With My Free Mini-Video Course!
Thank you so much for taking the time to read this tutorial and watch the video. That means a lot to me. I hope you find it very helpful in your portrait painting.
Yours for Better Portraits,

P.S. Did you find this post helpful or encouraging? If so, send it in ahead! Let others know with the share buttons below. I’d love to hear your comments. Thank you so much! Also, do you have a question on acrylic portrait painting you’d like answered? Let me know, and I’d be happy to help!

How to Begin Acrylic Portrait Painting Grisaille—Titanium White
Learn the grisaille technique using titanium white for stunning acrylic portraits
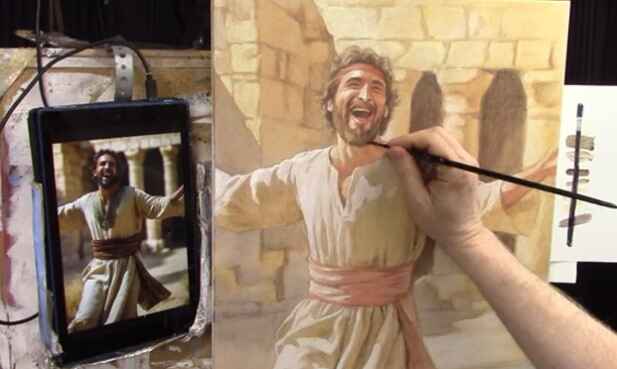
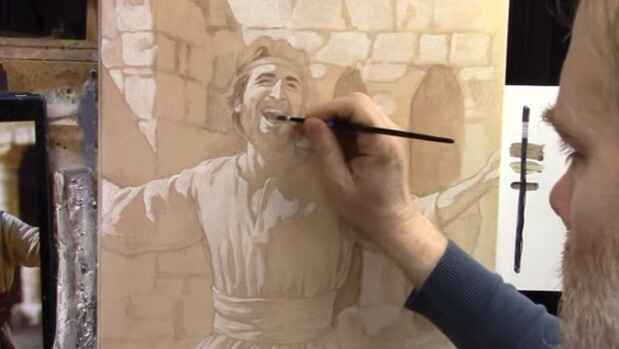
Creating a compelling acrylic portrait often involves mastering various techniques. One such technique is grisaille, a method of painting in shades of gray, that helps to establish depth and dimension in your artwork. In this tutorial, we’ll explore how to start an acrylic portrait painting using titanium white, focusing on a depiction of King David rejoicing as the Ark of the Covenant returns to Jerusalem. This step-by-step guide will help you understand the process and give you practical tips to apply to your paintings.
Introduction to Grisaille Technique
Grisaille is a classic painting technique that involves creating a monochromatic underpainting. This technique was traditionally used to simulate sculpture and can serve as a strong foundation for adding color later. Using titanium white in the grisaille method helps in building up highlights and ensuring that the final painting has a vibrant and dynamic range of tones.

Setting Up Your Painting
- Sketching the Subject: Begin by sketching your subject. In this case, we’re focusing on King David with a joyful expression, arms outstretched, and dancing as the Ark of the Covenant returns to Jerusalem. Ensure your sketch captures the essential features and emotions of the subject.
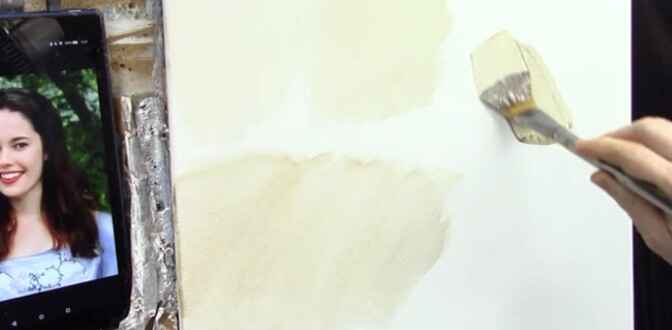
- Applying the Ground Layer: Before starting the actual painting, apply a toning layer or ground. This is usually done with a mixture of colors such as raw umber or burnt sienna to create an earthy background that sets the stage for the painting.
Starting with Titanium White
Materials Needed:
- Titanium white acrylic paint
- Matte medium
- Small round brush
- Flat brush (optional)
- Spray bottle with water
- Palette
Step-by-Step Process:
- Mixing Titanium White: Mix titanium white with matte medium to create a slightly translucent paint. This mixture should have a consistency similar to warm honey, making it easy to apply and blend.
- Initial Application: Start applying the titanium white over the ground layer. Focus on the areas that will have the strongest highlights. For King David, this includes parts of his face, arms, and background elements such as the temple.
- Working from Left to Right: Since most people are right-handed, it’s beneficial to work from left to right to avoid smudging your work. Begin with the background, applying the titanium white to highlight the bricks and stones.
- Detailing the Subject: Move to the main subject, King David. Apply the titanium white to the illuminated areas of his face and body. Pay attention to the reference photo, ensuring you capture the highlights accurately.
- Blending and Precision: Use brush pressure to control the application. Light pressure will give you thinner, more precise lines, while heavier pressure will result in thicker, more opaque coverage. Blend the edges to create smooth transitions between light and shadow.
Tips and Techniques
- Glazing in Reverse: This technique involves painting light on dark instead of the traditional dark on light. It helps in building up the highlights gradually and achieving a smooth finish.
- Using Brush Pressure: Adjusting brush pressure is crucial for creating varying tonal values. Use less pressure for lighter applications and more pressure for thicker, more opaque strokes.
- Reloading the Brush: Reload your brush strategically to maintain a consistent application of paint. This ensures that the highlights remain strong and the transitions smooth.
- Avoid Reworking Dry Areas: Once an area has begun to dry, avoid going over it again. Reworking dry paint can lead to a blotchy and uneven finish.
- Reference Photo: Continuously refer to your reference photo. Painting what you see rather than what you think you see ensures accuracy in capturing the subject’s features and light effects.
Adding Finishing Touches
After establishing the highlights with titanium white, the next steps involve adding shadows and further refining the details. Once the grisaille underpainting is complete, you can start introducing color to bring the portrait to life. This method not only helps in achieving a realistic and three-dimensional look but also makes the subsequent layers of color more vibrant.
Using titanium white in the grisaille technique is an effective way to start an acrylic portrait painting. It allows you to focus on the tonal values and build a strong foundation for your artwork. By following the steps and tips outlined in this guide, you’ll be able to create a compelling underpainting that sets the stage for a vibrant and detailed final piece.
Read more about my additional resources, tutorials, to learn more and check my free courses. Whether you’re a beginner or an experienced artist, there’s always something new to learn and apply to your paintings. Happy painting!
LEARN MORE
- Sketching Your Painting Accurately
- Beginning a Pet Portrait in Acrylic
- The Mystery of Realism in Painting
- Apply A Burnt Sienna Glaze to a Portrait
- Learn How to Sketch a Portrait Freehand in 45 Minutes
- Adding highlights to your acrylic painting
- 5 Excellent Reasons to Use Aluminum Foil
- Paint Realistic Wrinkles in Acrylic
- Painting Clothing in an Acrylic Portrait
- Paint a Cloudy Sky Acrylic
- How to add Semi-Opaque Highlights
- How to Enhance the Contrast in Your Acrylic
- How to Add Glaze to Your Acrylic Painting
- Paint Realistic Reflections on Eyeglasses in an Acrylic Portrait
- Build Up Depth on Your Acrylic Portrait Backgrounds
- How Do You Do Layers With the Glazing Technique?
- Learn How to Paint Wrinkles in Acrylic
Read more about how to paint a portrait that you can surely be proud of!
I’d love to hear your thoughts on this video. Please share it with your friends and family. Let me know if you have any further questions. I’ll greatly help you.
If you’d like to learn more, sign up for my free email tips and video class today.
Learn How to Paint Acrylic Portraits With My Free Mini-Video Course!
Thank you so much for taking the time to read this tutorial and watch the video. That means a lot to me. I hope you find it very helpful in your portrait painting.
Yours for Better Portraits,

P.S. Did you find this post helpful or encouraging? If so, send it in ahead! Let others know with the share buttons below. I’d love to hear your comments. Thank you so much! Also, do you have a question on acrylic portrait painting you’d like answered? Let me know, and I’d be happy to help!

How to Add Details and Finish Your Pet Portrait
Learn the detail and finishing touches your acrylic pet portraits
Creating a pet portrait that captures the essence of your beloved animal companion requires not only a good understanding of basic painting techniques but also a keen eye for details. In this tutorial, we will explore how to add intricate details and finish your pet portrait using acrylic paints. Whether you’re a beginner or an experienced artist, these tips and techniques will help you enhance the realism of your artwork.
The Glazing Technique
One of the key techniques used in creating a realistic pet portrait is glazing. Glazing involves mixing a small amount of paint with a large amount of matte medium. This creates a translucent layer that can be applied over existing paint to build depth and richness in color. Here’s how you can use the glazing technique in your pet portrait:
- Start with Darker Values: Begin by blocking in the darker areas of your portrait. This helps establish contrast, which is crucial for creating a realistic image. Use a mixture of ultramarine blue, raw umber, and dark alizarine crimson for rich, deep blacks instead of straight ivory black.
- Build Midtones and Highlights: After establishing the dark values, move on to the midtones. Use glazes to gradually build up the colors and textures. Add highlights using lighter colors, like titanium white mixed with your base colors.
- Layering for Depth: Apply multiple layers of glazes to create depth and dimension. Each layer should be thin and allow the underlying colors to show through. This technique is especially useful for rendering the soft, fluffy texture of fur.
Achieving Realistic Textures
Textures play a significant role in bringing your pet portrait to life. Here are some tips for achieving realistic textures:
- Fur Texture: Use a small round brush to add fine details to the fur. Vary your brush strokes to mimic the natural direction and flow of the fur. For areas with longer fur, use longer, sweeping strokes. For shorter fur, use shorter, more controlled strokes.
- Eyes: Eyes are often the focal point of a pet portrait. Treat them like parabolic mirrors that reflect the surrounding environment. Use colors like ultramarine blue and phthalo blue to create reflections and highlights in the eyes. Pay attention to the placement of light and shadow to make the eyes look lifelike.
- Nose and Muzzle: The nose and muzzle should have a soft, three-dimensional look. Use a combination of dark and light glazes to create the shape and texture. Pay special attention to the shadows and highlights around the nose and mouth.
Blending and Smoothing
Blending is essential for creating smooth transitions between different areas of your portrait. Here’s how you can achieve seamless blending:
- Use Matte Medium: Mix your paint with matte medium to create a smooth, translucent layer. This allows you to blend colors without losing their vibrancy.
- Work Quickly: Acrylic paint dries fast, so work quickly to blend colors while they’re still wet. This helps prevent harsh lines and create smooth transitions.
- Layering: Build up layers gradually, blending each layer into the previous one. This technique helps create a unified, cohesive look.
Finishing Touches
The finishing touches are what bring your portrait to completion. Here are some steps to ensure your pet portrait looks polished and professional:
- Add Final Details: Go over your painting and add any final details. This could include small highlights, additional fur texture, or refining the shadows.
- Check for Balance: Ensure that your painting has a balanced composition. Pay attention to the distribution of light and dark areas, as well as the overall harmony of colors.
- Ground Your Subject: Make sure your pet doesn’t look like it’s floating. Add shadows beneath the feet and around the body to ground your subject and create a sense of space.
- Sign and Varnish: Once you’re satisfied with your painting, sign it. Apply a final varnish to protect your artwork and enhance the colors.
Tips and Techniques
- Contrast is Key: High contrast between light and dark areas is essential for creating a realistic and engaging portrait.
- Use a Value Checker: A value checker tool can help you measure the lightness and darkness of your colors, ensuring accurate values.
- Keep Your Paint Wet: Acrylics dry quickly, so keep your paint wet by using a palette with a wet sponge or misting your palette with water.
- Work from General to Specific: Start with general shapes and values, then gradually add more specific details.
- Practice Patience: Building up layers and details takes time. Be patient and enjoy the process.
Creating a detailed and realistic pet portrait with acrylics requires practice and attention to detail. By using techniques like glazing, careful blending, and adding finishing touches, you can create a portrait that truly captures the spirit of your pet. Remember, the key to a successful painting is patience and persistence.
Read more about my additional resources, tutorials, to learn more and check out my free courses. Whether you’re a beginner or an experienced artist, there’s always something new to learn and apply to your paintings. Happy painting!
LEARN MORE
- Sketching Your Painting Accurately
- Beginning a Pet Portrait in Acrylic
- The Mystery of Realism in Painting
- Apply A Burnt Sienna Glaze to a Portrait
- Learn How to Sketch a Portrait Freehand in 45 Minutes
- Adding highlights to your acrylic painting
- 5 Excellent Reasons to Use Aluminum Foil
- Paint Realistic Wrinkles in Acrylic
- Painting Clothing in an Acrylic Portrait
- Paint a Cloudy Sky Acrylic
- How to add Semi-Opaque Highlights
- How to Enhance the Contrast in Your Acrylic
- How to Add Glaze to Your Acrylic Painting
- Paint Realistic Reflections on Eyeglasses in an Acrylic Portrait
- Build Up Depth on Your Acrylic Portrait Backgrounds
- How Do You Do Layers With the Glazing Technique?
- Learn How to Paint Wrinkles in Acrylic
Read more about how to paint a portrait that you can surely be proud of!
I’d love to hear your thoughts on this video. Please share it with your friends and family. Let me know if you have any further questions. I’ll greatly help you.
If you’d like to learn more, sign up for my free email tips and video class today.
Learn How to Paint Acrylic Portraits With My Free Mini-Video Course!
Thank you so much for taking the time to read this tutorial and watch the video. That means a lot to me. I hope you find it very helpful in your portrait painting.
Yours for Better Portraits,

P.S. Did you find this post helpful or encouraging? If so, send it in ahead! Let others know with the share buttons below. I’d love to hear your comments. Thank you so much! Also, do you have a question on acrylic portrait painting you’d like answered? Let me know, and I’d be happy to help!

5 Acrylic Blending Techniques: How to Achieve Stunning Portraits
Unlock the secrets of acrylic blending to achieve stunning portraits
Creating a lifelike and realistic portrait with acrylic paints can be challenging, but mastering the right blending techniques can make a significant difference. In this guide, we’ll explore five essential acrylic blending techniques that can elevate your portraits to a new level of realism and depth. Follow along with your canvas and brush as we dive into each technique.
Technique 1: Segmented Blending
Segmented blending is akin to the fluted facades of ancient temples, where dark and light shades create a dynamic and visually appealing contrast. This method involves overlapping layers of glazes to build up a rich sense of shading and depth.
Steps:
- Prepare Your Glaze: Mix a small amount of burnt umber dark with matte medium to create a semi-transparent glaze (about 90% opaque).
- Apply the First Layer: Use a half-inch flat brush to apply an even layer of the glaze onto the canvas. Brush in multiple directions to ensure smooth application.
- Let it Dry: Allow the layer to dry completely before applying the next one.
- Add Additional Layers: Apply the next layer, slightly overlapping the first one. This overlapping will create a darker shade where the layers meet, mimicking the effect of stained glass.
Segmented blending is excellent for achieving a controlled gradient from one color to another, making it perfect for backgrounds and large areas of shading.
Technique 2: Dilution Blending
Dilution blending involves using a highly diluted glaze to achieve smooth transitions and subtle shading. This technique is beneficial for creating soft gradients and gentle transitions between colors.
Steps:
- Mix Your Glaze: Combine burnt umber dark with matte medium (about 90% matte medium and 10% paint).
- Apply the Glaze: Brush the glaze onto the canvas in a diagonal square pattern.
- Blend with Matte Medium: Wipe off excess paint from your brush, dip it in pure matte medium, and blend into the glaze. Use varying brush pressure to achieve a smooth transition.
- Smooth the Edges: Gradually ease up the brush pressure to blur and soften the edges.
This technique works best on canvases with multiple layers of paint, enhancing the cumulative effect of underlying colors.
Technique 3: Dab Blending
Dab blending is a versatile technique ideal for softening edges and correcting overly dark areas in small, detailed sections of your painting.
Steps:
- Apply the Glaze: Load your brush with a similar glaze mixture and apply it to the canvas.
- Dab with Your Finger: Use your finger to gently dab and lift off excess paint, softening the edges and lightening the area.
Dab blending is particularly useful for fine details, such as facial features, where precision and subtlety are crucial.
Technique 4: Dry Brushing
Dry brushing allows for the creation of delicate, cloudy effects and subtle textures. This technique involves using minimal paint on a dry brush to achieve a light, airy application.
Steps:
- Load Your Brush: Apply a layer of burnt umber dark glaze to the canvas.
- Dry Your Brush: Use up most of the paint on your brush until it’s nearly dry.
- Apply with Light Pressure: With a nearly dry brush, lightly brush the canvas. Use perpendicular strokes to create a soft, blended effect.
Dry brushing is perfect for creating atmospheric backgrounds and adding texture to your portraits.
Technique 5: Wet-on-Wet Blending
Wet-on-wet blending is a traditional method that involves blending wet paint directly on the canvas to achieve smooth transitions and rich color depth.
Steps:
- Mix Your Paint: Combine burnt umber dark with titanium white to create a semi-opaque mix.
- Apply the Base Layer: Paint a diagonal pattern with the mixed color.
- Blend with White: Add titanium white to the right side of the painted area and blend it into the base layer using diagonal brush strokes.
This technique is versatile and can be used for both large areas and small details, making it a staple in any artist’s toolkit.
Tips and Techniques for Mastery
- Practice on a Separate Canvas: Before applying these techniques to your main portrait, practice on a separate canvas to get a feel for the brushwork and blending.
- Use a Hair Dryer: Speed up the drying process between layers with a hair dryer to maintain momentum and avoid smudging.
- Experiment with Brush Pressure: Varying the pressure of your brush can significantly impact the blending effect, so experiment to find what works best for different sections of your painting.
- Combine Techniques: Don’t hesitate to mix and match these techniques to achieve the desired effect. Each method can complement the others, adding complexity and richness to your portraits.
Mastering these five acrylic blending techniques will open up new possibilities in your portrait painting, allowing you to create stunning, lifelike images with depth and realism. Whether you’re a beginner or an experienced artist, incorporating these methods into your practice will enhance your skills and take your artwork to the next level. So grab your brushes, prepare your canvas, and start experimenting with these fantastic blending techniques today!
This video is part of a complete portrait painting course called. “Paint an Amazing Acrylic Portrait“
Read more about my additional resources, tutorials, to learn more and check my free courses. Whether you’re a beginner or an experienced artist, there’s always something new to learn and apply to your paintings. Happy painting!
LEARN MORE
- Sketching Your Painting Accurately
- Beginning a Pet Portrait in Acrylic
- The Mystery of Realism in Painting
- Apply A Burnt Sienna Glaze to a Portrait
- Learn How to Sketch a Portrait Freehand in 45 Minutes
- Adding highlights to your acrylic painting
- 5 Excellent Reasons to Use Aluminum Foil
- Paint Realistic Wrinkles in Acrylic
- Painting Clothing in an Acrylic Portrait
- Paint a Cloudy Sky Acrylic
- How to add Semi-Opaque Highlights
- How to Enhance the Contrast in Your Acrylic
- How to Add Glaze to Your Acrylic Painting
- Paint Realistic Reflections on Eyeglasses in an Acrylic Portrait
- Build Up Depth on Your Acrylic Portrait Backgrounds
- How Do You Do Layers With the Glazing Technique?
- Learn How to Paint Wrinkles in Acrylic
Read more about how to paint a portrait that you can surely be proud of!
I’d love to hear your thoughts on this video. Please share it with your friends and family. Let me know if you have any further questions. I’ll greatly help you.
If you’d like to learn more, sign up for my free email tips and video class today.
Learn How to Paint Acrylic Portraits With My Free Mini-Video Course!
Thank you so much for taking the time to read this tutorial and watch the video. That means a lot to me. I hope you find it very helpful in your portrait painting.
Yours for Better Portraits,

P.S. Did you find this post helpful or encouraging? If so, send it in ahead! Let others know with the share buttons below. I’d love to hear your comments. Thank you so much! Also, do you have a question on acrylic portrait painting you’d like answered? Let me know, and I’d be happy to help!

How To Paint Red Hair With Dark Skin Tones in 30 minutes
Learn how to paint red hair and dark skin tones in just 30 minutes
Welcome to my 30 minute acrylic portrait painting session! We’re diving into an exciting project: painting a side profile portrait of a woman with red hair and dark skin tones. This tutorial is perfect for artists looking to enhance their skills quickly and effectively. Let’s get started!
Materials and Setup
To begin, gather your materials:
- Canvas: 8×10, toned gray
- Palette: Ivory black, raw umber dark, burnt sienna, raw sienna, ultramarine blue, alizarin crimson, Napthol red, organic (pyro) orange, Indian yellow, titanium white
- Medium: Matte medium for translucency
- Brushes: Variety of flats and rounds (1/2 inch flat, 1/4 inch flat, and various rounds)
Step-by-Step Guide
1. Initial Composition
Start by blocking in the overall composition using a mixture of Ivory black, raw umber dark, and matte medium with a round brush. This step involves sketching the head’s shape, positioning the ear, and outlining major facial features and shadows.
2. Blocking in Shadows
Using a large flat brush, mix raw umber dark, titanium white, and burnt sienna to create a warm shadow color. Apply this to the shadow areas of the face, including the nose and lips. This helps establish the depth and structure of the portrait early on.
3. Adding Hair Color
For the hair, mix naphthol red, organic orange, and burnt sienna to achieve a rich, reddish color. Apply this to the hair, adding raw sienna for lighter areas. Blend these colors to create a natural transition and depth.
4. Highlighting the Skin
Use a round brush to apply highlights with a mixture of titanium white, Indian yellow, and raw sienna. Focus on the areas where light hits the face, such as the eyebrow ridge, nose, and chin. This step brings out the facial features and adds a three-dimensional effect.
5. Detailed Shadows and Features
Refine the shadows using a cooler tone mixed with raw umber dark, alizarine crimson, and ultramarine blue. Apply this to the eye sockets and other recessed areas. Darken the eye shape and add details to the lips and nose to enhance realism.
6. Hair Highlights
For the hair highlights, mix titanium white with Indian yellow and raw sienna. Apply this to the top of the hair, blending it into the darker shades to create a luminous effect. Use a fine brush for detailed highlights and flyaway hairs.
7. Clothing and Final Touches
Block in the clothing with a dark mixture of ivory black and ultramarine blue. Add lighter shades for the right side of the clothing. Refine the skin tones and add additional shading and highlights to enhance the volume and depth of the portrait.
Tips and Techniques
- Use Matte Medium: It helps in creating translucent layers, making it easier to build depth.
- Keep It Loose: During the initial stages, keep your brush strokes loose and fluid. This helps in adjusting proportions and composition easily.
- Prioritize Shadows: Establishing shadows early helps in defining the structure and form of the portrait.
- Blend Colors: Smooth transitions between different colors and tones are crucial for realism.
- Focus on Light: Highlights are essential in bringing out the features and adding a three-dimensional effect.
Painting a portrait in 30 minutes is a challenging yet rewarding exercise that sharpens your skills and helps you work efficiently. Remember, this is an excellent practice to enhance your speed and accuracy in portrait painting. If you encounter difficulties, don’t get discouraged. Keep practicing and get my free gift guide for you, “Fix Muddy Skin Tones in Your Acrylic Portrait.”
Watch the full video below!
Read more about my additional resources, tutorials, to learn more and check my free courses. Whether you’re a beginner or an experienced artist, there’s always something new to learn and apply to your paintings.
LEARN MORE
- Sketching Your Painting Accurately
- Beginning a Pet Portrait in Acrylic
- The Mystery of Realism in Painting
- Apply A Burnt Sienna Glaze to a Portrait
- Learn How to Sketch a Portrait Freehand in 45 Minutes
- Adding highlights to your acrylic painting
- 5 Excellent Reasons to Use Aluminum Foil
- Paint Realistic Wrinkles in Acrylic
- Painting Clothing in an Acrylic Portrait
- Paint a Cloudy Sky Acrylic
- How to add Semi-Opaque Highlights
- How to Enhance the Contrast in Your Acrylic
- How to Add Glaze to Your Acrylic Painting
- Paint Realistic Reflections on Eyeglasses in an Acrylic Portrait
- Build Up Depth on Your Acrylic Portrait Backgrounds
- How Do You Do Layers With the Glazing Technique?
- Learn How to Paint Wrinkles in Acrylic
Read more about how to paint a portrait that you can surely be proud of!
I’d love to hear your thoughts on this video. Please share it with your friends and family. Let me know if you have any further questions. I’ll greatly help you.
If you’d like to learn more, sign up for my free email tips and video class today.
Learn How to Paint Acrylic Portraits With My Free Mini-Video Course!
Thank you so much for taking the time to read this tutorial and watch the video. That means a lot to me. I hope you find it very helpful in your portrait painting.
Yours for Better Portraits,

P.S. Did you find this post helpful or encouraging? If so, send it in ahead! Let others know with the share buttons below. I’d love to hear your comments. Thank you so much! Also, do you have a question on acrylic portrait painting you’d like answered? Let me know, and I’d be happy to help!

How To Paint Black Hair And Clothing In 30 Minutes
Learn how to paint black hair and clothing with these proven techniques
Learn how to paint black hair and clothing in just 30 minutes with this step-by-step acrylic portrait tutorial. Perfect for improving your skills and speeding up your painting process.
Introduction
Painting black hair and clothing can present unique challenges, but with the right techniques and practice, you can achieve stunning results even in a limited time frame. In this blog post, we will guide you through a step-by-step process to paint black hair and clothing in just 30 minutes. Whether you’re a seasoned artist or a beginner, these tips will help you refine your skills and produce high-quality acrylic portraits quickly.
Getting Started: Preparation and Setup
Before diving into the painting process, ensure you have all your materials ready. For this 30-minute acrylic portrait session, you’ll need:
- Acrylic paints: Raw umber dark, burnt sienna, ultramarine blue, alizarine crimson, titanium white, organic orange, and Indian yellow
- Brushes: Round brush, Filbert brush, Flat brush
- Canvas or painting surface, pre-toned
Tip: A pre-toned canvas can save time and set a warm base for your painting, helping colors blend more seamlessly.
Step 1: Establish the Basic Form
Start by blocking in the basic form of your subject. Use a mixture of raw umber dark and matte medium to create a translucent base layer. This will help you sketch out the general shapes without committing to dark colors too soon.
Technique:
- Plot the Composition: Lightly sketch the outline of the head, neck, and shoulders. Pay attention to proportions and positioning based on your reference photo.
- Adjust as Needed: Keep the lines light and adjustable to make any necessary changes easily.
Step 2: Block in Major Shapes and Shadows
With the basic form established, begin blocking in major shapes and shadows. For black hair and clothing, it’s essential to use rich, dark tones while keeping the paint opaque.
Technique:
- Mix Dark Colors: Combine raw umber dark, ultramarine blue, and a touch of titanium white to create a deep, dark shade for the hair.
- Apply to Hair and Clothing: Use a larger brush to block in the hair and clothing areas, focusing on the overall shape and major shadow areas.
Tip: Use a mix of different dark colors to add depth and variation to the hair and clothing.
Step 3: Add Mid-tones and Highlights
Once the base layers are dry, start adding midtones and highlights to bring your painting to life. This step is crucial for creating realistic textures and depth.
Technique:
- Mix Mid-tones: Combine burnt sienna with raw umber dark and a bit of titanium white to achieve a mid-tone color for the skin and other non-black areas.
- Add Highlights: Use a lighter color mix (titanium white with a touch of indian yellow) for highlights on the hair and clothing.
Tip: To create realistic highlights, observe how light falls on your reference photo and apply lighter shades accordingly.
Step 4: Refine Details and Adjustments
In the final stages, refine the details of your painting. Focus on small adjustments to enhance the realism and finish the piece.
Technique:
- Detail Work: Use a fine round brush to add details such as individual strands of hair, folds in the clothing, and fine highlights.
- Blending: Blend colors smoothly to avoid harsh lines and create a natural transition between shadows, midtones, and highlights.
Tip: Regularly step back from your painting to assess the overall balance and make adjustments as needed.
Painting black hair and clothing in 30 minutes is a challenging yet rewarding exercise that can significantly improve your acrylic portrait skills. By following these steps—establishing the basic form, blocking in major shapes and shadows, adding midtones and highlights, and refining details—you can achieve impressive results in a short time.
Remember, practice is key to mastering these techniques. The more you paint, the more proficient you’ll become. Keep experimenting with different colors, brush techniques, and compositions to continue improving your skills.
Additional Resource: Download our free guide on fixing muddy skin tones in acrylic portraits to further enhance your painting techniques.
Read more about my additional resources, tutorials, to learn more and check out my free courses. Whether you’re a beginner or an experienced artist, there’s always something new to learn and apply to your paintings. Happy painting!
LEARN MORE
- Sketching Your Painting Accurately
- Beginning a Pet Portrait in Acrylic
- The Mystery of Realism in Painting
- Apply A Burnt Sienna Glaze to a Portrait
- Learn How to Sketch a Portrait Freehand in 45 Minutes
- Adding highlights to your acrylic painting
- 5 Excellent Reasons to Use Aluminum Foil
- Paint Realistic Wrinkles in Acrylic
- Painting Clothing in an Acrylic Portrait
- Paint a Cloudy Sky Acrylic
- How to add Semi-Opaque Highlights
- How to Enhance the Contrast in Your Acrylic
- How to Add Glaze to Your Acrylic Painting
- Paint Realistic Reflections on Eyeglasses in an Acrylic Portrait
- Build Up Depth on Your Acrylic Portrait Backgrounds
- How Do You Do Layers With the Glazing Technique?
- Learn How to Paint Wrinkles in Acrylic
Read more about how to paint a portrait that you can surely be proud of!
I’d love to hear your thoughts on this video. Please share it with your friends and family. Let me know if you have any further questions. I’ll greatly help you.
If you’d like to learn more, sign up for my free email tips and video class today.
Learn How to Paint Acrylic Portraits With My Free Mini-Video Course!
Thank you so much for taking the time to read this tutorial and watch the video. That means a lot to me. I hope you find it very helpful in your portrait painting.
Yours for Better Portraits,

P.S. Did you find this post helpful or encouraging? If so, send it in ahead! Let others know with the share buttons below. I’d love to hear your comments. Thank you so much! Also, do you have a question on acrylic portrait painting you’d like answered? Let me know, and I’d be happy to help!

5 Brush Techniques On How To Paint Smoothly In Acrylic
Learn the 5 techniques and tips to paint smoothly in acrylic
Introduction
Painting smoothly with acrylics can be a challenge, but mastering the right brush techniques can make all the difference. In this blog post, we’ll cover 5 brush techniques on how to paint smoothly in acrylic paintings. Whether you’re a beginner or looking to refine your skills, these tips will enhance your painting process and results.
1. Apply More Pressure at the Beginning and Less at the End
One of the most effective techniques for smooth acrylic application is adjusting the pressure you use with your brush. Start by applying more pressure at the beginning of your stroke to ensure that the paint, mixed with a glazing medium, penetrates deeply into the weave of the canvas. As you proceed, gradually reduce the pressure to smooth out the paint and achieve a seamless blend.
How to Implement:
- Use a 90% matte medium to 10% paint ratio for a more visible glaze.
- Apply the glaze with firm pressure, holding the brush perpendicular to the canvas.
- Smooth the application by reducing pressure and using varied brush strokes.
2. Use a Variety of Brush Strokes
Incorporating different brush strokes is crucial for achieving an even surface when painting with acrylics. Using a mix of diagonal, horizontal, and vertical strokes helps to blend the glaze more evenly and reduce streaks.
How to Implement:
- Start with diagonal strokes in both directions.
- Continue with horizontal and vertical strokes to blend and smooth the paint.
- Adjust your technique based on how the glaze appears on the canvas.
3. Always Keep a Wet Edge
Maintaining a wet edge is essential for a smooth glaze application. As you work across a large area, avoid letting your paint dry before blending the next section. This helps in preventing blotchiness and ensures a consistent finish.
How to Implement:
- Smooth out one section at a time.
- Load your brush with glaze and work up to the edge of the previously applied glaze.
- Keep the edge wet to blend seamlessly without re-brushing.
4. Don’t Skimp on Glazes
Using an adequate amount of glaze is key to a smooth application. Avoid being frugal with the amount of paint and medium on your brush. A well-loaded brush will help coat the canvas thoroughly and reduce the likelihood of streaks and uneven areas.
How to Implement:
- Use a generous amount of matte medium and paint mixture.
- Apply the glaze with a brush that has a large dollop of paint.
- Smooth out excess paint if necessary, but ensure the surface is well-saturated.
5. Use the Right Brush for the Job
Selecting the appropriate brush size and type is crucial for efficient painting. Using a brush that is too small for large areas can lead to longer painting times and a streaky finish. Choose a brush that matches the size of the area you are working on to achieve a smooth application.
How to Implement:
- Opt for larger brushes for broader areas and smaller brushes for detailed work.
- Avoid using excessively small brushes for large sections to prevent uneven coverage.
Learning these brush techniques will significantly enhance your ability to paint smoothly with acrylics. Practice these tips on a spare canvas to become more familiar with their effects before applying them to your final artwork. By implementing these techniques, you’ll find that achieving a professional finish on your acrylic paintings becomes much more manageable.
Read more about my additional resources, tutorials, to learn more and check my free courses. Whether you’re a beginner or an experienced artist, there’s always something new to learn and apply to your paintings. Happy painting!
LEARN MORE
- Sketching Your Painting Accurately
- Beginning a Pet Portrait in Acrylic
- The Mystery of Realism in Painting
- Apply A Burnt Sienna Glaze to a Portrait
- Learn How to Sketch a Portrait Freehand in 45 Minutes
- Adding highlights to your acrylic painting
- 5 Excellent Reasons to Use Aluminum Foil
- Paint Realistic Wrinkles in Acrylic
- Painting Clothing in an Acrylic Portrait
- Paint a Cloudy Sky Acrylic
- How to add Semi-Opaque Highlights
- How to Enhance the Contrast in Your Acrylic
- How to Add Glaze to Your Acrylic Painting
- Paint Realistic Reflections on Eyeglasses in an Acrylic Portrait
- Build Up Depth on Your Acrylic Portrait Backgrounds
- How Do You Do Layers With the Glazing Technique?
- Learn How to Paint Wrinkles in Acrylic
Read more about how to paint a portrait that you can surely be proud of!
I’d love to hear your thoughts on this video. Please share it with your friends and family. Let me know if you have any further questions. I’ll greatly help you.
If you’d like to learn more, sign up for my free email tips and video class today.
Learn How to Paint Acrylic Portraits With My Free Mini-Video Course!
Thank you so much for taking the time to read this tutorial and watch the video. That means a lot to me. I hope you find it very helpful in your portrait painting.
Yours for Better Portraits,

P.S. Did you find this post helpful or encouraging? If so, send it in ahead! Let others know with the share buttons below. I’d love to hear your comments. Thank you so much! Also, do you have a question on acrylic portrait painting you’d like answered? Let me know, and I’d be happy to help!

Matte Medium vs. Gloss Medium for Acrylic Glazing
Students who are new to my glazing technique have a lot of questions. So many mediums to choose from. Which ones are best to use…and why?
That’s what I want to discuss today.
Here’s a portion of an email I got from one of my students:
As you know, I am currently working on your portrait course at the moment, however, I have a question that I hope you can clarify. All previous information I have looked up indicates that when applying glazes, acrylic matte medium dries cloudy and gloss medium dries clear and obviously glossy. Can you just explain it for me why we only use matte medium for glazing in your tutorial, as my initial thoughts would be that the cloudiness would just build up? Or am I just missing the l point in that this is how we build up the underpainting of the portrait? Many Thanks, R—
This is a good question.
So, what’s better for glazing? Matte medium or gloss medium?
Let me answer that with the reply I sent back to my student.
I use matte medium for three reasons:
1. It dries to a flat finish and so it doesn’t react with the lights in my studio, producing distracting glare.
2. Because it dries to a flat finish, it is closer to the sheen of paint, and so when you have areas that are more opaque and less opaque, they match up better. In other words, you can perceive the values more accurately. A glossy finish will make colors look more saturated and deepen values. When you put a varnish over the painting, it would present a problem, causing certain subtle nuances that seemed to look correct, suddenly become inaccurate. (Yes, this happened to me!)
3. Matte medium is usually less expensive than gloss medium. With the copious amounts of medium that I use, this adds up!
Now, I don’t find that matte medium builds up cloudiness, in the way that I teach. It will get cloudy, if you have areas of your painting that are quite dark or saturated, and you overlap those areas with a very transparent (high ratio of matte medium to paint) glaze.
But I don’t do it that way in my paintings. Rather, I start off very transparent, (95-5) then shift to more translucent (80-20), and finally end up with semi-opaque layers (50-50) over portions of the work.
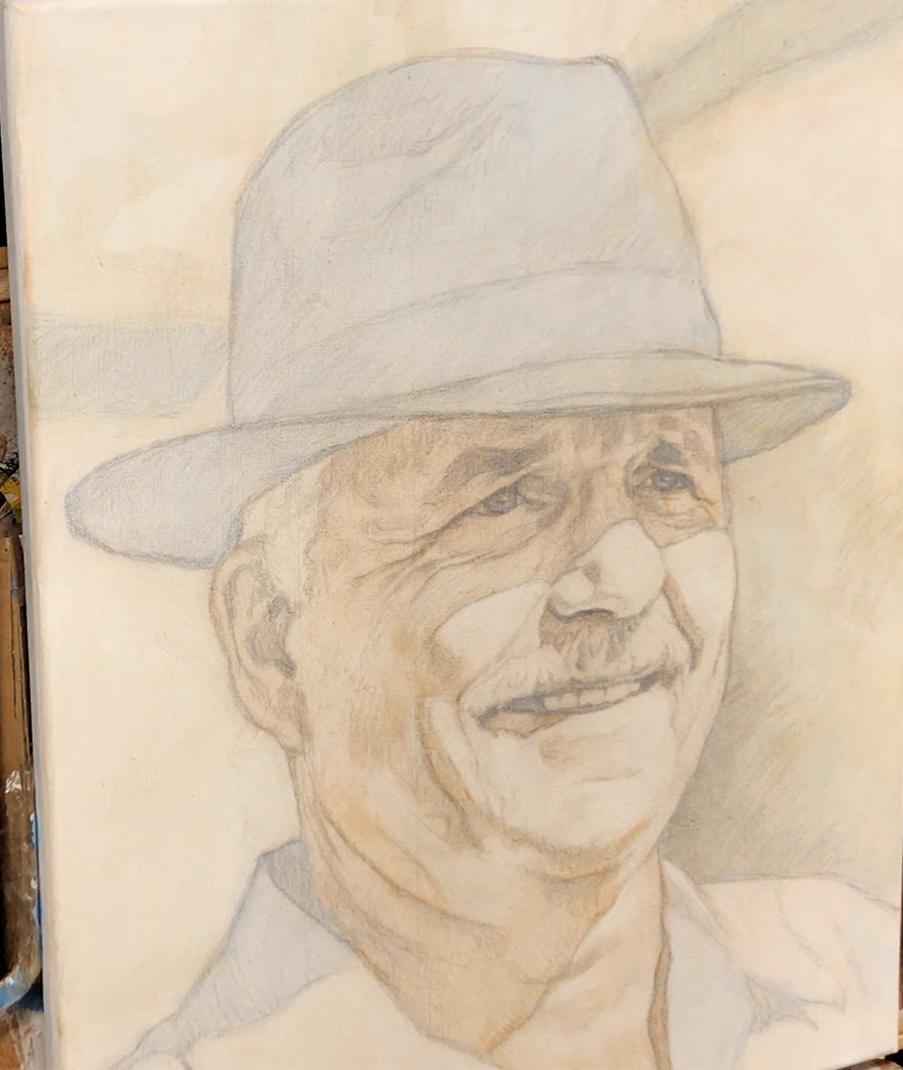
Acrylic portrait painting challenge example in progressm using the acrylic glazing technique, 16 x 20, acrylic on canvas by artist and instructor Matt Philleo
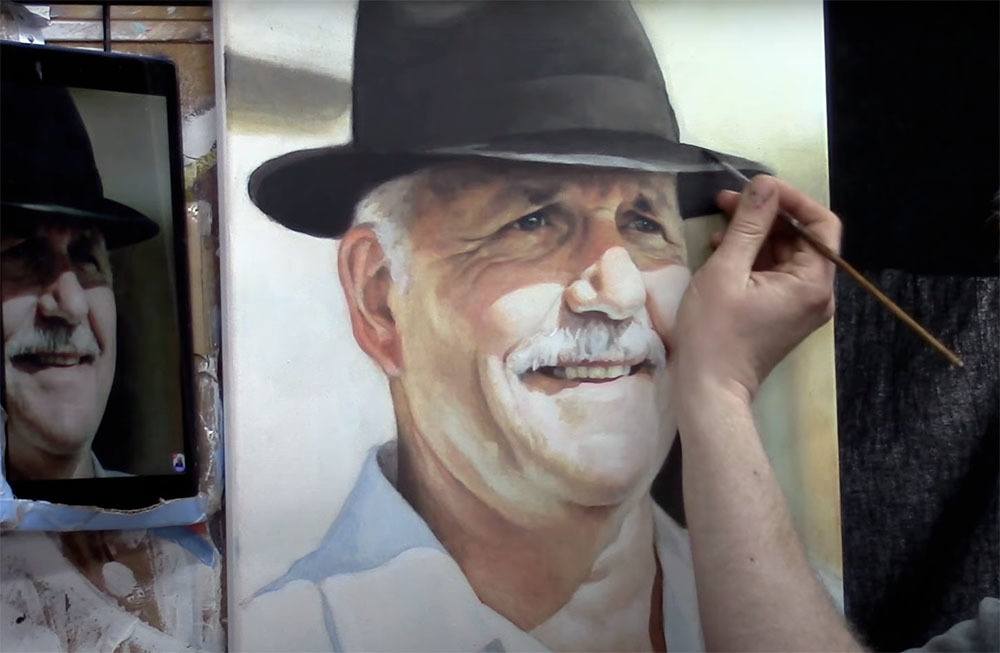
Matt Philleo painting an acrylic portrait from a photo for the Spring Portrait Painting Challenge ©2020 by Matt Philleo
This prevents that cloudiness from occurring and gives a rich saturation of color too. But we still retain the benefits of the smooth shading, vibrancy, and depth that glazing produces.
I finish my painting with a satin or semi-gloss varnish and that’s where we can add some extra saturation of value and vibrancy.
What is YOUR experience with acrylic mediums? Which do you prefer…and why? Let me know in the comments below.
Look forward to sharing more tips and tutorials with you.
Yours for Better Portraits,
![]()
If you found this post helpful or encouraging, would you send it on ahead? Let others know with the share buttons below. I’d love to hear your comments. Thank you so much!