Tag Archives for " learn to paint portraits "

How to Add Color Glazes to Black & White Grisaille
Bring vibrant life into your acrylic portraits with the subtle power of glazing over grisaille
The Secret Behind Lifelike Acrylic Portraits
Many artists struggle with making their acrylic portraits look realistic and full of life. Often, the colors appear flat, and the transitions seem abrupt. The solution? A powerful classical technique known as glazing over grisaille.
This tutorial will guide you step-by-step on how to add color glazes to a black and white grisaille acrylic painting just like the Old Masters did. By building transparent color layers over a monochrome underpainting, you can achieve stunning vibrancy, depth, and realism.
What Is Grisaille and Why Use It?
Grisaille is a monochromatic painting technique that uses only shades of gray to establish value, form, and lighting before color is applied. It acts as a detailed foundation that allows artists to focus solely on composition and contrast without the distraction of color.
When used with acrylic glazes, this technique offers control, precision, and flexibility. Because each color glaze is transparent, the values underneath shine through, preserving your drawing while enriching it with color.
Tools & Materials You’ll Need
To get started, here are the basic materials required:
- Acrylic paints (Raw Umber Dark, Ultramarine Blue, Phthalo Blue, Alizarine Crimson, Raw Sienna, Titanium White)
- Matte medium or glazing medium
- Flat and round synthetic brushes
- A black-and-white grisaille painting (prepared ahead)
- Water container and palette
Step-by-Step: How to Add Color Glazes to Your Grisaille Painting
Step 1: Understand the Glazing Medium
A clear matte medium is mixed with small amounts of acrylic paint. This makes the paint transparent and allows it to be layered gently over the grisaille without obscuring details.
Tip: The more medium you use, the more transparent the glaze becomes.
Step 2: Start with the Foreground
Using raw umber dark mixed with raw sienna and matte medium, apply the first glaze to the foreground. This introduces warm earth tones and begins building a sense of depth.
Technique: Use broad, smooth brush strokes and build up layers slowly. Allow each layer to dry before adding another.
Step 3: Add Depth to the Background
Cool tones like ultramarine blue and raw umber are mixed to create a grayish-blue color for the distant mountains and sky. A touch of white is added to soften the transition.
Apply these glazes in multiple layers, adjusting the hue slightly to reflect atmospheric perspective. This subtle shift helps push the background back and brings your subjects forward.
Step 4: Introduce Color to Clothing and Figures
George Washington’s jacket, for example, is painted using a mix of ultramarine blue, phthalo blue, alizarine crimson, and raw umber dark. Apply thin layers, observing how the underlying grayscale defines shadows and highlights.
Tip: Avoid painting over insignias or fine uniform details. Glazes should enhance not hide the line work beneath.
Step 5: Gradually Build Up Layers
It was noted in the video that it may take many layers to achieve a rich, dimensional color. Patience is key. Each glaze builds upon the previous one, creating a luminous effect.
Remember, this process is about refinement. You don’t need to achieve full color saturation in one pass.
Tips & Techniques for Successful Glazing
- Let each layer dry completely before adding another to prevent muddy colors.
- Keep brushes clean and damp to ensure smooth blending.
- Work from dark to light when building glazes to maintain tonal structure.
- Mix cool and warm tones to create more visual interest and realistic lighting.
- Use less paint and more medium for better transparency.
- Avoid overworking one area, which could disturb the grisaille underneath.
Why Use Glazing Instead of Opaque Painting?
Glazing is ideal for artists who want to:
- Maintain the original drawing and detail.
- Add richness without repainting the entire area.
- Control the intensity and temperature of the colors.
- Create subtle transitions and atmospheric effects.
Although acrylics are known for being opaque, this method shows how they can behave more like oils with stunning results.
Why This Technique Matters
By learning how to add color glazes to your black and white grisaille, you’re unlocking a timeless method used by the Old Masters, now made accessible with acrylics. You no longer have to struggle with blending or losing detail. With each translucent layer, your portrait gains life, depth, and expression.
You can paint confidently, knowing that every step enhances what you’ve already built.
Frequently Asked Questions (FAQ)
Q: What is the best medium to use for acrylic glazing?
A: A clear matte medium or glazing medium is recommended. It increases transparency and flow while maintaining the integrity of your underlying layers.
Q: Can I glaze over any acrylic painting?
A: Yes, but the best results come from starting with a value-based grisaille painting. This ensures you have a strong tonal foundation for your glazes to sit on.
Q: How long should I wait between glaze layers?
A: Typically, 15-30 minutes depending on the thickness of your glaze and humidity. Ensure it is completely dry before layering.
Q: Will glazing make my painting shiny?
A: Not necessarily. Using a matte medium helps keep the surface flat. You can adjust gloss levels by varnishing the finished piece with a matte or satin finish.
Q: Is this technique beginner-friendly?
A: Absolutely. As long as you start with a solid black-and-white painting, color glazing can be a simple and forgiving way to explore acrylics.
LEARN MORE
- How to Paint Foliage Using the Acrylic Glazing Technique
- How to Trace for an Accurate Portrait Sketch
- How to Paint Realistic Eyes in Your Acrylic Portrait
- How to Add Raw Umber Dark & Ultramarine Blue to Your Portrait
- How to Make Your Own Raw Umber Dark
- How to Paint Realistic Trees & Grass in Your Acrylic
- How to Block In Skin Tone Values Using Glazing Technique
- How to Paint Vibrant Reds in Your Acrylic Portrait
- How to Glaze Background Colors & More Acrylic Portrait
- How to Paint White Clothing in Your Acrylic Portrait
- How to Easily Transition from a Sketch to a Painting
- How to Block In Shading & Skin Tones in Your Acrylic
- How to Build Up Color on Acrylic Pet Portrait
- How to Build Up Form on Clothing with Acrylic
- How to Paint Dark Clothing Using Acrylic Glazing Technique
- How to Paint a 24 x 30 Acrylic With 30 People
- How to Do Smooth Shading with Acrylic
- How to Sketch an Acrylic Portrait with a Grid
Read more about how to paint a portrait that you can surely be proud of!
I’d love to hear your thoughts on this video. Please share it with your friends and family. Let me know if you have any further questions. I’ll greatly help you.
If you’d like to learn more, sign up for my free email tips and video class today.
Learn How to Paint Acrylic Portraits With My Free Mini-Video Course!
Thank you so much for taking the time to read this tutorial and watch the video. That means a lot to me. I hope you find it very helpful in your portrait painting.
Yours for Better Portraits,

P.S. Did you find this post helpful or encouraging? If so, send it in ahead! Let others know with the share buttons below. I’d love to hear your comments. Thank you so much! Also, do you have a question on acrylic portrait painting you’d like answered? Let me know, and I’d be happy to help!

2025 Winter Acrylic Painting Challenge, Lesson 8 Bringing Your Portrait Home
Master the final touches: Bring your acrylic portrait to life with precision and confidence
Congratulations! You’ve made it to the final stage of your acrylic portrait. This is where all the hard work comes together, and your painting truly comes to life. In Lesson 8: Bringing Your Portrait Home, we will focus on refining details, sharpening edges, and adding those final highlights that make your portrait stand out.
It’s tempting to keep working indefinitely, but knowing when to stop is just as important as knowing how to start. By the end of this lesson, you’ll feel confident that your painting is complete, ready to be signed, and displayed with pride.
Step 1: Assess Your Progress
Before making any final touches, take a step back and evaluate your portrait. Ask yourself:
✔ Are the proportions and facial features balanced?
✔ Is the contrast strong enough to create depth?
✔ Do the highlights and shadows define the form effectively?
✔ Are there any unresolved areas that need attention?
If you notice anything that feels off, now is the time to make minor adjustments.
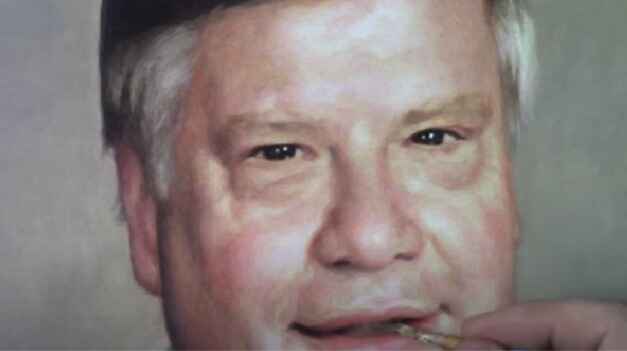
Step 2: Refining Edges and Enhancing Contrast
One of the most effective ways to bring realism to your portrait is by sharpening edges and boosting contrast.
Techniques for Crisp Edges:
- Use a small round brush with slightly thinned paint for clean, sharp lines.
- Define important areas like the jawline, nose bridge, and lips with subtle refinements.
- Blur unnecessary details in background elements to enhance depth and focus.
Boosting Contrast for Depth:
- Deepen shadows with a mix of raw umber and alizarine crimson for warmth.
- Brighten highlights using titanium white with a touch of yellow ochre for natural skin tones.
- Adjust mid-tones to create smooth transitions between light and shadow.
These small changes will make a significant difference in the overall impact of your portrait.
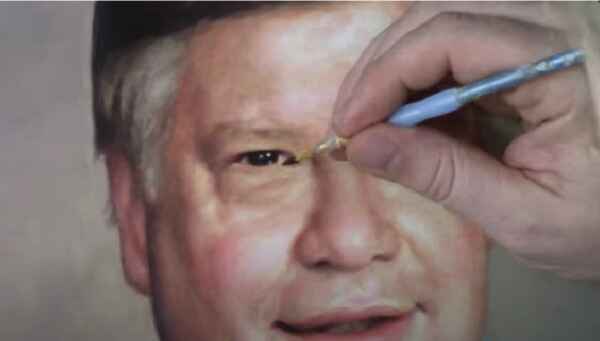
Step 3: Adding Final Highlights
To make your portrait pop, strategic highlights should be applied.
Where to Place Highlights:
✔ The tip of the nose and cheekbones
✔ The upper eyelids and brow ridge
✔ The edges of the lips and chin
✔ The light-catching areas of clothing or accessories
Using a dry brush technique with minimal paint can help you create soft, natural highlights without overpowering the painting.
Step 4: Knowing When to Stop
It’s easy to overwork a painting, but at some point, you must decide it’s finished. A few signs that your portrait is complete:
✔ The main subject stands out against the background.
✔ The details are refined but not overly complicated.
✔ The colors and contrast look balanced.
✔ You feel satisfied when viewing your work from a distance.
If you can check off these points, it’s time to bring your portrait home and move on to the final step—signing your artwork!
Step 5: Signing Your Painting
A signature is the finishing touch that makes your work official.
Tips for Signing Your Acrylic Painting:
✔ Use a fine brush or acrylic paint pen for precision.
✔ Place your signature in a subtle but visible area (bottom right or left corner).
✔ Keep it small and unobtrusive so it does not distract from the portrait.
✔ Use a color that complements but contrasts slightly with the background.
Once signed, your painting is officially complete!
Celebrate Your Progress!
Completing a portrait is a huge achievement! Whether you’re keeping it for yourself, gifting it, or selling it, take a moment to appreciate your hard work.
If you’ve participated in the 2025 Winter Acrylic Painting Challenge, share your final piece with the community and celebrate your growth as an artist. Remember each finished portrait is a stepping stone to even greater artistic success.
📢 Did you enjoy this challenge? Sign up for the next one and keep improving your portrait painting skills! 🎨✨
FAQs: Bringing Your Portrait Home
1. How do I know when my painting is finished?
If the details, contrast, and composition feel balanced, and you no longer see major issues, it’s time to stop. Overworking a painting can reduce its realism.
2. Should I varnish my painting after finishing?
Yes! A protective varnish will enhance colors and provide longevity. Use a gloss, satin, or matte finish, depending on your preference.
3. How can I fix mistakes in the final stages?
For minor errors, gently layer paint over the area with a dry brush. If needed, use a soft wet cloth to lift fresh paint before it dries.
4. What’s the best way to display my finished portrait?
Frame your painting with a simple, elegant border or display it on a stretched canvas for a professional look.
2025 Winter Acrylic Portrait Painting Challenge Series
2025 Winter Acrylic Portrait Painting Challenge: Steps to Get Started
2025 Winter Acrylic Portrait Challenge Pre-Lesson: Gathering Your Supplies
2025 Winter Acrylic Portrait Challenge, Lesson 1: Prepping Your Canvas for the Portrait
2025 Winter Acrylic Painting Challenge, Lesson 2: Sketching Your Portrait Accurately
2025 Winter Acrylic Painting Challenge, Lesson 3: Sealing in Your Sketch
2025 Winter Acrylic Painting Challenge, Lesson 4: Beginning Your Portrait with Glazes
2025 Winter Acrylic Painting Challenge, Lesson 5: Building Up Color and Contrast
2025 Winter Acrylic Painting Challenge,Bonus Video: Increasing Contrast
2025 Winter Acrylic Painting Challenge, Lesson 6 Shading and Color Nuances
2025 Winter Acrylic Painting Challenge, Lesson 7 Creating Realism in Your Portrait
2025 Winter Acrylic Painting Challenge, BONUS Video:Adjusting Colors and Details

2025 Winter Acrylic Painting Challenge,Bonus Video: Increasing Contrast
Master the art of increasing contrast in your acrylic portraits with simple glazing techniques
In this bonus session of the 2025 Winter Acrylic Painting Challenge, we focus on an essential stepincreasing contrast to create more depth and realism. By building up layers and refining shadows, we can bring out key elements in the portrait before moving into the next lesson.
Why Contrast Matters in Acrylic Painting
Contrast is one of the fundamental principles that makes a painting stand out. It helps define the subject, create a sense of depth, and guide the viewer’s eye. Without proper contrast, an image may appear flat or lifeless.
In this lesson, the focus is on:
- Strengthening shadows and highlights
- Refining shapes with precise brushwork
- Using glazing techniques for smooth transitions
Materials Used
- Raw Umber Dark
- Ultramarine Blue
- Alizarine Crimson
- Titanium White
- Raw Sienna
- Matte Medium
- Round Detail Brush (Size 2)
- Flat Brush (1/4 inch)
Step-by-Step Process for Increasing Contrast
1. Adding Definition to Clothing and Accessories
The first area of focus is the clothing, particularly the buttons and fabric folds. To prevent losing the details, a light mixture of titanium white and raw sienna is applied to the buttons. This ensures they remain visible even after additional layers of paint are added.
- Mix titanium white with raw sienna for an opaque highlight.
- Apply it in thin, controlled strokes to emphasize the button edges.
- Allow the layer to dry before applying additional glazes.
2. Applying a Glaze for Deeper Shadows
To create a darker value for the clothing shadows, a glaze is prepared using raw umber dark, ultramarine blue, and a touch of alizarine crimson mixed with matte medium.
- This mixture is semi-translucent, allowing previous layers to remain visible.
- It is applied to the edges of the clothing and negative spaces between elements.
- A smooth gradient is achieved by feathering out the edges with a dry brush.
3. Refining Shadows in Facial Features
To make the face more three-dimensional, subtle shadows are introduced under the hat brim, around the eyes, and along the mustache and beard.
- A smaller detail brush is used for precision.
- A glaze mixture similar to the clothing shadows is applied in thin layers.
- The darkest areas are carefully deepened while still allowing for soft transitions.
4. Enhancing the Background and Rope Details
The negative space behind the subject is darkened to make the foreground stand out. Additionally, the ropes and scarf details are defined by using precise brush strokes.
- A darker glaze is applied to the background while maintaining soft edges.
- The spaces between the ropes are carefully shaded to enhance contrast.
- Layering shadows on the scarf creates a sense of texture and folds.
Tips for Mastering Contrast in Acrylic Painting
✔ Use a Limited Palette for Shadows: Mixing complementary colors rather than using straight black results in more natural-looking shadows.
✔ Work from General to Specific: Begin with broad shadow areas before refining small details.
✔ Layer Gradually: Instead of applying dark paint all at once, build it up in thin layers to control the intensity.
✔ Utilize Soft and Hard Edges: Hard edges emphasize details, while soft edges create depth and natural transitions.
✔ Check Your Painting in Black and White: Viewing your work in grayscale helps assess contrast levels effectively.
By following these steps and gradually increasing contrast, your painting will gain a greater sense of realism. Whether you are working on clothing, facial features, or background elements, strategic contrast adjustments can make all the difference.
Keep practicing, and don’t be afraid to layer and refine your shadows! What part of contrast enhancement do you find most challenging? Let’s discuss in the comments below.
🚀 Stay tuned for the next lesson in the 2025 Winter Acrylic Painting Challenge! Don’t forget to join my Facebook group, where I post update for the next lessons.
Frequently Asked Questions: Increasing Contrast in Acrylic Painting
Q: Why does my painting still look flat even after adding shadows?
A: The issue might be the lack of balance between shadows and highlights. Try increasing contrast in both areas by brightening highlights and deepening shadows gradually.
Q: How many layers should I use for proper contrast?
A: This depends on the opacity of your paint. Glazing techniques require multiple thin layers, while more opaque applications may need fewer.
Q: How can I blend shadows smoothly in acrylic painting?
A: Using matte medium or water can help create smoother transitions. Also, working while the paint is still wet allows for better blending.
2025 Winter Acrylic Portrait Painting Challenge Series
2025 Winter Acrylic Portrait Painting Challenge: Steps to Get Started
2025 Winter Acrylic Portrait Challenge Pre-Lesson: Gathering Your Supplies
2025 Winter Acrylic Portrait Challenge, Lesson 1: Prepping Your Canvas for the Portrait
2025 Winter Acrylic Painting Challenge, Lesson 2: Sketching Your Portrait Accurately
2025 Winter Acrylic Painting Challenge, Lesson 3: Sealing in Your Sketch
2025 Winter Acrylic Painting Challenge, Lesson 4: Beginning Your Portrait with Glazes
2025 Winter Acrylic Painting Challenge, Lesson 5: Building Up Color and Contrast

How to Paint Realistic Trees: Acrylic Glazing Technique
Master the art of adding depth, vibrance, and fine details to your tree paintings with this step-by-step acrylic glazing technique.
Painting trees can be a rewarding but challenging endeavor for artists. Have you ever felt stuck with your landscape painting, unsure how to enhance the realism or depth of your trees? With the acrylic glazing technique, you can bring life to your tree paintings by layering subtle, translucent hues for stunning visual effects. In this guide, we’ll show you how to paint realistic trees step-by-step, using tips and techniques that can elevate your acrylic art.
Why Use the Acrylic Glazing Technique?
Acrylic glazing involves layering transparent paint to build depth, luminosity, and subtle tonal shifts. This technique allows you to control the vibrancy and realism of your work. It’s especially effective for creating the intricate textures and colors found in trees and foliage.
Step-by-Step Guide to Painting Realistic Trees
1. Prepare Your Materials
Before you start, gather the following materials:
- Acrylic Paints: Titanium white, Indian yellow, phthalo blue, raw sienna
- Matte Medium: To create fluid, transparent layers
- Brushes: Small round brush for details, flat brush for broader strokes
- Palette: For mixing colors
- Canvas or Paper: Prepped with a neutral base layer
2. Create the Base Layers
Start by painting a base layer with mid-tone colors to establish the overall structure of the trees. Use a mix of Indian yellow, phthalo blue, and raw sienna to create a natural, earthy palette. Allow the base layer to dry completely before moving on.
3. Mix Your Glaze
Combine a small amount of acrylic paint with matte medium to create a transparent glaze. For the first layer, use a mix of Indian yellow and titanium white. This will help add subtle warmth and highlight areas where light hits the foliage.
4. Add Details and Highlights
Use your small round brush to add highlights to the edges of leaves and branches. Adjust the intensity of your colors by mixing in more titanium white for lighter tones or phthalo blue for cooler shadows. Work methodically from left to right to avoid smudging.
5. Incorporate Chromatic Nuances
To achieve realistic depth, vary your glaze colors. For example:
- Add more Indian yellow to enhance vibrancy in sunlit areas.
- Use a cooler mix of phthalo blue and titanium white for shaded areas.
Blend these variations smoothly to mimic the natural interplay of light and shadow.
6. Refine the Texture
Focus on the intricate details of tree bark and leaves. Use your round brush to create fine lines and textures, layering darker glazes for shadows. Be patient and build the texture gradually, allowing each glaze to dry before adding more.
Mastering the acrylic glazing technique opens up a world of possibilities for creating realistic trees in your paintings. By layering colors with precision and patience, you can achieve breathtaking depth and vibrancy. Don’t let frustration hold you back embrace these techniques and watch your landscapes come to life.
For further resources and guides, visit realisticacrylic.com and check out my free courses to enhance your acrylic painting journey.
Tips for Success
- Use Matte Medium: It ensures smooth, transparent layers without compromising the paint’s consistency.
- Test Your Colors: Check the intensity of your glaze by painting a small swatch on a white card. Adjust as needed.
- Work with Light Layers: Avoid applying thick glazes; subtlety is key for realistic results.
- Keep a Reference: Use a photo or observe real trees to capture accurate colors and details.
Frequently Asked Questions
Q: What is the best brush for painting tree details?
A small round brush is ideal for fine details like leaves and branches, while a flat brush works well for broader areas.
Q: How do I prevent my painting from looking muddy?
Use transparent glazes and let each layer dry completely before adding another. Avoid overmixing colors directly on the canvas.
Q: Can I use glazing techniques for other elements in landscapes?
Absolutely! Glazing is versatile and can enhance skies, water reflections, and even distant mountains.
Conclusion
Mastering the acrylic glazing technique opens up a world of possibilities for creating realistic trees in your paintings. By layering colors with precision and patience, you can achieve breathtaking depth and vibrancy. Don’t let frustration hold you back—embrace these techniques and watch your landscapes come to life.
LEARN MORE
- Sketching Your Painting Accurately
- Beginning a Pet Portrait in Acrylic
- The Mystery of Realism in Painting
- Apply A Burnt Sienna Glaze to a Portrait
- Learn How to Sketch a Portrait Freehand in 45 Minutes
- Adding highlights to your acrylic painting
- 5 Excellent Reasons to Use Aluminum Foil
- Paint Realistic Wrinkles in Acrylic
- Painting Clothing in an Acrylic Portrait
- Paint a Cloudy Sky Acrylic
- How to add Semi-Opaque Highlights
- How to Enhance the Contrast in Your Acrylic
- How to Add Glaze to Your Acrylic Painting
- Paint Realistic Reflections on Eyeglasses in an Acrylic Portrait
- Build Up Depth on Your Acrylic Portrait Backgrounds
- How Do You Do Layers With the Glazing Technique?
- Learn How to Paint Wrinkles in Acrylic
Read more about how to paint a portrait that you can surely be proud of!
I’d love to hear your thoughts on this video. Please share it with your friends and family. Let me know if you have any further questions. I’ll greatly help you.
If you’d like to learn more, sign up for my free email tips and video class today.
Learn How to Paint Acrylic Portraits With My Free Mini-Video Course!
Thank you so much for taking the time to read this tutorial and watch the video. That means a lot to me. I hope you find it very helpful in your portrait painting.
Yours for Better Portraits,
P.S. Did you find this post helpful or encouraging? If so, send it in ahead! Let others know with the share buttons below. I’d love to hear your comments. Thank you so much! Also, do you have a question on acrylic portrait painting you’d like answered? Let me know, and I’d be happy to help!

How to Paint Titanium White Highlights on Acrylic Grisaille
Unlocking depth and dimension with the power of highlights
Acrylic grisaille painting, where the initial layer focuses on monochromatic shades, builds a solid foundation for adding light and shadow. By incorporating titanium white, you’ll create highlights that bring vibrancy and realism to the piece. This tutorial focuses on how to add titanium white highlights on an acrylic grisaille painting, with an emphasis on using layering and glazing techniques.
1. Understanding Titanium White in Acrylic Grisaille
Titanium white is a high-opacity pigment ideal for creating highlights that stand out against darker backgrounds. It’s often used as the top layer in grisaille to add illumination. Mixed with a matte medium, titanium white becomes more translucent, making it perfect for glazing subtle highlights.
2. Setting Up Your Materials
Before you start painting, make sure to gather these essential materials:
- Titanium white acrylic paint
- Matte medium for glaze consistency
- Raw sienna for warm undertones
- Soft, synthetic brushes for precision
- Reference photo, if available for guidance
Setting up your materials in advance helps ensure a smooth painting process and allows for better color blending.
3. Mixing Titanium White with Matte Medium
To achieve a translucent effect, mix titanium white with a matte medium.
- Combine Equal Parts of titanium white and matte medium.
- Adjust Opacity by adding more medium if needed.
- Add a touch of raw sienna to warm the highlights.
Mixing with matte medium softens the intensity of titanium white, which avoids chalky finishes and integrates with existing shades.
4. Building Up Highlights with Layers
The key to lifelike highlights is building them in layers. Start with lighter layers and intensify as needed:
- Apply in Thin Layers: Use translucent white for softer highlights.
- Use a Dabbing Technique: Apply paint gently with your fingers or a soft brush to blend naturally.
- Focus on Key Areas: Areas like the forehead, cheeks, and hands usually capture light.
Building highlights gradually gives you control over how much brightness is added and helps blend with the underlying grisaille.
5. Creating Soft, Blended Edges
Blending is crucial to achieving a realistic finish. Soft edges allow highlights to transition smoothly:
- Feather the Edges by gently moving your brush outwards.
- Dab with a Clean Brush to soften transitions between highlighted and shaded areas.
- Layer Highlights: Adding subsequent layers after each has dried creates depth.
6. Incorporating Warm Undertones with Raw Sienna
Adding a touch of raw sienna to titanium white enhances the warmth, making highlights appear more natural.
- Mix with Titanium White: A small amount of raw sienna warms up highlights for a more lifelike effect.
- Apply Over Darker Areas: Use raw sienna highlights where the form turns, such as along the scroll in the painting.
- Layer Gradually: Continue layering with raw sienna-infused highlights to achieve depth.
Warm undertones help the highlights feel more integrated with the skin tones and surroundings.
7. Emphasizing Key Highlights for Depth
With grisaille, the highest highlights create the most contrast and depth:
- Focus on High Points: Areas like the cheekbones, forehead, and hands should be brighter.
- Use a Slightly Thicker Application: In these areas, reduce the amount of matte medium to make highlights more opaque.
- Add Fine Details: Tiny highlights on features such as eyes or the edge of a scroll add realism.
Tips and Techniques
- Practice Patience with Layers: Allow each layer to dry fully before adding more white to avoid muddying colors.
- Experiment with Blending Tools: Fingers can be a great blending tool, allowing for soft, natural transitions.
- Keep Highlights Soft: Avoid hard edges by lightly feathering the brush or dabbing with a clean brush.
Conclusion
Painting titanium white highlights on an acrylic grisaille foundation elevates your artwork by adding brilliance and realism. Through layering and blending techniques, each highlight contributes to the depth and life of the portrait. Start by mixing titanium white with matte medium and raw sienna, and then carefully apply highlights in key areas. The result will be a stunning, light-infused painting that truly stands out.
FAQs
What is the Purpose of Using Titanium White in Acrylic Grisaille?
Titanium white is highly opaque and ideal for creating crisp highlights that stand out against darker monochromatic underpainting. It helps to enhance light and depth.
How Do I Avoid Chalky Highlights?
Mixing titanium white with matte medium and a touch of raw sienna creates a warmer, less chalky effect, blending smoothly with darker tones.
Why Use Raw Sienna in White Highlights?
Adding raw sienna brings warmth and helps integrate the highlights with the rest of the painting. It adds a subtle vibrancy, avoiding the starkness that pure white can sometimes create.
How Should I Place Highlights on a Portrait?
Focus on areas where light naturally falls, such as the forehead, nose, cheeks, and hands. Adding highlights here enhances depth and realism.
How Do I Layer Highlights for Realism?
Start with thin, translucent layers, gradually adding more opacity to the final highlights. This layering builds a natural depth that closely resembles real light and shadow.
LEARN MORE
- Sketching Your Painting Accurately
- Beginning a Pet Portrait in Acrylic
- The Mystery of Realism in Painting
- Apply A Burnt Sienna Glaze to a Portrait
- Learn How to Sketch a Portrait Freehand in 45 Minutes
- Adding highlights to your acrylic painting
- 5 Excellent Reasons to Use Aluminum Foil
- Paint Realistic Wrinkles in Acrylic
- Painting Clothing in an Acrylic Portrait
- Paint a Cloudy Sky Acrylic
- How to add Semi-Opaque Highlights
- How to Enhance the Contrast in Your Acrylic
- How to Add Glaze to Your Acrylic Painting
- Paint Realistic Reflections on Eyeglasses in an Acrylic Portrait
- Build Up Depth on Your Acrylic Portrait Backgrounds
- How Do You Do Layers With the Glazing Technique?
- Learn How to Paint Wrinkles in Acrylic
Read more about how to paint a portrait that you can surely be proud of!
I’d love to hear your thoughts on this video. Please share it with your friends and family. Let me know if you have any further questions. I’ll greatly help you.
If you’d like to learn more, sign up for my free email tips and video class today.
Learn How to Paint Acrylic Portraits With My Free Mini-Video Course!
Thank you so much for taking the time to read this tutorial and watch the video. That means a lot to me. I hope you find it very helpful in your portrait painting.
Yours for Better Portraits,

P.S. Did you find this post helpful or encouraging? If so, send it in ahead! Let others know with the share buttons below. I’d love to hear your comments. Thank you so much! Also, do you have a question on acrylic portrait painting you’d like answered? Let me know, and I’d be happy to help!

How to Paint a Smiling Man with Dark Hair
A step-by-step guide on painting a captivating portrait in just 30 minutes
Discover the secrets of creating a stunning 30-minute acrylic portrait of a smiling man with dark hair. Perfect for both beginners and experienced artists, this guide will walk you through each step of the process with expert tips and techniques.
Creating a portrait in just 30 minutes may seem like a daunting task, but with the right techniques and materials, it can be an exhilarating and rewarding experience. In this guide, we’ll explore the step-by-step process of painting a smiling man with dark hair using acrylics. Whether you’re a seasoned artist or a beginner looking to improve your skills, this tutorial will provide you with the tools and confidence needed to create a stunning piece of art in just half an hour.
Materials You’ll Need
Before diving into the painting process, ensure you have all the necessary materials at hand:
- Acrylic paints: A basic set including primary colors, white, and black.
- Brushes: A variety of sizes, including a flat brush, a round brush, and a detail brush.
- Canvas or painting surface: Preferably pre-primed for acrylics.
- Palette: For mixing your paints.
- Water and a container: For cleaning brushes.
- Paper towels or rags: For wiping brushes.
Step by- step on how to paint smiling man with dark hair in 30 minute acrylic portrait
Step 1: Prepare Your Workspace
Set up your workspace with all your materials within easy reach. Ensure you have good lighting to accurately see your colors and details. Place your reference photo in a visible spot for easy access.
Step 2: Sketch the Outline
Using a light pencil, sketch the basic outline of the man’s face on the canvas. Focus on the placement of key features such as the eyes, nose, mouth, and hairline. Keep the sketch light to avoid visible lines through the paint.
Step 3: Blocking in the Base Colors
Start by blocking in the base colors of the face. Mix a skin tone using a combination of white, red, yellow, and a touch of blue. Apply the skin tone using a flat brush, covering the entire face area. Don’t worry about details at this stage; focus on creating a smooth and even base layer.
For the hair, mix a dark brown or black shade and block in the hair area. Use broad, sweeping strokes to cover the entire hair section. This will serve as the foundation for adding texture and highlights later.
Step 4: Adding Shadows and Highlights
Once the base layer is dry, begin adding shadows and highlights to create depth and dimension. Mix a slightly darker shade of the skin tone for the shadows and a lighter shade for the highlights.
- Shadows: Apply the darker shade to areas such as under the cheekbones, around the eyes, and along the jawline. Use a soft, round brush to blend the edges, creating a smooth transition between the shadow and the base color.
- Highlights: Apply the lighter shade to areas where light naturally hits the face, such as the forehead, the bridge of the nose, and the tops of the cheeks. Blend the edges to create a seamless transition.
For the hair, add highlights by mixing a lighter shade of the base color and applying it to areas where light would naturally reflect, such as the top of the head and along the strands. Use a smaller brush for finer details.
Step 5: Detailing the Features
Now that the basic tones and shades are in place, focus on adding details to the facial features. This step brings the portrait to life and captures the subject’s expression.
- Eyes: Use a small detail brush to paint the whites of the eyes, leaving the pupils for later. Add shadows around the eye sockets and highlights to the upper eyelids to create depth. Paint the irises using a color that matches the reference photo, and add small highlights to give the eyes a lifelike sparkle.
- Nose: Refine the shape of the nose by adding subtle shadows along the sides and under the tip. Highlight the bridge and the tip to give the nose dimension.
- Mouth: Paint the lips using a mix of red and skin tone. Add shadows to the corners and under the lower lip to create volume. Highlight the center of the lower lip for a fuller appearance.
- Hair: Add fine strands and texture using a small brush and lighter shades of the base color. Pay attention to the direction of the hair growth and the natural flow of the strands.
Step 6: Final Touches
In this final step, refine any areas that need additional work and add the finishing touches. Check for consistency in lighting and shadows across the entire portrait. Add any necessary details, such as subtle wrinkles, moles, or other distinguishing features.
Step 7: Let It Dry
Allow the painting to dry completely before making any further adjustments or displaying it. Acrylic paints dry quickly, but it’s important to ensure all layers are thoroughly dry to prevent smudging or damage.
Tips for Success
- Work quickly: The 30-minute technique relies on swift application and blending. Keep your brush strokes fluid and confident.
- Practice blending: Smooth transitions between shadows, midtones, and highlights are key to creating a realistic portrait. Practice blending techniques on a separate sheet before applying them to your painting.
- Use a limited palette: Working with a limited color palette can help maintain color harmony and simplify the painting process.
By following these steps, you can create a stunning and expressive portrait of a smiling man with dark hair using the 30-minute acrylic portrait painting technique. This method allows you to achieve impressive results in a short amount of time, making it perfect for artists of all skill levels. With practice and patience, you’ll be able to capture the essence of your subjects and bring them to life on canvas.
Remember, the key to learn this technique is practice and experimentation. Don’t be afraid to try different approaches and make adjustments as needed. Happy painting!
Watch the video below for more details.
LEARN MORE
- Sketching Your Painting Accurately
- Beginning a Pet Portrait in Acrylic
- The Mystery of Realism in Painting
- Apply A Burnt Sienna Glaze to a Portrait
- Learn How to Sketch a Portrait Freehand in 45 Minutes
- Adding highlights to your acrylic painting
- 5 Excellent Reasons to Use Aluminum Foil
- Paint Realistic Wrinkles in Acrylic
- Painting Clothing in an Acrylic Portrait
- Paint a Cloudy Sky Acrylic
- How to add Semi-Opaque Highlights
- How to Enhance the Contrast in Your Acrylic
- How to Add Glaze to Your Acrylic Painting
- Paint Realistic Reflections on Eyeglasses in an Acrylic Portrait
- Build Up Depth on Your Acrylic Portrait Backgrounds
- How Do You Do Layers With the Glazing Technique?
- Learn How to Paint Wrinkles in Acrylic
Read more about how to paint a portrait that you can surely be proud of!
I’d love to hear your thoughts on this video. Please share it with your friends and family. Let me know if you have any further questions. I’ll greatly help you.
If you’d like to learn more, sign up for my free email tips and video class today.
Learn How to Paint Acrylic Portraits With My Free Mini-Video Course!
Thank you so much for taking the time to read this tutorial and watch the video. That means a lot to me. I hope you find it very helpful in your portrait painting.
Yours for Better Portraits,
P.S. Did you find this post helpful or encouraging? If so, send it in ahead! Let others know with the share buttons below. I’d love to hear your comments. Thank you so much! Also, do you have a question on acrylic portrait painting you’d like answered? Let me know, and I’d be happy to help!

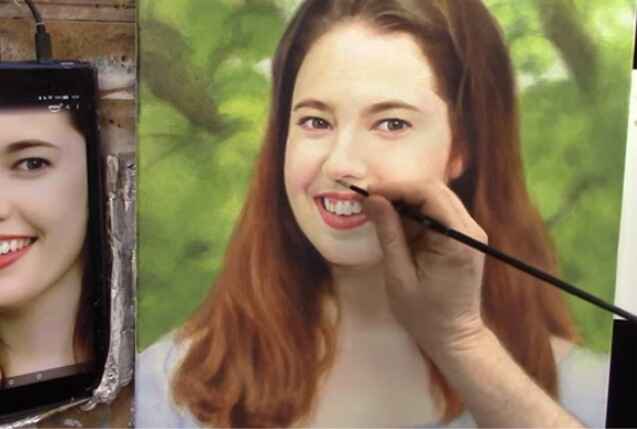
How to Make Your Acrylic Portrait Realistic With Vibrant
From initial sketch to final Glaze: A comprehensive guide to acrylic portrait painting techniques
The process of making a realistic acrylic portrait painting involves mastering various techniques, with shadows being one of the most crucial. In this comprehensive guide, I’ll show you through my process of painting an 11×14 acrylic portrait of a late pastor.
Highlighting the importance of shadows and finishing touches. At the end of this video tutorial, you’ll have a deeper understanding of how to bring your portraits to life with realistic depth and dimension.
The Importance of Shadows in Portrait Painting
Shadows add depth and dimension to a portrait, making it look realistic. They help define the line of the face and other elements, giving the painting a three-dimensional appearance. Here’s how you can make the shadow of your acrylic portrait painting realistic.
- Choosing the Right Colors: Start by selecting a shadow color that complements your base tones. For this portrait, I used a mix of raw umber dark, titanium white, and ultramarine blue. Adjust the mix to avoid overly harsh or light shadows.
- Applying Shadows to the Chin and Jawline: To create a shadow under the chin, I applied the shadow mix to darken the clerical collar, enhancing the depth and realism. Extend the shadows outward from the jawline to create a natural gradient.

- Detailing the Eyes: Adjust the reflections near the eyelids by darkening specific areas to highlight subtle details. This step is crucial for capturing the subject’s expression and character.
- Refining Teeth and Lips: Add fine details to the teeth and lips without overdoing them. Too much detail can make the painting look artificial. Aim for subtlety to maintain a natural look.
- Enhancing Cloths and Accessories: Softly outline the chains and zippers in the subject’s vestment. Use sketch lines as a guide, then soften them to create a realistic appearance.
Step-by-Step Process of Adding Shadows
Step 1: Mixing Shadow Colors
- Mix raw umber dark, titanium white, and ultramarine blue to create a balanced shadow color.
- Adjust the mix if it appears too blue by adding more raw umber.
Step 2: Applying Shadows Under the Chin
- Apply the shadow mix under the chin and along the jawline.
- Darken the clerical collar to emphasize the shadow cast by the chin.
Step 3: Extending Shadows from the Shoulder and Arm
- Gradually extend the shadows from the shoulder and arm area, creating a smooth gradient.
- Use a light touch to blend the shadows seamlessly into the surrounding areas.
Step 4: Adjusting Eye Reflections
- Darken the reflection near the eyelids by adding a small amount of brown at the top.
- Ensure the reflection is subtle to enhance the realism of the eyes.
Step 5: Detailing Teeth and Lips
- Add minimal details to the teeth to suggest their presence without making them too prominent.
- Enhance the highlights on the lips to give them a glossy appearance.
Step 6: Softening Sketch Lines on Cloth.
- Use a mix of white and blue to soften the sketch lines on chains and zippers.
- Break up the lines into small segments to mimic the appearance of chains.
Final Touches
As you near the completion of your portrait, it’s essential to review your work with fresh eyes. Here are some final touches to consider:
First, Emphasizing Highlights: Use titanium white mixed with a touch of red to enhance the highlights on the lips and other reflective areas.
Secondly, Cloth Details: Ensure the chains and zippers are well-defined but not overly harsh. Subtlety is key to achieving a realistic portrait.
Lastly, Balancing Shadows and Highlights: Revisit the shadowed areas and adjust as needed to ensure a balanced contrast with the highlights.
Final Review: Take a break and revisit your painting the next day. A fresh perspective can help identify areas that need improvement.
Watch the Process
For a detailed guide, watch the complete video tutorial here.
Creating a realistic acrylic portrait painting involves patience, practice, and attention to detail. Especially in learning shadow techniques and applying subtle touches. And you can bring your portraits to life with depth and realism. Remember, the key is to balance shadows and highlights, ensuring a natural and lifelike portrait.
Happy painting! Get your free acrylic portrait painting techniques and don’t forget to share your progress and finished works. If you found this tutorial helpful, please give it a thumbs up and subscribe to my YouTube channel for more painting tips and tutorials.
LEARN MORE
- Sketching Your Painting Accurately
- Beginning a Pet Portrait in Acrylic
- The Mystery of Realism in Painting
- Apply A Burnt Sienna Glaze to a Portrait
- Learn How to Sketch a Portrait Freehand in 45 Minutes
- Adding highlights to your acrylic painting
- 5 Excellent Reasons to Use Aluminum Foil
- Paint Realistic Wrinkles in Acrylic
- Painting Clothing in an Acrylic Portrait
- Paint a Cloudy Sky Acrylic
- How to add Semi-Opaque Highlights
- How to Enhance the Contrast in Your Acrylic
- How to Add Glaze to Your Acrylic Painting
- Paint Realistic Reflections on Eyeglasses in an Acrylic Portrait
- Build Up Depth on Your Acrylic Portrait Backgrounds
- How Do You Do Layers With the Glazing Technique?
- Learn How to Paint Wrinkles in Acrylic
Read more about how to paint a portrait that you can surely be proud of!
I’d love to hear your thoughts on this video. Please share it with your friends and family. Let me know if you have any further questions. I’ll greatly help you.
If you’d like to learn more, sign up for my free email tips and video class today.
Learn How to Paint Acrylic Portraits With My Free Mini-Video Course!
Thank you so much for taking the time to read this tutorial and watch the video. That means a lot to me. I hope you find it very helpful in your portrait painting.
Yours for Better Portraits,

P.S. Did you find this post helpful or encouraging? If so, send it in ahead! Let others know with the share buttons below. I’d love to hear your comments. Thank you so much! Also, do you have a question on acrylic portrait painting you’d like answered? Let me know, and I’d be happy to help!

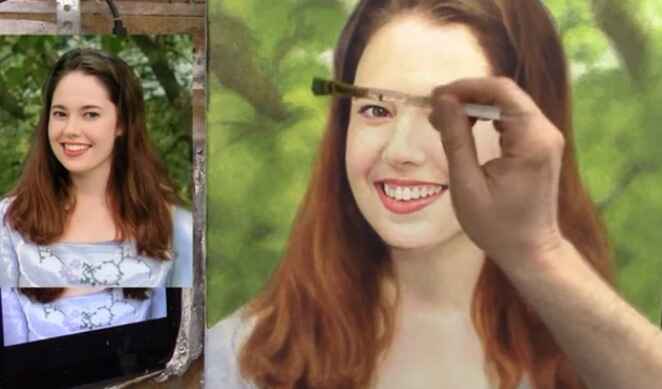
How to do Portrait Adjustments: Here is the Step-by-Step Guide
Learn how to enhance value and color in your portraits with glazing techniques.
Introduction
Portrait painting is an intricate art that requires attention to detail, especially when it comes to adjusting values and colors. In this free guide, we’ll explore how to make nuanced adjustments to your portrait painting using glazing techniques. And based on insights from a recent tutorial. Whether you’re an experienced artist or a beginner, these tips will help you enhance your portraits and bring them to life.
Here is a step-by-step guide to portrait painting adjustments
Understand the basic of portrait painting adjustment
The key to successful portrait painting adjustments lies in an understanding of value and color. Value refers to the lightness or darkness of a color, while the color itself can be modified with tints (adding white) and shades (adding black). In this tutorial, the focus is on using glazes to make subtle adjustments that can significantly improve the overall look of your portrait.
Step 1: Darkening the Right Eyelid Start with the right eyelid by using small round brushes. Mix both raw umber dark with a bit of napthol red and raw sienna. This combination creates a cooler tint that can be applied between the eyebrow and the eye. Transparent glazes can be used at any stage of the painting to add depth and adjust tones without overpowering the existing layers.
Step 2: Adjusting the Shadow Under the Nose Next, work on darkening the shadow under the nose. Use the same glaze mixture and add a touch of titanium white for smoothness. During this adjustment it requires patience, as it might take several layers to achieve the desired effect. The key is to apply the glaze lightly, blending with your finger to create a natural transition.
Step 3: Enhancing the Background Finally, focus on the background. Use a combination of ultramarine blue, Indian yellow, and raw sienna to create a rich, sap green color. Adding titanium white will cool and smooth out the glaze. Apply this selectively to darken areas and bring out the nuances in the background, creating a realistic depth of field.
Additional Tips:
- Use a value checker tool to evaluate your painting and identify areas needing adjustment. While not mandatory, it can provide an accurate measure for making precise changes. You can check my value checker and get it for free.
- Darker values in your painting should generally be cooler in tone to maintain a balanced look.
- Be patient with the process, as building up layers gradually will yield the best results.
Adjusting values and colors in your portraits can transform them from good to extraordinary. By following these acrylic glazing techniques and being mindful of value and color, you’ll be able to enhance your portraits with ease. Keep practicing and experimenting with different mixtures to find what works best for your unique style. Happy painting!
With these insights and techniques, you’re now equipped to make impactful adjustments to your portrait paintings. Remember, art is a journey, and as a result, each stroke brings you closer to mastering your portrait painting.
Watch the Process
For a detailed guide, watch the complete video tutorial below.
LEARN MORE
- Sketching Your Painting Accurately
- Beginning a Pet Portrait in Acrylic
- The Mystery of Realism in Painting
- Apply A Burnt Sienna Glaze to a Portrait
- Learn How to Sketch a Portrait Freehand in 45 Minutes
- Adding highlights to your acrylic painting
- 5 Excellent Reasons to Use Aluminum Foil
- Paint Realistic Wrinkles in Acrylic
- Painting Clothing in an Acrylic Portrait
- Paint a Cloudy Sky Acrylic
- How to add Semi-Opaque Highlights
- How to Enhance the Contrast in Your Acrylic
- How to Add Glaze to Your Acrylic Painting
- Paint Realistic Reflections on Eyeglasses in an Acrylic Portrait
- Build Up Depth on Your Acrylic Portrait Backgrounds
- How Do You Do Layers With the Glazing Technique?
- Learn How to Paint Wrinkles in Acrylic
Read more about how to paint a portrait that you can surely be proud of!
I’d love to hear your thoughts on this video. Please share it with your friends and family. Let me know if you have any further questions. I’ll greatly help you.
If you’d like to learn more, sign up for my free email tips and video class today.
Learn How to Paint Acrylic Portraits With My Free Mini-Video Course!
Thank you so much for taking the time to read this tutorial and watch the video. That means a lot to me. I hope you find it very helpful in your portrait painting.
Yours for Better Portraits,

P.S. Did you find this post helpful or encouraging? If so, send it in ahead! Let others know with the share buttons below. I’d love to hear your comments. Thank you so much! Also, do you have a question on acrylic portrait painting you’d like answered? Let me know, and I’d be happy to help!

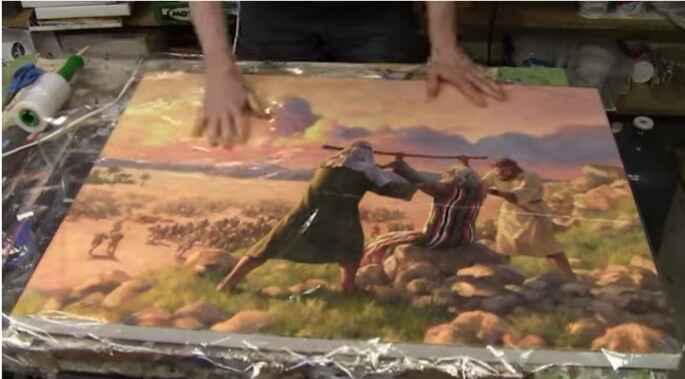
7 Best Ways To Ship Your Acrylic Paintings Secure!
Securely package your portrait for safe delivery with these step-by-step guide
Here are the 7 best ways to ship your large acrylic paintings securely!
Shipping large paintings, especially delicate acrylic paintings, requires careful attention to detail to ensure they arrive safely. As a professional artist, I’ve developed an effective method for packaging large paintings that minimizes the risk of damage during transit. Whether you’re shipping acrylic or oil paintings, follow these step-by-step instructions to protect your artwork and ensure it reaches its destination in perfect condition.
Step 1: Shrink Wrap the Painting
Start by wrapping your painting in shrink wrap to create a protective barrier. Place the painting face down and cover it completely with shrink wrap. This initial layer shields the surface of the artwork from scratches and scuffs. Fold the shrink wrap over and secure it with packaging tape. There’s no need to use a heat gun; the wrap should be tight enough to protect the painting.
Step 2: Add Foam Core
Lay the shrink-wrapped painting on top of two pieces of foam core. These will serve as the first protective layer. Fold the shrink wrap over the foam core and tape it in place. The foam core provides cushioning and prevents the painting from moving inside the package.
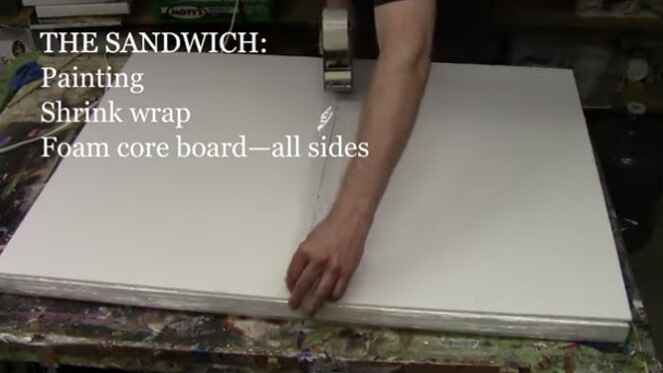
Step 3: Protect the Edges
Cut strips of foam core to match the thickness of your canvas (typically around one inch). Tape these strips along the edges of the painting to create a protective buffer. This step ensures that the edges of the canvas are well protected and reduces the risk of dents or damage during shipping.
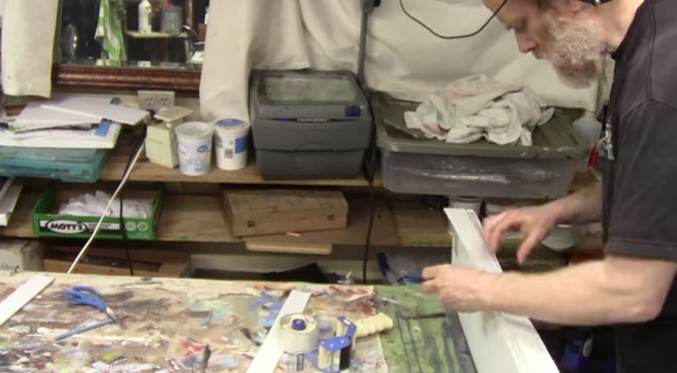
Step 4: Add Hardboard and Styrofoam
Sandwich the painting between two pieces of hardboard. The hardboard provides a sturdy protective layer that reinforces the package. Next, add two pieces of Styrofoam insulation board (3/4 inch to 1 inch thick) on either side of the hardboard. The Styrofoam offers additional cushioning and shock absorption.
Step 5: Encase in Cardboard
Wrap the entire package in a large piece of cardboard. If you don’t have a single piece large enough, you can piece together several smaller pieces. Use a utility knife to cut and crease the cardboard, ensuring it fits snugly around the package. Secure the cardboard with packaging tape, making sure all sides and corners are well protected.
Step 6: Secure with Additional Tape
Once the cardboard is in place, reinforce all edges and corners with extra layers of packaging tape. Pay special attention to the corners, as they are more susceptible to damage. Ensure the tape is applied smoothly and firmly to prevent the package from coming apart during transit.
Step 7: Label and Ship
Finally, attach the shipping label to the package. It’s a good idea to add “Fragile” and “Handle with Care” stickers to alert the shipping company that the contents are delicate. Choose a reliable shipping service that offers tracking and insurance to safeguard your artwork.
Additional Tips for Safe Shipping
- Insurance: Always insure your painting for its full value. In case of any damage or loss, insurance will provide coverage for your artwork.
- Documentation: Include a packing list and documentation inside the package with details of the painting, your contact information, and the recipient’s information.
- Weather Considerations: If you’re shipping during extreme weather conditions, be mindful of temperature fluctuations and humidity, as they can affect the painting.
- Communication: Inform the recipient about the delivery date and provide them with the tracking number. This helps ensure that someone is available to receive the package promptly.
- Test the Packaging: Before shipping, gently shake the package to check if there’s any movement inside. If you hear or feel movement, add more padding to secure the painting further.
By following these steps and tips, you can ship your large acrylic paintings with confidence, knowing they are well-protected against potential damage. This packaging step-by-step guide has been tested and proven effective, ensuring your artwork arrives safely at its destination.
DISCLAIMER: I cannot be held responsible for damages incurred while using this method of shipping. It is just what has worked well for me. Also, purchasing insurance is advisable any time you ship an expensive painting.
I hope this guide has been helpful. If you have any questions or need further assistance, feel free to reach out. Safe shipping!
Watch my video below for the process on how I did it.
LEARN MORE
- Sketching Your Painting Accurately
- Beginning a Pet Portrait in Acrylic
- The Mystery of Realism in Painting
- Apply A Burnt Sienna Glaze to a Portrait
- Learn How to Sketch a Portrait Freehand in 45 Minutes
- Adding highlights to your acrylic painting
- 5 Excellent Reasons to Use Aluminum Foil
- Paint Realistic Wrinkles in Acrylic
- Painting Clothing in an Acrylic Portrait
- Paint a Cloudy Sky Acrylic
- How to add Semi-Opaque Highlights
- How to Enhance the Contrast in Your Acrylic
- How to Add Glaze to Your Acrylic Painting
- Paint Realistic Reflections on Eyeglasses in an Acrylic Portrait
- Build Up Depth on Your Acrylic Portrait Backgrounds
- How Do You Do Layers With the Glazing Technique?
- Learn How to Paint Wrinkles in Acrylic
Read more about how to paint a portrait that you can surely be proud of!
I’d love to hear your thoughts on this video. Please share it with your friends and family. Let me know if you have any further questions. I’ll greatly help you.
If you’d like to learn more, sign up for my free email tips and video class today.
Learn How to Paint Acrylic Portraits With My Free Mini-Video Course!
Thank you so much for taking the time to read this tutorial and watch the video. That means a lot to me. I hope you find it very helpful in your portrait painting.
Yours for Better Portraits,

P.S. Did you find this post helpful or encouraging? If so, send it in ahead! Let others know with the share buttons below. I’d love to hear your comments. Thank you so much! Also, do you have a question on acrylic portrait painting you’d like answered? Let me know, and I’d be happy to help!

How To Use Contrast And Vibrancy: Acrylic Grisaille Technique
Unlock the secrets to dynamic paintings with the acrylic grisaille technique
Discover how to bring your portrait to life with vibrant contrasts and nuanced details using the acrylic grisaille technique.
In the realm of acrylic painting, learning the art of contrast and vibrancy can elevate your work to new heights. In this tutorial, we delve into the acrylic grisaille technique, a method that adds depth, richness, and dynamic energy to your paintings. Follow along as we explore the final steps in creating a painting of King David dancing as the Arc of the Covenant returns to Jerusalem.
What is the acrylic grisaille technique?
The acrylic grisaille technique begins with a monochromatic underpainting, typically done in shades of gray or sepia. This foundation allows artists to focus on values and contrasts without the distraction of color. Once the grisaille layer is complete, transparent glazes of color are applied, building up layers to create a rich and vibrant final image.
Enhancing Contrast and Vibrancy
In this demonstration, the artist uses a variety of techniques to enhance the contrast and vibrancy of the painting:
- Adding Halation for Vibrancy: Halation involves adding vibrant colors to the areas where bright highlights meet darker tones. By mixing organic orange, Indian yellow, and titanium white, the artist creates a glowing effect that makes the white clothing of King David pop against the background.
- Layering Glazes: Multiple glazes of color are applied over the sepia-toned underpainting. This layering process builds depth and richness, allowing the artist to fine-tune the vibrancy of the painting.
- Nuanced Details: Small round brushes are used to add intricate details and highlights, particularly in areas of high contrast. These details draw the viewer’s eye and add a sense of realism and movement to the painting.

Step-by-Step Process
- Prepare the Underpainting: Start with a monochromatic sepia tone. Focus on establishing the values and contrasts that will guide the final image.
- Mix Vibrant Colors: Create a mix of organic orange, Indian yellow, and titanium white. Adjust the strength of the color to suit the desired level of vibrancy.
- Apply Halation Effects: Carefully apply the vibrant mix to the edges of bright highlights. This technique enhances the contrast and makes the lighter areas stand out more vividly.
- Layer Glazes: Apply transparent glazes over the underpainting. Use a combination of colors to build depth and richness, allowing each layer to dry before adding the next.
- Add Nuanced Details: Use small brushes to add highlights and details. Focus on areas of high contrast to draw the viewer’s eye and add a sense of movement and realism.
Final Touches
The final steps involve signing the painting and adding any last-minute highlights or details. The artist emphasizes the importance of placing the signature in a way that complements the composition, ensuring it is visible but not intrusive
By learning the acrylic grisaille technique, you, as artists, can create paintings that are not only visually striking but also rich in depth and detail. Whether you are a seasoned artist or a beginner, these tips and techniques will help you bring your portrait to life.
For more detailed tutorial, watch the video below: Finishing the Painting of King David Dancing in Jerusalem (Acrylic Grisaille Technique)
LEARN MORE
- Sketching Your Painting Accurately
- Beginning a Pet Portrait in Acrylic
- The Mystery of Realism in Painting
- Apply A Burnt Sienna Glaze to a Portrait
- Learn How to Sketch a Portrait Freehand in 45 Minutes
- Adding highlights to your acrylic painting
- 5 Excellent Reasons to Use Aluminum Foil
- Paint Realistic Wrinkles in Acrylic
- Painting Clothing in an Acrylic Portrait
- Paint a Cloudy Sky Acrylic
- How to add Semi-Opaque Highlights
- How to Enhance the Contrast in Your Acrylic
- How to Add Glaze to Your Acrylic Painting
- Paint Realistic Reflections on Eyeglasses in an Acrylic Portrait
- Build Up Depth on Your Acrylic Portrait Backgrounds
- How Do You Do Layers With the Glazing Technique?
- Learn How to Paint Wrinkles in Acrylic
Read more about how to paint a portrait that you can surely be proud of!
I’d love to hear your thoughts on this video. Please share it with your friends and family. Let me know if you have any further questions. I’ll greatly help you.
If you’d like to learn more, sign up for my free email tips and video class today.
Learn How to Paint Acrylic Portraits With My Free Mini-Video Course!
Thank you so much for taking the time to read this tutorial and watch the video. That means a lot to me. I hope you find it very helpful in your portrait painting.
Yours for Better Portraits,

P.S. Did you find this post helpful or encouraging? If so, send it in ahead! Let others know with the share buttons below. I’d love to hear your comments. Thank you so much! Also, do you have a question on acrylic portrait painting you’d like answered? Let me know, and I’d be happy to help!