Category Archives for New Course

New Portrait Painting Class Coming Very Soon!
I’m SO excited for the new painting class that I will be opening up tomorrow!
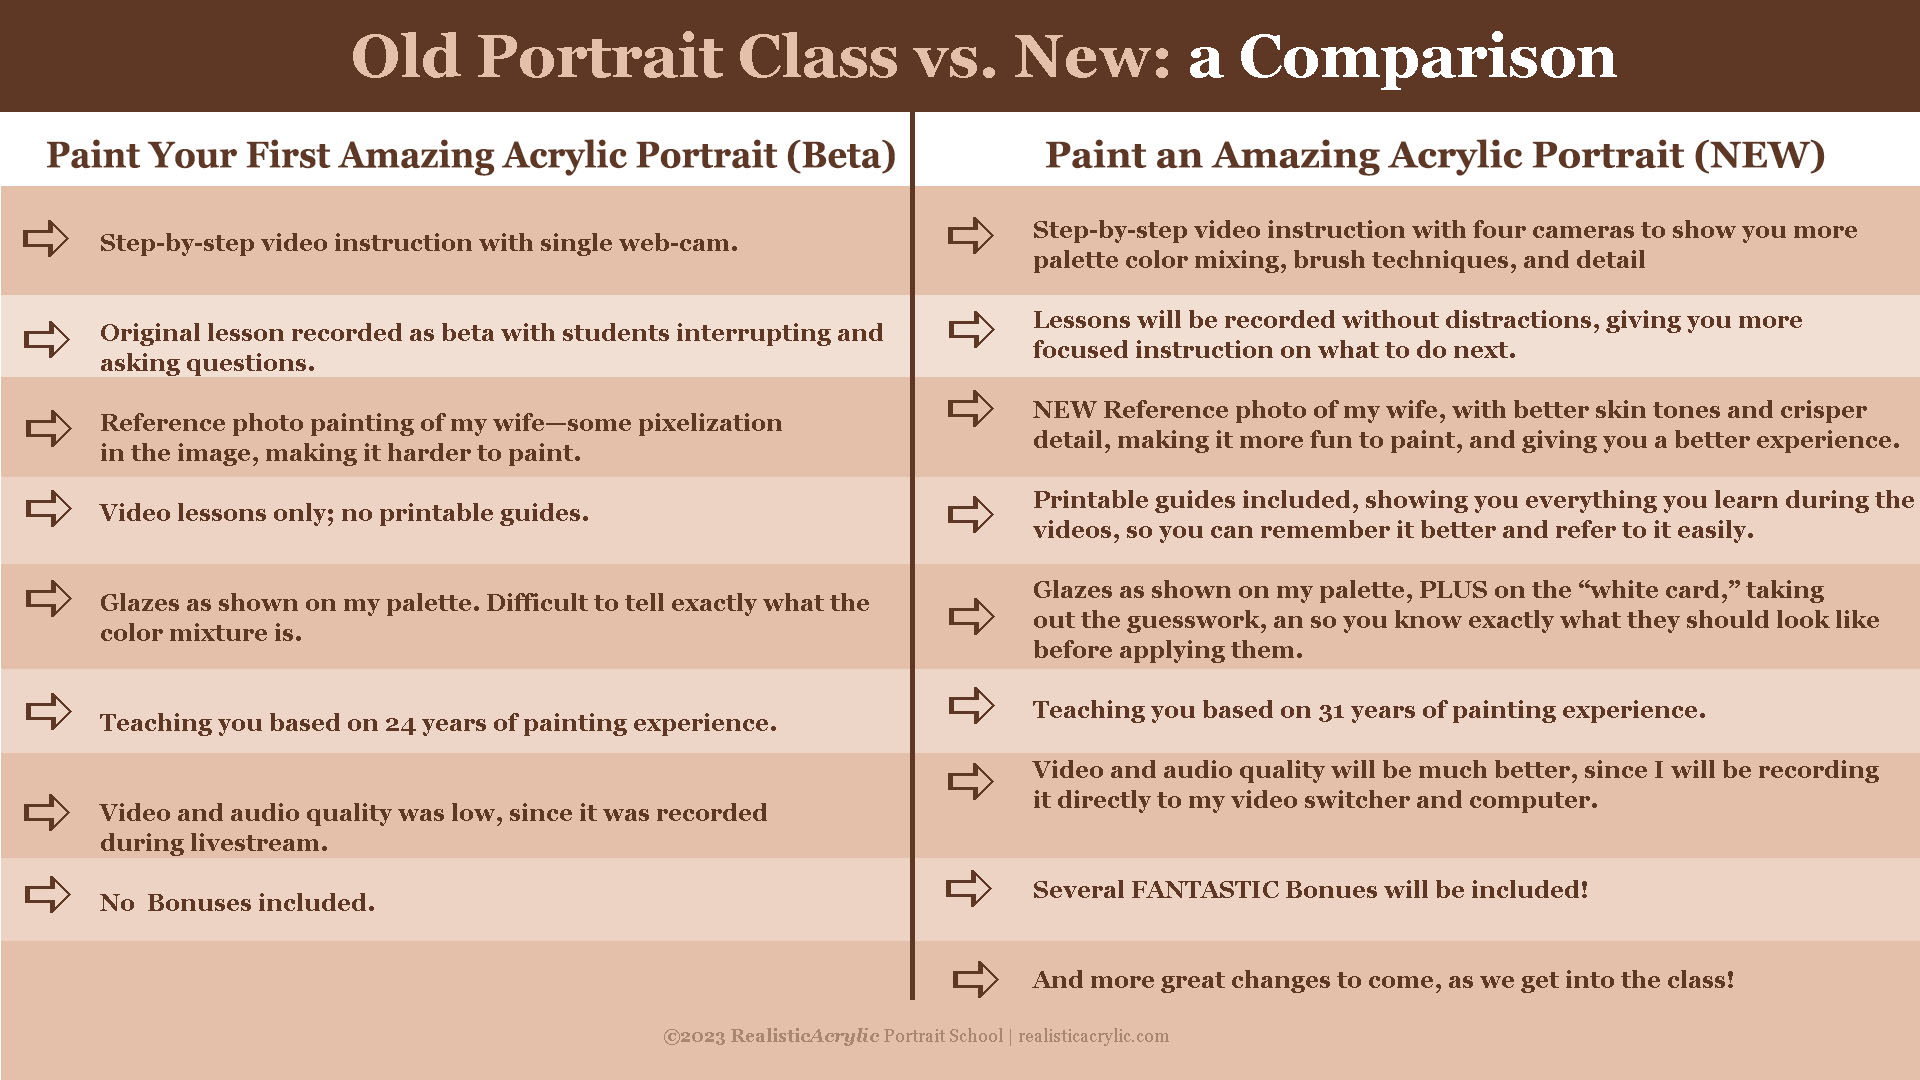
So what’s the difference between that one and the old one?
Well, the first one, “Paint Your First Amazing Acrylic Portrait,” was launched waaaay back in 2017. One of my online followers, Dorothy, asked and asked and asked me when I was going to teach a class. I had taught in-person classes for a while, but I wasn’t sure if it was possible to teach online.
Despite my uncertainty, a very eager Dorothy, who was in her 80’s, bought a webcam and I walked her through on how to set it up. Then she asked me, “IF you were to teach a class, how much would you charge?”
I researched online, and it seemed like $97 was a good price. So I told her, and she said, “I’ll mail you a check.”
So now, I HAD to do the class!
I let the people on my email list of 141 people know and 10 signed up! And that was my original class. I taught it all live. I bought an online class teaching me how to teach an online class. They said, “it’s better just to do it imperfectly than to be a perfectionist and not do it at all.”
I took that to heart and decided to take action.
From several conversations with artists, I learned what they wanted in a class, and what frustrations they were experiencing while trying to paint a portrait in acrylic. I created my lesson plan based on that.
Quickly, I suspended my webcam with some sticks and wire on the ceiling and started meeting with the students once a week, and recording the lessons.
That first class was good—for a beta class—and hundreds of students got great results from it. But I know it could be better. I’ve gotten tons of feedback. Like hundreds of comments from students to know what to improve.
So what will be the difference between the classes?
Let me show you.
As you can see, God willing, the new class will be TONS better! I am excited to offer it to you.
Tomorrow, I’ll give you more details and open it up for enrollment.
Sign up here on my email list to get the invite:
Learn How to Paint Acrylic Portraits
Blessings,
Matt
P.S. Do you have any questions about this class? Leave a comment below. I’m excited to teach you!
12 Steps to Painting Realistic Skin Tones in Your Acrylic Portrait
“What do you MOST want to learn?”
This is a question I asked the artists in my Facebook group. The #1 answer was skin tones.
So I decided to put together a 5-week live video class, showing the whole process of painting an acrylic portrait, step-by-step, concentrating on flesh tones.
Most people know me as the guy that does slow, methodical glazes. But in this series, I wanted to meet artists where they’re at and do the portrait in more of an opaque technique. We had a great response to the class, with about eighty students on board right away during the first lesson!
I decided to create a printable guide that shows what we covered during the classes, although obviously not in as much depth as you’d get out of watching 5 hours of video! I think you’ll find this guide helpful. This online tutorial is an adaptation of the guide, showing a portrait from a photo I painted of my wife. If you take the video course (now open for enrollment) it will complement it well, and give you something to keep next to your easel as you paint. It can stand on its own, too. If you put the techniques to practice, you’ll see improvement in your portrait painting, for sure.
Either way, enjoy this tutorial, and I look forward to teaching you more!
Step 1: Create a Basic Sketch
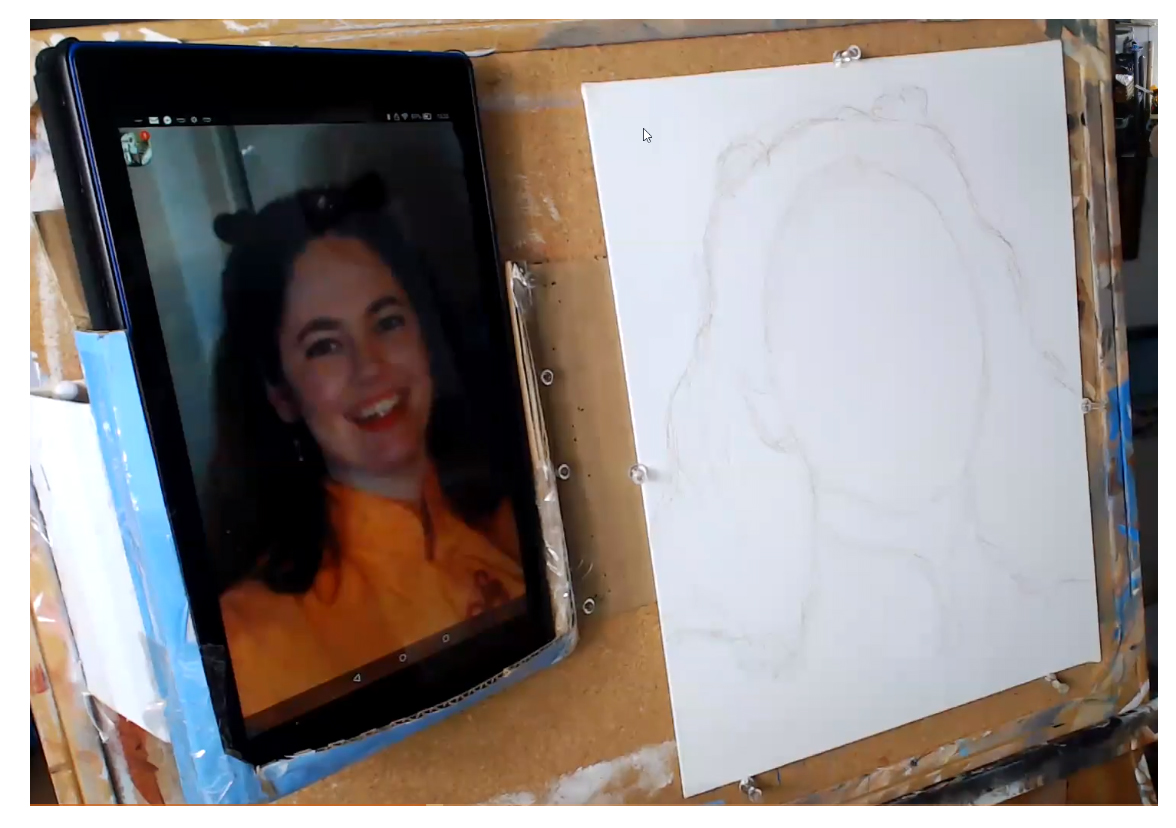
To begin your portrait, just fill in the outlines of the face. Don’t draw in the features. All you need is enough information to know where to block in the color. You can sketch it freehand if you’re comfortable with the process, or grid if necessary.
Step 2: Block in the Hair Color and Value
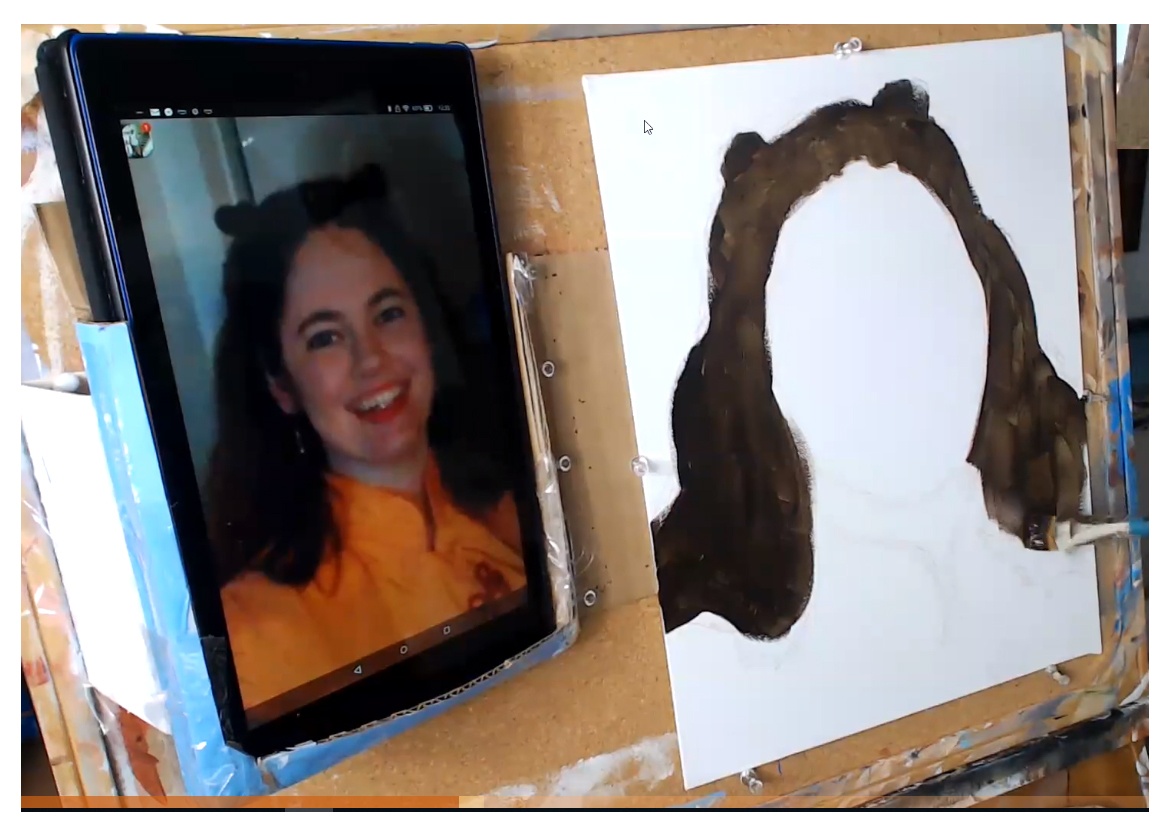
Although we are concentrating on skin tones, quickly blocking in the hair color and value frames the face. It will help us determine what colors to use for the skin tone, and make sure it is accurate. When you paint on top of plain white, you will think your skin tone is too dark, when in reality it’s not. We look for the predominant color in the hair. In this example, I’m using raw umber dark, and applying with a 3/4” -1” flat brush.
Step 3: Fill in the Skin Tone Base
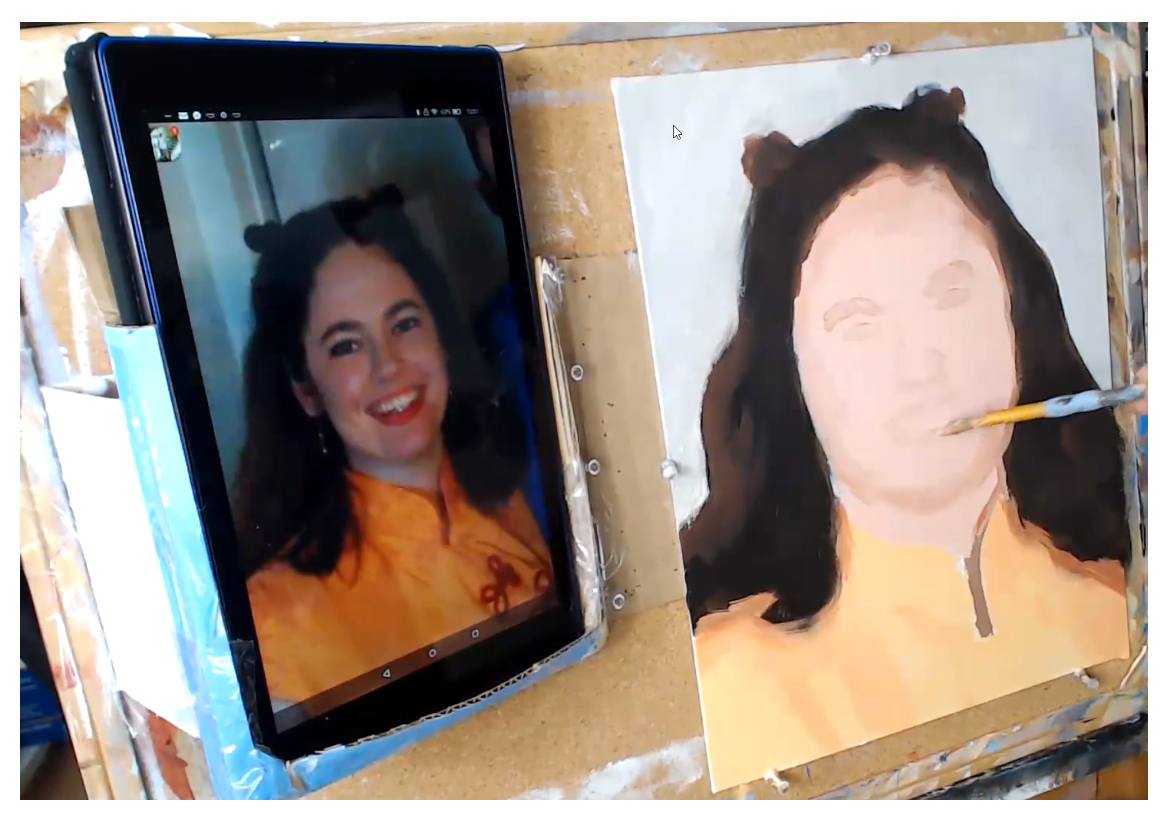
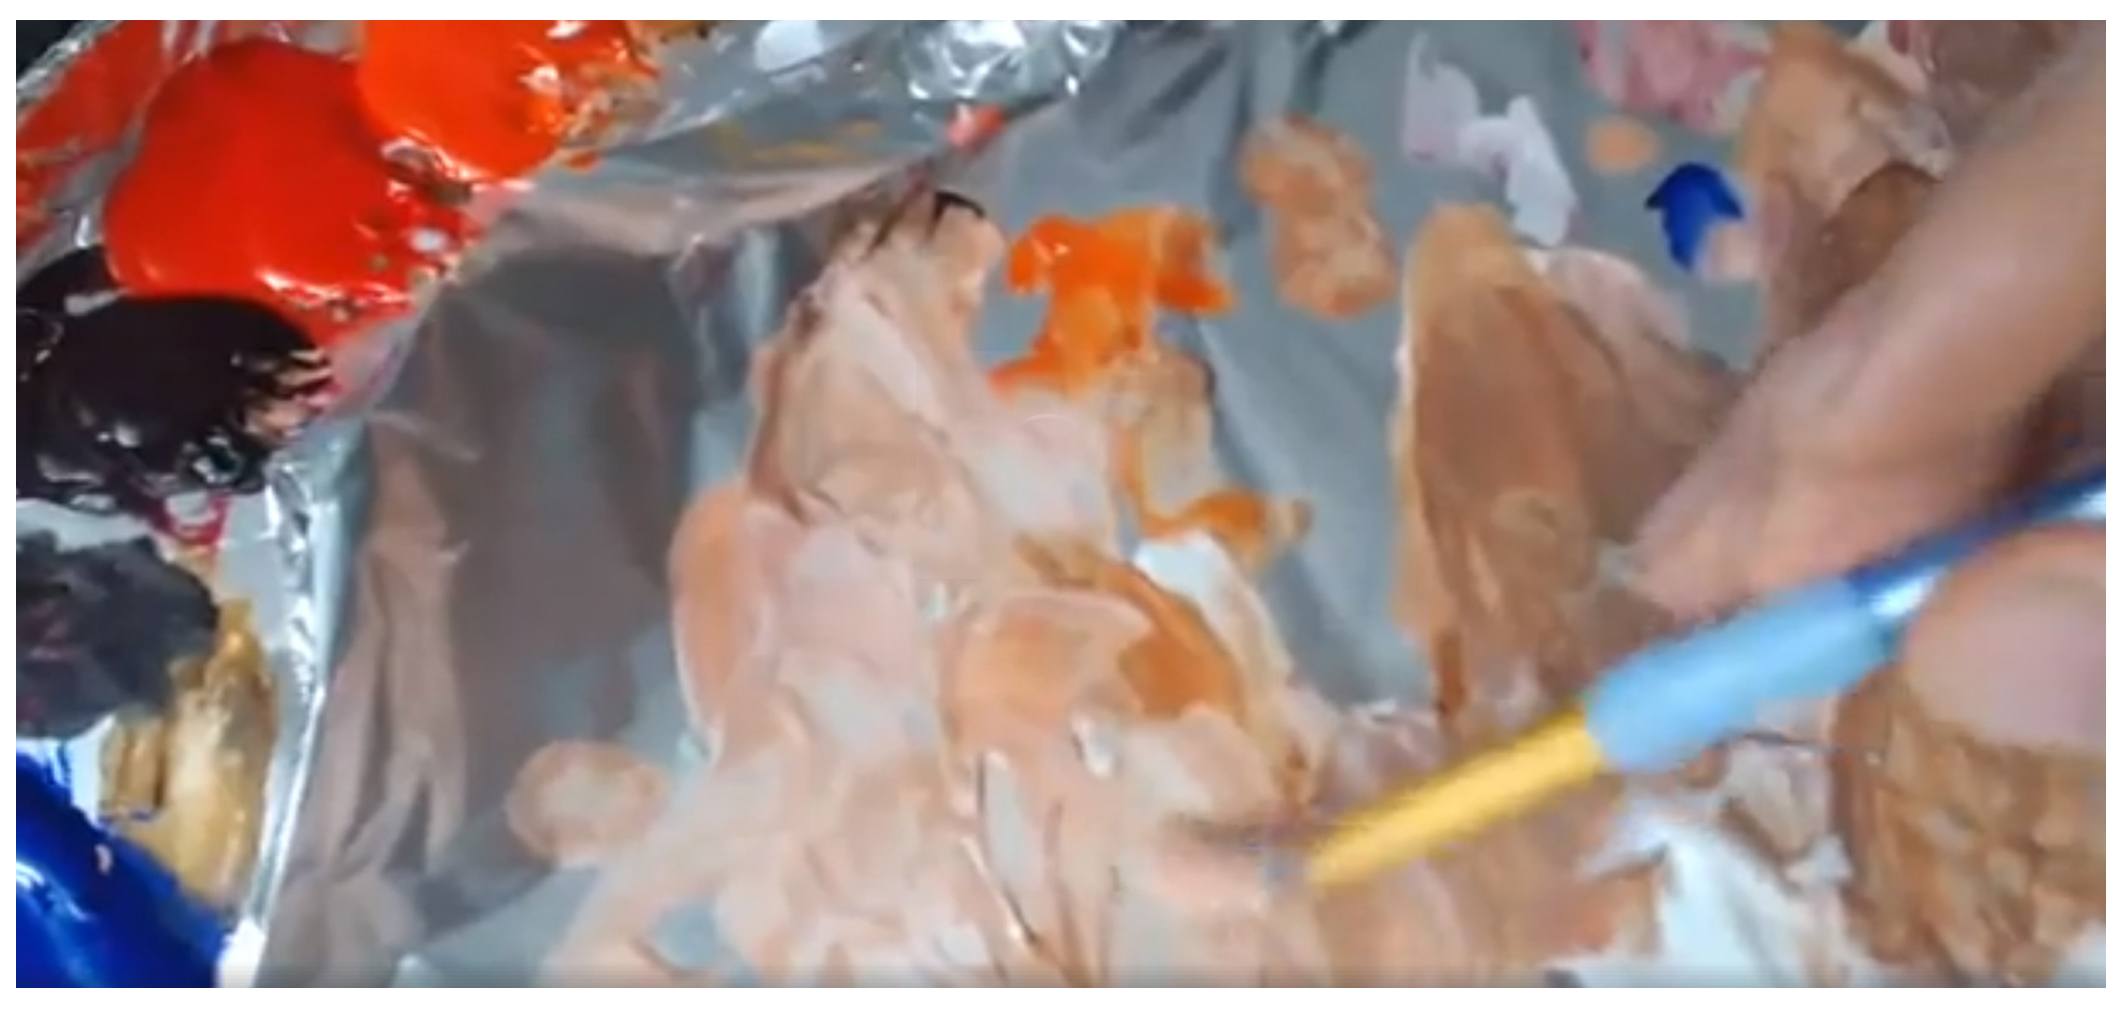
In this step, I’m using a mixture of titanium white, burnt sienna, and organic red orange for the first, foundational skin tone layer. Make the paint as fluid as you can, by adding a little matte medium (10%) and brush quickly, just filling the whole area in.
Print off Your Own Guide to Paint Realistic Skin Tones in Acrylic
I created a handy reference guide that covers all the steps in this article in a 7 page PDF. You can download it right now, print it, and set it next to your easel, so you know exactly what colors, what techniques and what steps to take when you paint skin tones on your portrait. Download it below…
Download and Print the Skin Tones Guide
Step 4: Suggest the Features
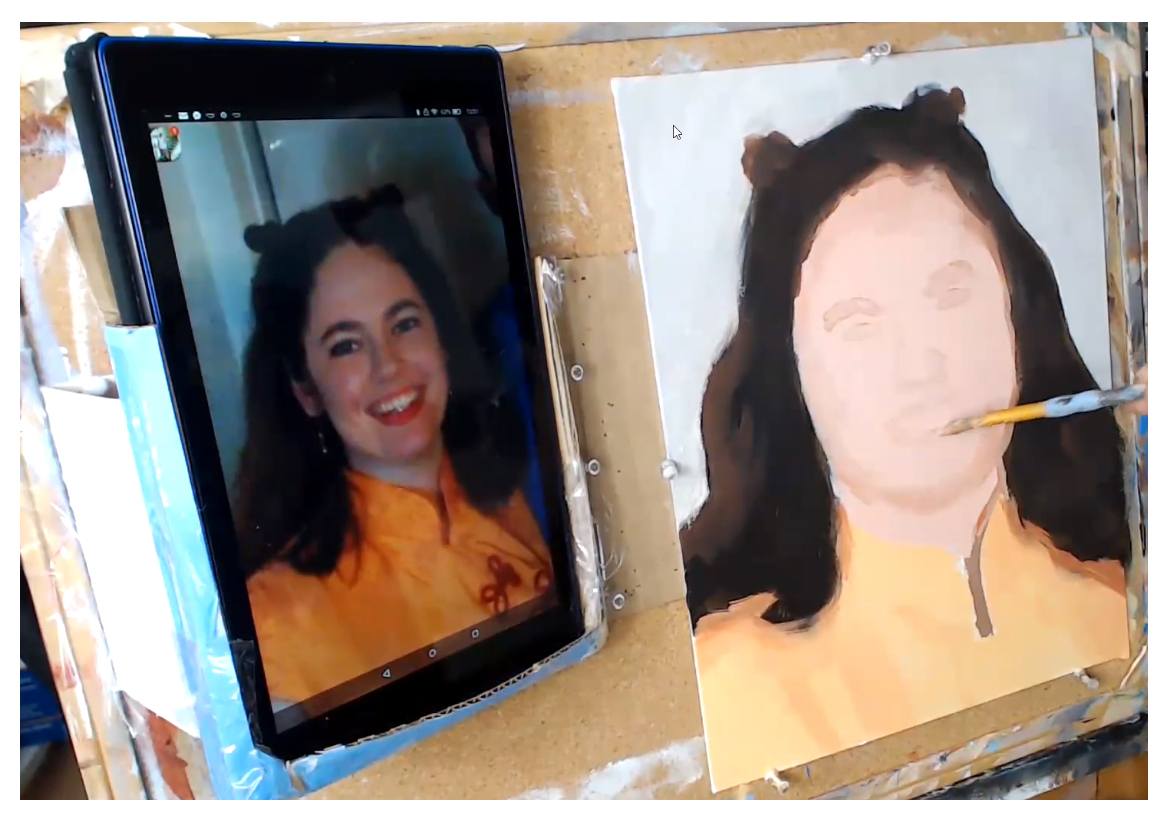
Now it’s time to get the fun part: actually painting in the facial features–the eyes, nose and mouth. But we don’t want to paint them too dark right away. Lightly “suggest” them in using a mixture of the skin tone base from the previous layer and burnt sienna. Painting the features this way at first will allow you to adjust them if necessary.
Step 5: Darken and Refine the Features
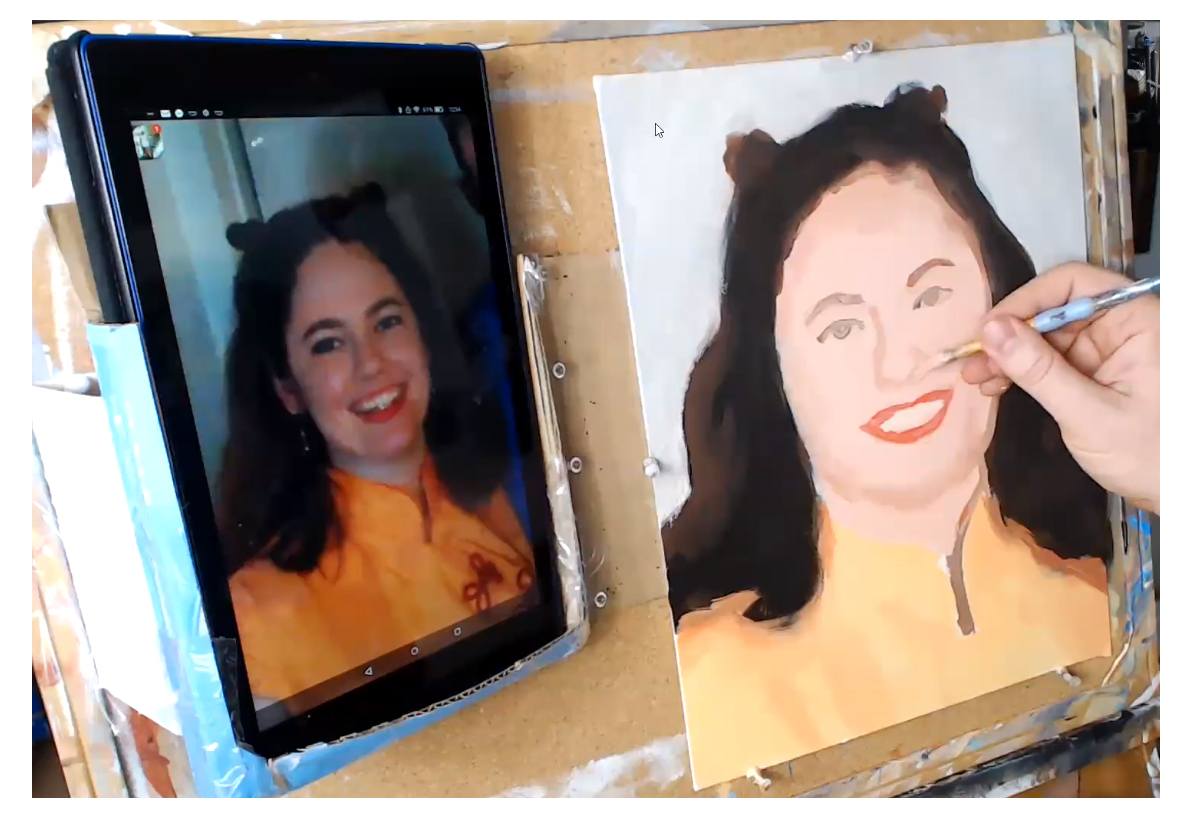
After the facial features dry, you can go over them with a darker color. Just add a little more burnt sienna for the eyebrows and nose. For the eyes, a bit of raw umber will cool down the color enough so that if the eyes are a different color than brown, you can easily adjust it. We’re not trying to dial in the exact eye color; rather, we’re just trying to ger the main shape and value established. For the lips, in this case, I’m using napthol red and burnt sienna, diluted a bit by the main flesh tone color.
Step 6: Block in the Mid-tone Shadows
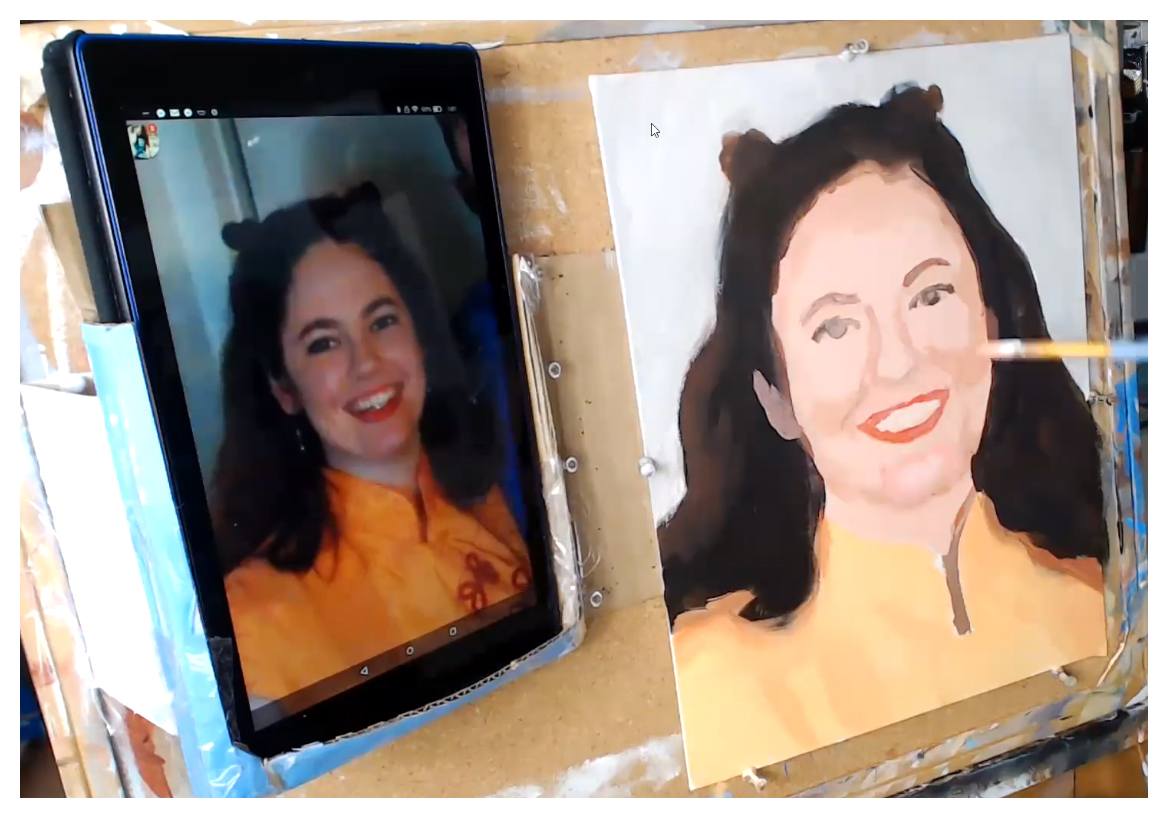
Unless we add in shadows on the face, it will look flat. That is obvious. The trick is to use the right color and value. And then to place that tone in the right places to give the illusion of three dimensionality, In my example, I use a similar color to what I used for the previous step, and lightened it up just a bit with the main skin tone color, so it’s easy to control and doesn’t get too dark.
Step 7: Refine the Eyebrows
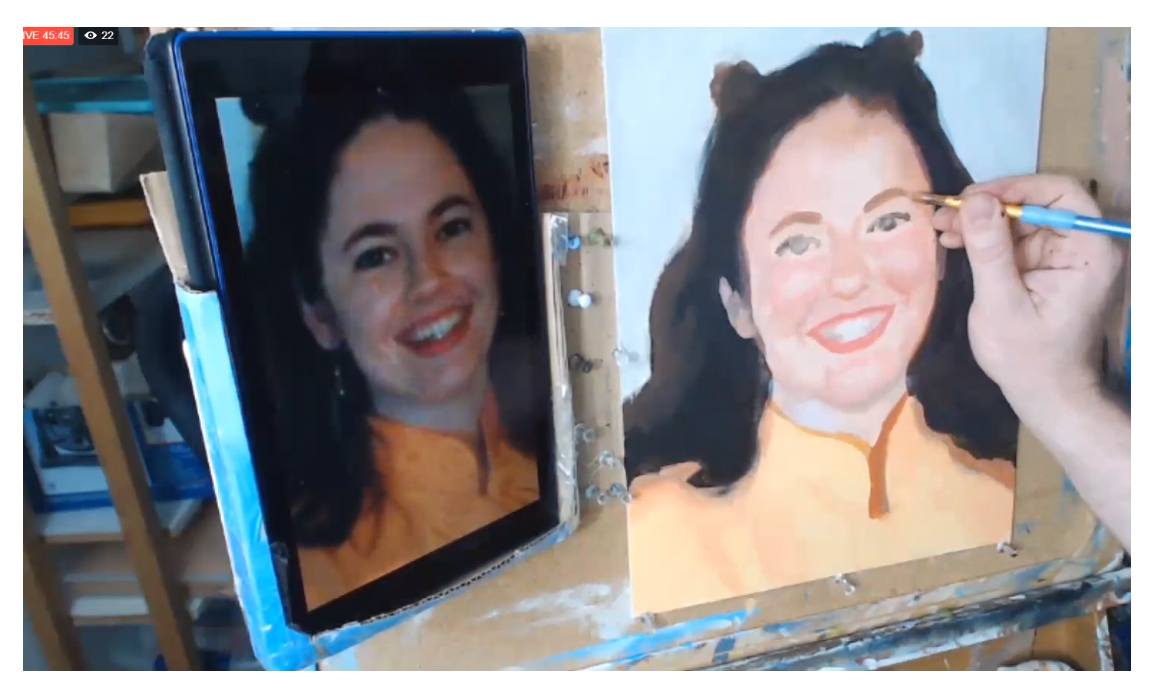
The eyebows up to this point look too thin. So what I’m doing here is creating a mixture of raw umber dark, alizarine crimson, raw sienna, and a touch of burnt sienna. Then, I carefully go over the eyebrow areas, and also thicken them up a bit too. You have to think of the eyebrows not just as hairs but also the shadow under the eye socket. What we’re doing is actually painting the base tone for the eyebrows. Then we go over with a darker color to suggest the hairs.
Tired of Muddy Colors?
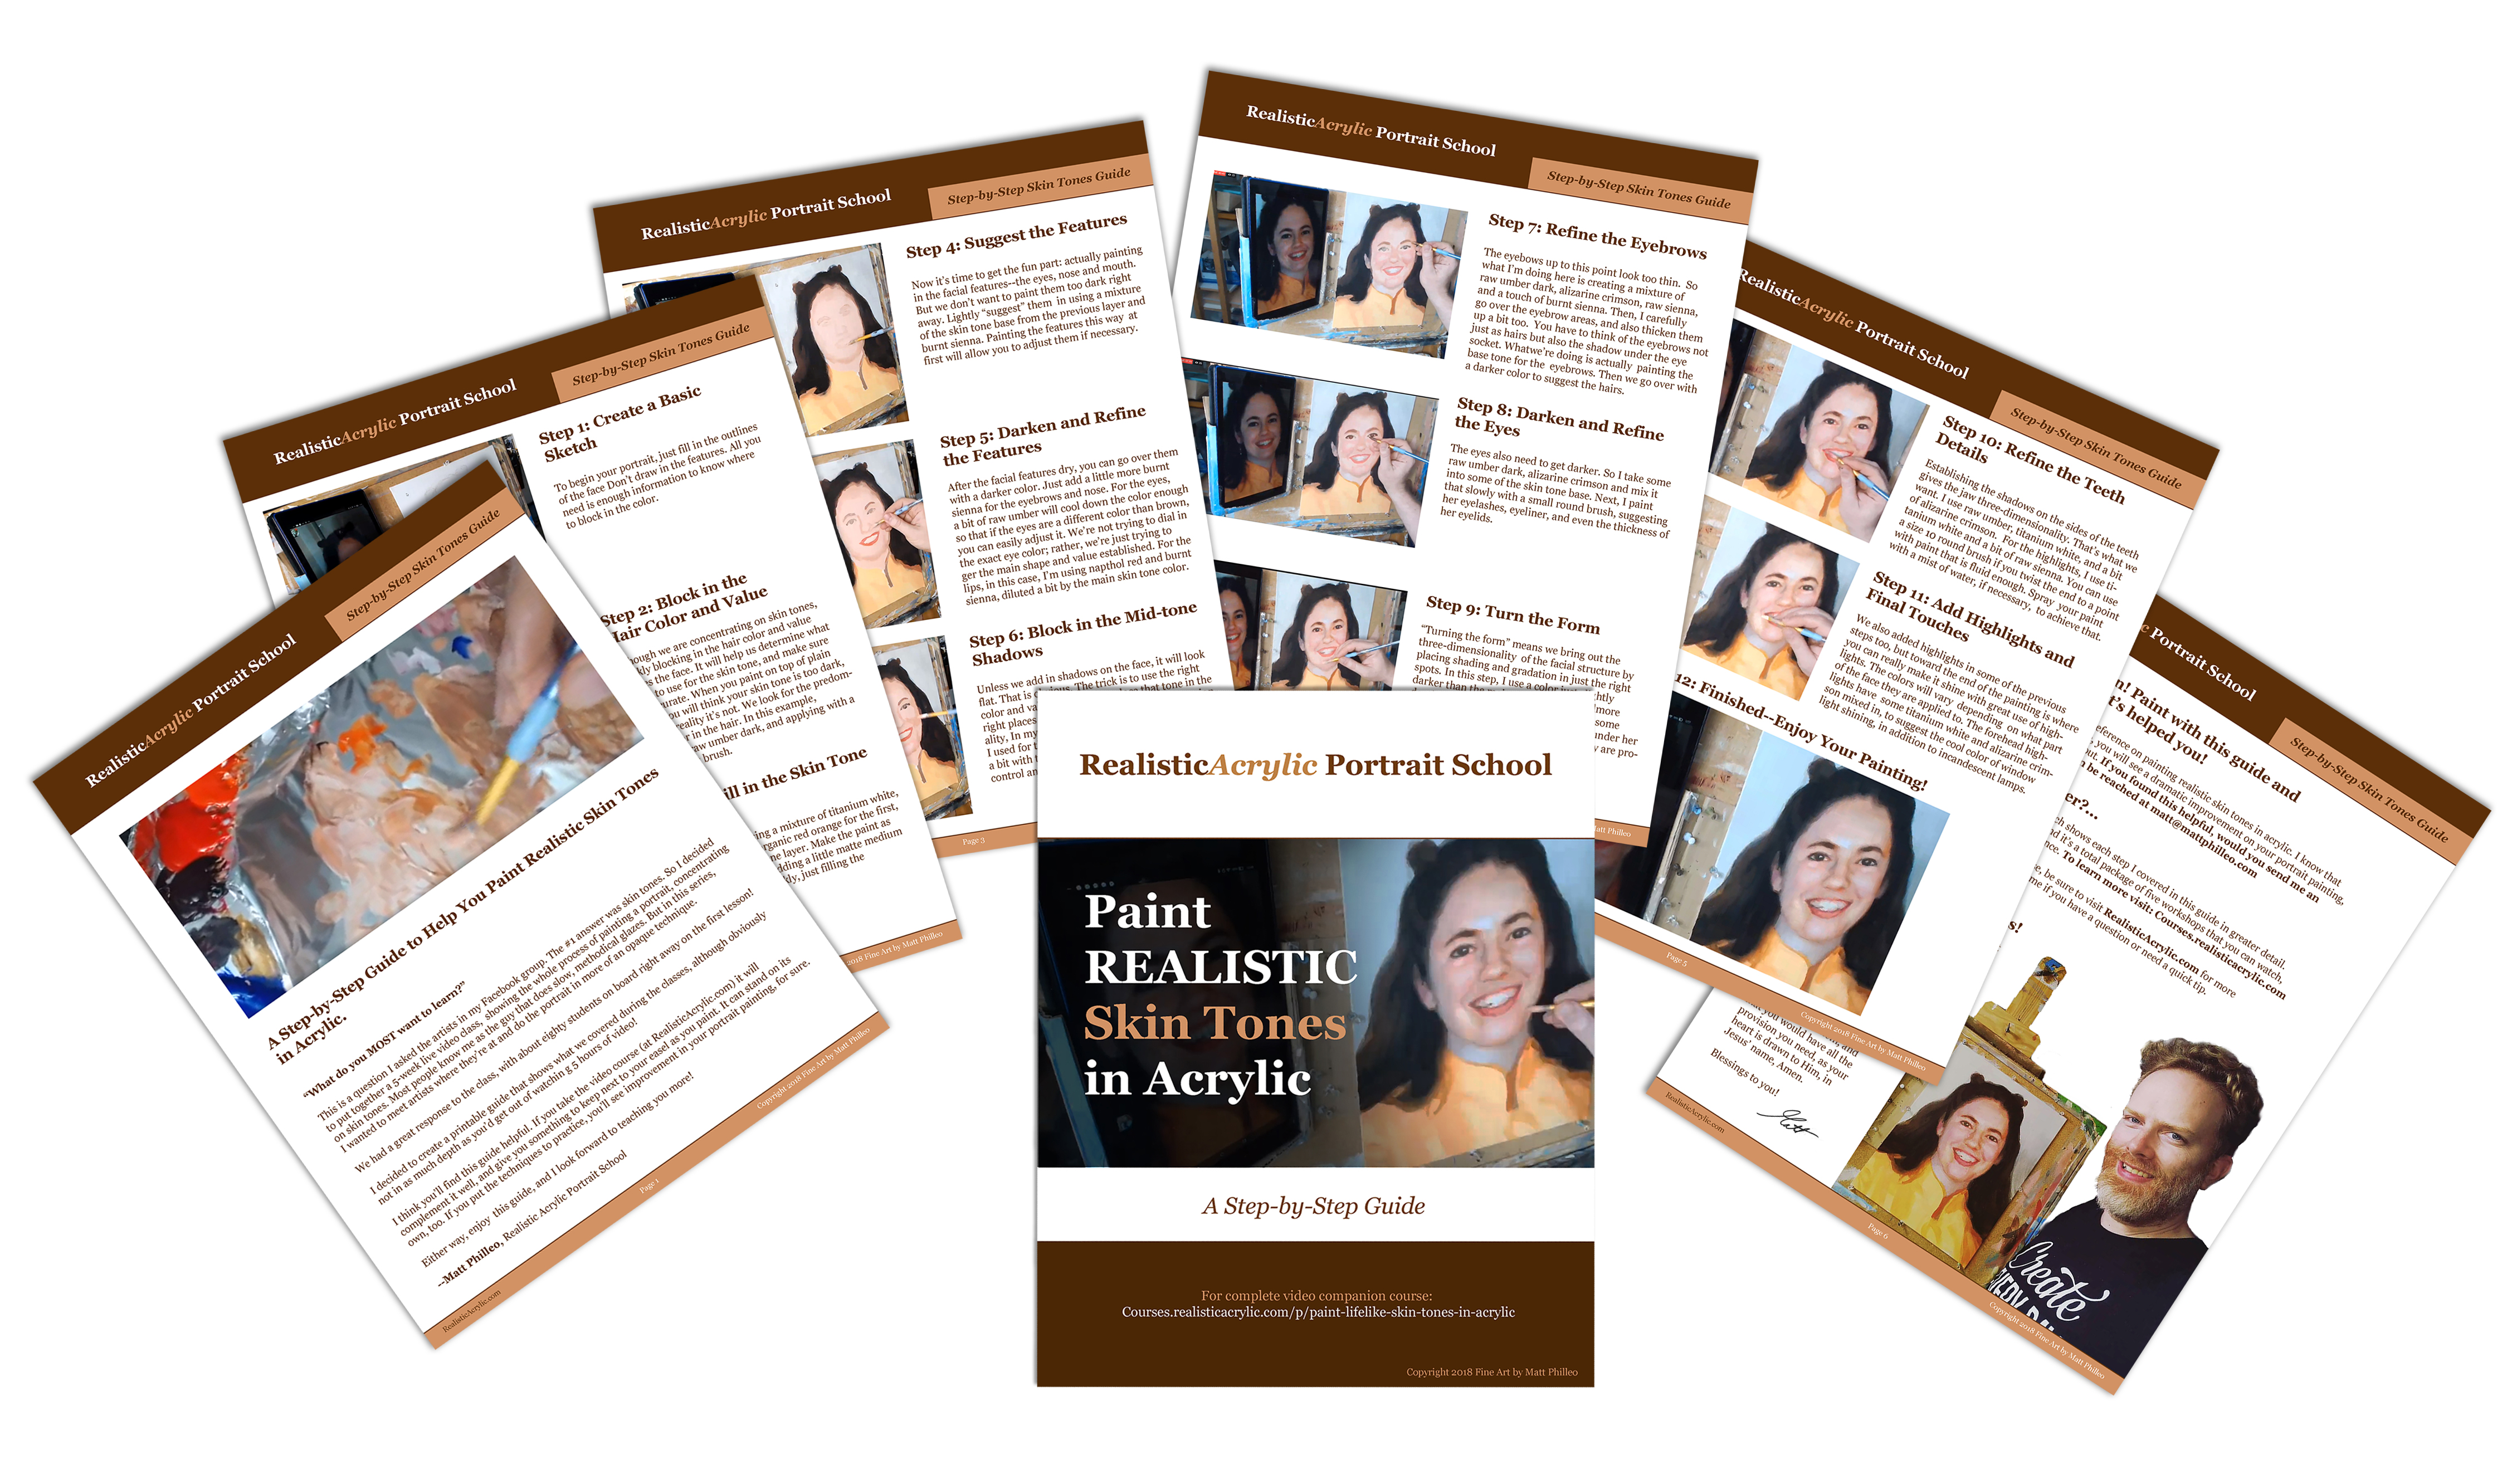
Get my complete guide on painting skin tones, for free, and start mixing and blending realistic skin tones right away…
Download and Print the Skin Tones Guide
Step 8: Darken and Refine the Eyes
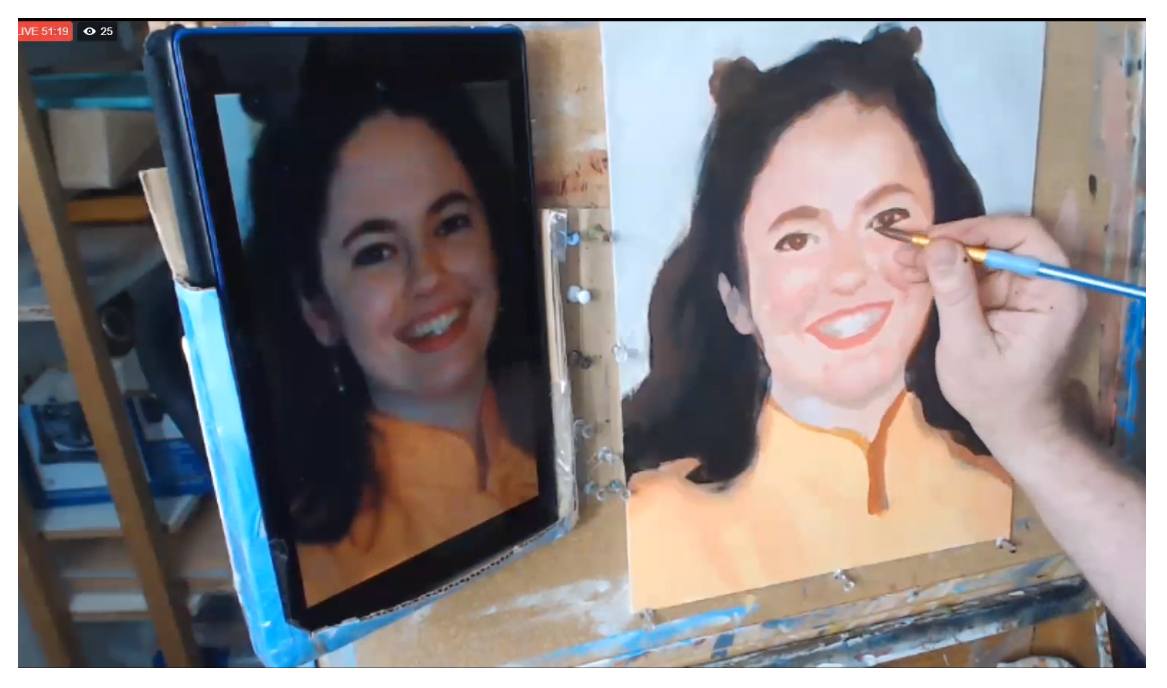
The eyes also need to get darker. So I take some raw umber dark, alizarine crimson and mix it into some of the skin tone base. Next, I paint that slowly with a small round brush, suggesting her eyelashes, eyeliner, and even the thickness of her eyelids.
Step 9: Turn the Form
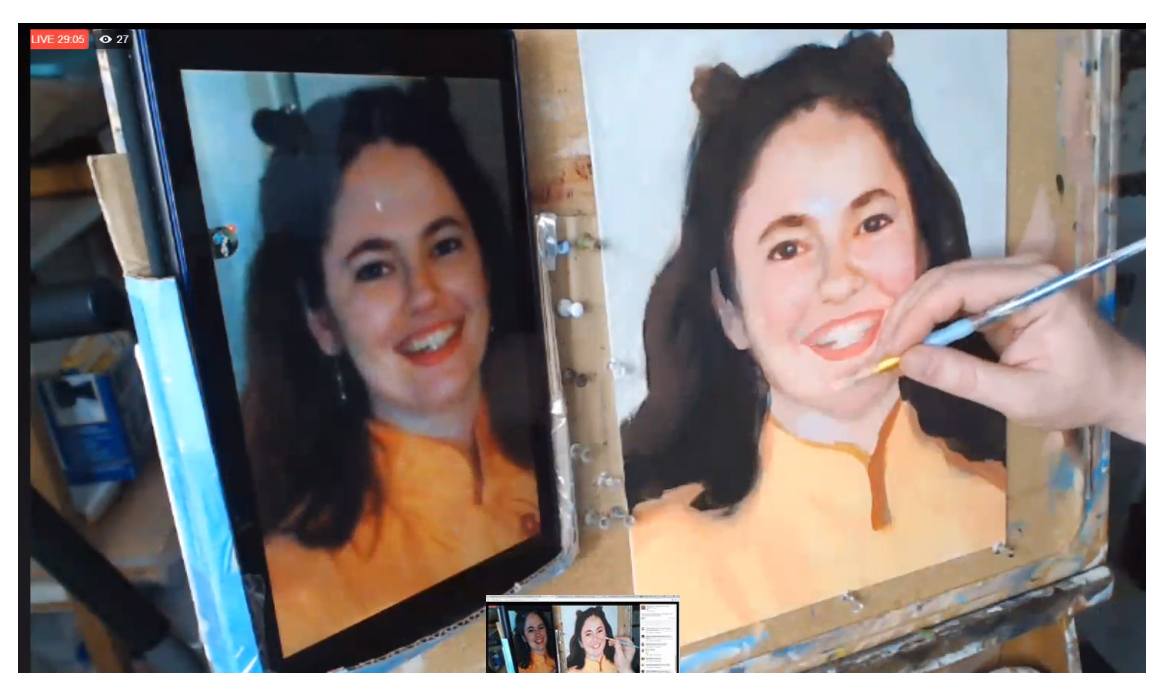
“Turning the form” means we bring out the three-dimensionality of the facial structure by placing shading and gradation in just the right spots. In this step, I use a color just slightly darker than the main skin tone and add more depth to her chin. In addition, I deepen some of the shadows alongside her nose, and under her eyes, to make the cheeks appear as if they are projecting forward in space a little bit.
Step 10: Refine the Teeth Details
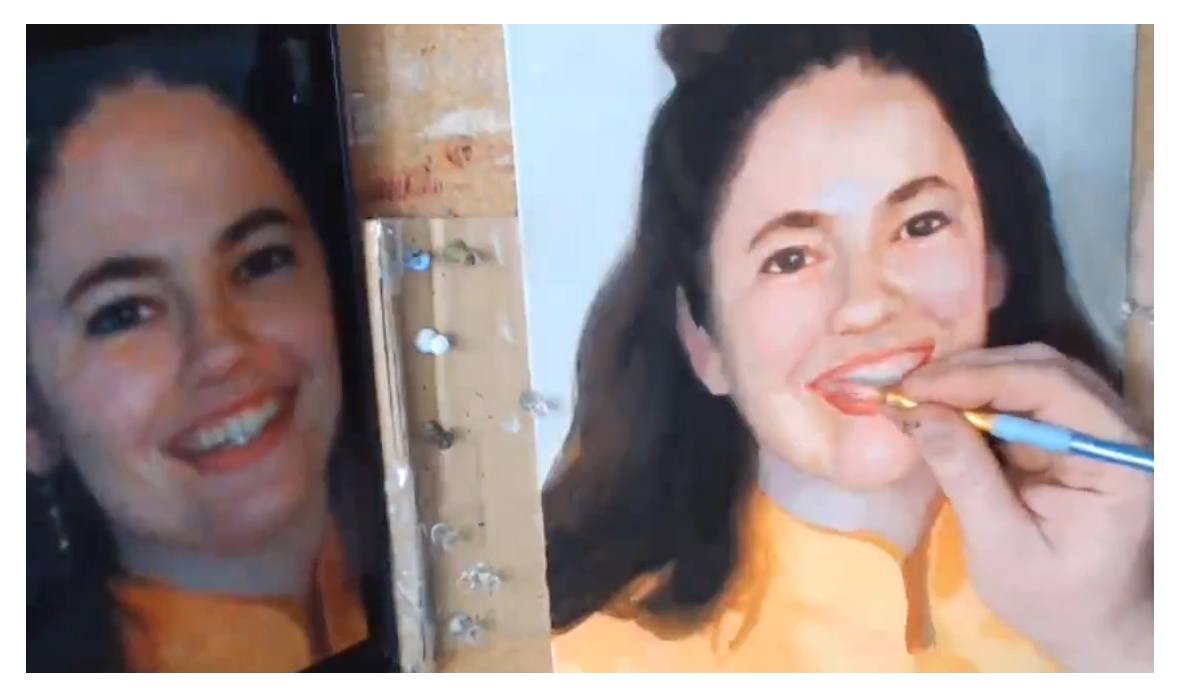
Establishing the shadows on the sides of the teeth gives the jaw three-dimensionality. That’s what we want. I use raw umber, titanium white, and a bit of alizarine crimson. For the highlights, I use titanium white and a bit of raw sienna. You can use a size 10 round brush if you twist the end to a point with paint that is fluid enough. Spray your paint with a mist of water, if necessary, to achieve that.
Step 11: Add Highlights and Final Touches
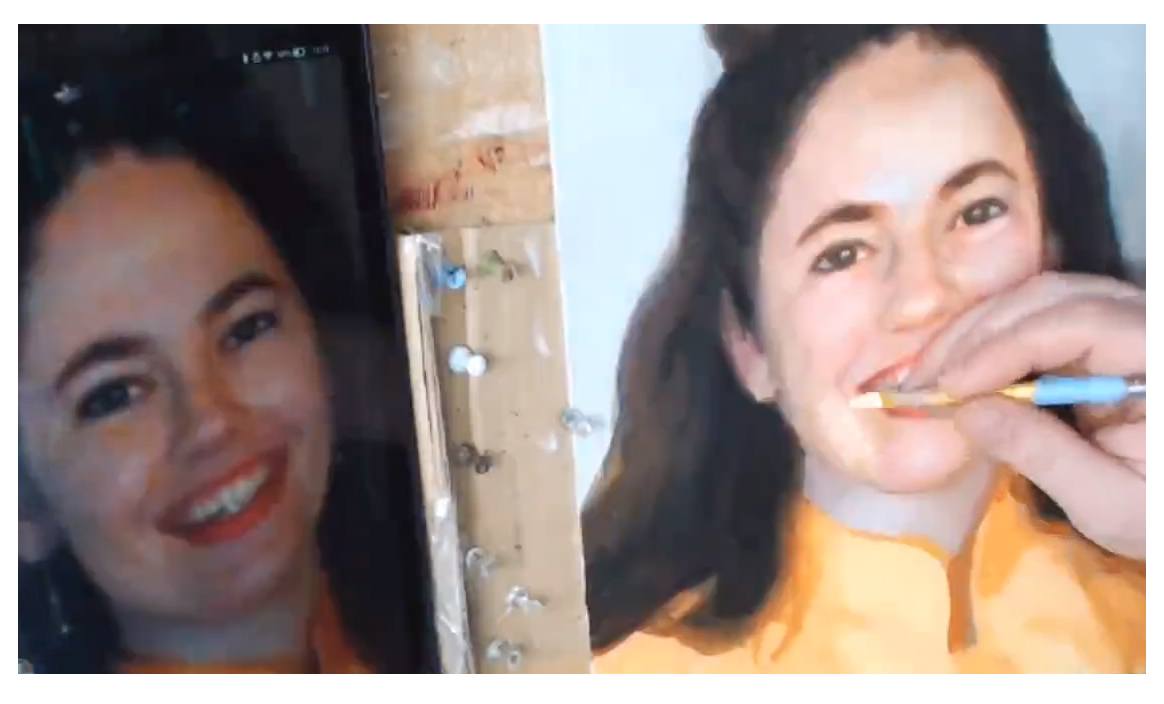
We also added highlights in some of the previous steps too, but toward the end of the painting is where you can really make it shine with great use of high- lights. The colors will vary depending on what part of the face they are applied to. The forehead high- lights have some titanium white and alizarine crimson mixed in, to suggest the cool color of window light shining, in addition to incandescent lamps.
Step 12: Finished–Enjoy Your Painting!
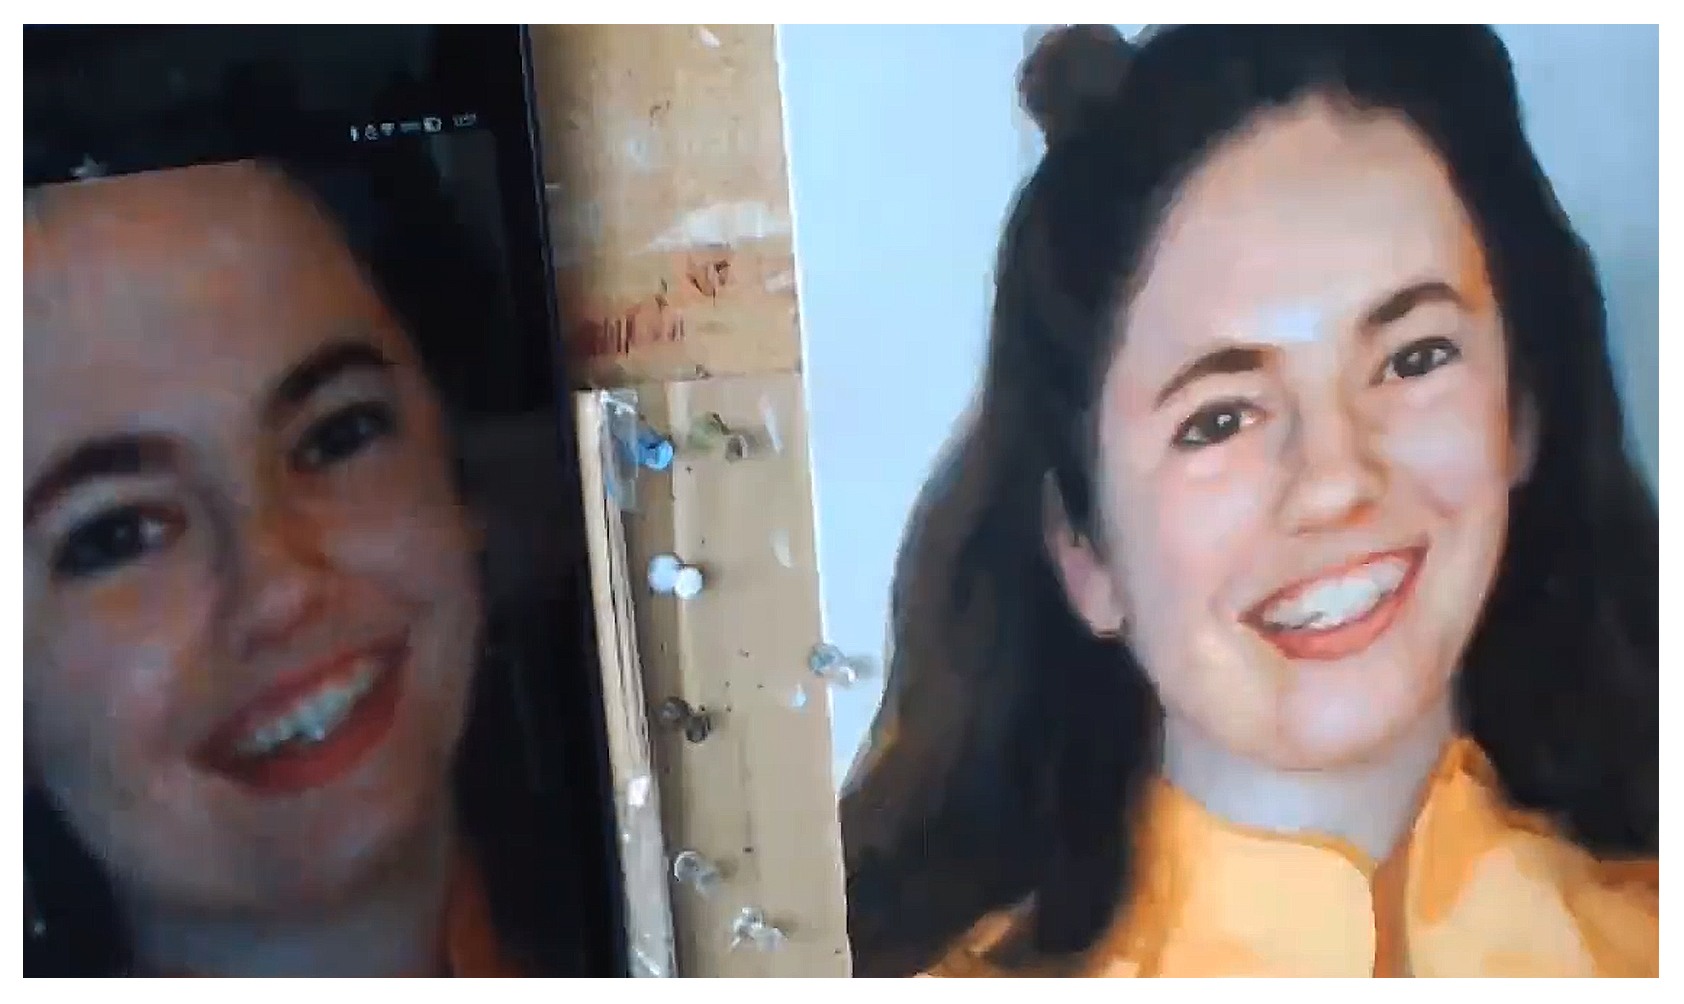
Now, it’s your turn! Paint with this guide and let me know how it’s helped you!
I enjoyed creating this helpful reference on painting realistic skin tones in acrylic. I know that if you put the steps into practice, you will see a dramatic improvement on your portrait painting, especially if you’re just starting out. If you found this helpful, would you send me an email and let me know? I can be reached at [email protected].
Make you print off the skin tones guide so you can paint a lifelike portrait you can be proud to show. Click the button below to download it.
Download and Print the Skin Tones Guide
Can I help you further?…
I have a video course available which shows each step I covered in this guide in greater detail. The course is about 5 hours long, and it’s a total package of five workshops that you can watch, step-by-step, at your own convenience. To learn more visit: Courses.realisticacrylic.com Even if you aren’t able take the course, be sure to get the free printable reference guide on painting skin tones in acrylic. Email me if you have a question or need a quick tip. I’ll be happy to help.

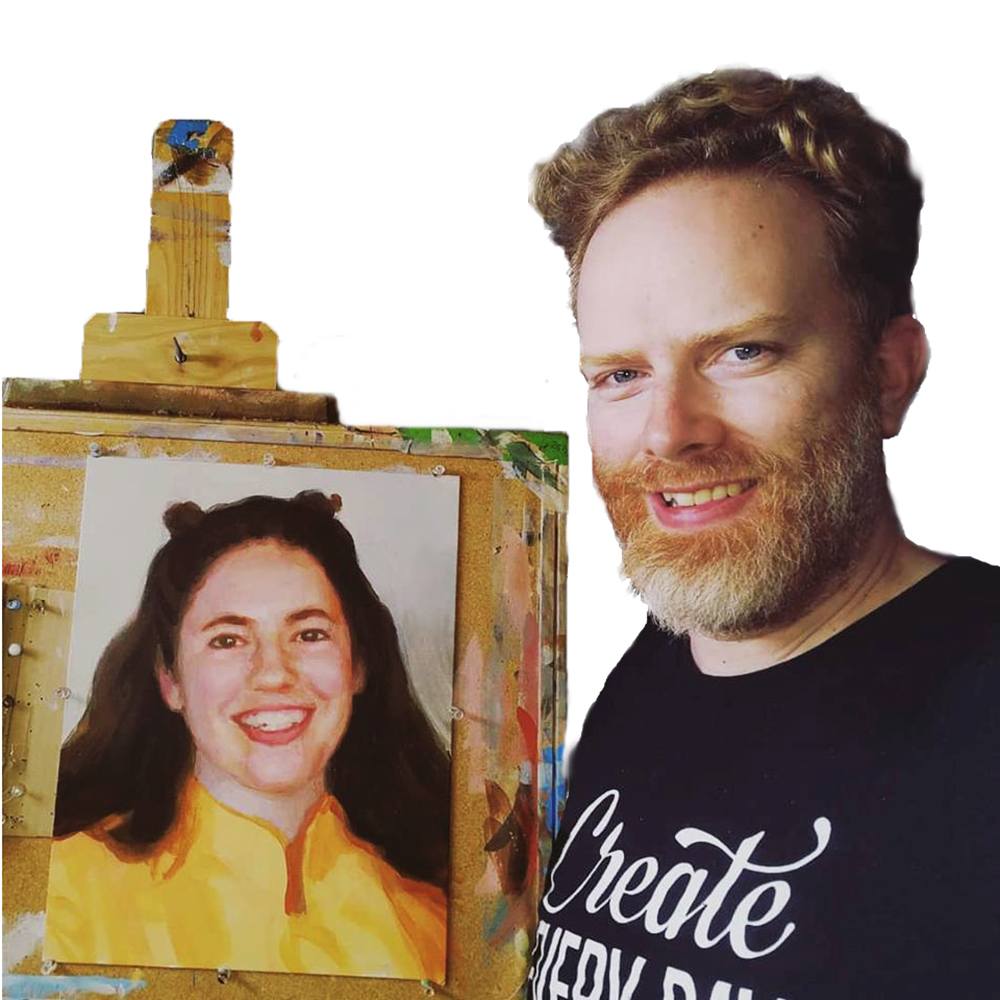
Acrylic portrait artist Matt Philleo posing next to a painting of his wife, painted for the Paint Realistic Skin Tones in Acrylic online class, teaching you how to paint with step-by-step lessons.
Share with your friends!
Let your fellow artists know about Realistic Acrylic Portrait School. My desire is to help artists learn how to paint an acrylic portrait they can be proud of. As I do for all my students, I pray that God would bless you with His peace in your painting process, direct your brush-strokes, that your paintings would encourage those who seem them, and that you would have all the provision you need, as your heart is drawn to Him, in Jesus’ name, Amen.
Blessings to you!

P.S. Did you find this post helpful or encouraging? If so, send it on ahead! Let others know with the share buttons below. I’d love to hear your comments. Thank you so much! Also, do you have a question on acrylic portrait painting you’d like answered? Let me know, and I’d be happy to help!

My New Course–“Paint Realistic Wrinkles in Acrylic”
Everyone has at least a few wrinkles.
And so as portrait artists, we need to learn how to paint them–whether we’re painting someone old or young. Painting wrinkles well can really help to capture a person’s likeness in a portrait. They can add so much to the personality.
But it’s not easy. There’s so much to it: the shape, the coloring of the shadows, the highlights, and the blending. How do you do it, without it looking fake?
Do You Struggle To…
- paint wrinkles that look like they are actually wrinkles?
- paint the creases from nose to mouth convincingly, to make it look the person is really smiling?
- show the expression and personality of the person by painting the wrinkles in the forehead correctly?
- paint the different nuances in light and shade, the shadows on the wrinkles and how to make them look natural?
- choose, mix and blend the colors to create realistic shadows and skin tone?
- accentuate the wrinkles without making them too prominent?
- create smooth gradients on your wrinkles, with correct shadows and highlights blending together, cohesively?
- see the correct shape of the wrinkles from your reference photo and accurately represent that on your canvas?
- capture the likeness of the person you’re painting by painting wrinkles realistically?
If you’re an an acrylic portrait painter who struggles with painting wrinkles, then I’d love to help you get better at it.
Introducing My New Course…
“Paint Realistic Wrinkles in Acrylic”
Why did I decide to do a course on painting wrinkles?
I’ve been painting portraits in acrylic for nearly 25 years and teaching classes for the last two. During that time, I’ve taught over 100 students how to paint an acrylic portrait, step-by-step. That course covers a lot of material and it’s been wonderful to see students take it and get noticeably better at their portrait painting.
But one of my students was really struggling with how to paint wrinkles. So I thought, “Why not teach an online class on it?” After getting feedback from my other students, I realized there are other artists who struggle with this as well.
And so, now I’m excited to teach you, too, how to paint wrinkles realistically!
What will we cover in the course?
- Why painting wrinkles well is important and how it can make your paintings better
- The 5 different kinds of wrinkles in the face and how to see them accurately, so you can paint them accurately
- How to sketch wrinkles accurately, and do the “heavy lifting” here so the painting part is way easier.
- Choosing the right colors, mixing and blending so they don’t get muddy.
- Achieving accurate values for both the colors and highlights so the wrinkles actually have depth to them
- Finishing up with a gentle touch, painting smooth gradients, resulting in a portrait that just begs to be looked at
- And more!
Here’s How We’ll Do it
> This is a brand new course, so I will teach a lesson every week, recorded in my studio on Tuesday and released Wednesday morning for the next four weeks. I will upload them to this site, and you will get instant access as soon as they are up. The lessons will start June 6th.
> Each lesson will be about an hour long, and broken up into smaller segments so you can easily watch them and come back to them when you like.
> I’ll respond to your feedback and questions, making sure I’m teaching exactly what you need to succeed.
> You will have lifetime access to these videos on this site (as long as technology holds out) and can watch them at your own pace 24/7.
Enroll Today!
Personal Critiques to Help You When You Feel Stuck
If you need extra help, I’d be happy to record a personal video just for you and critique your work. I’ll point out any areas that could be corrected or refined. I’ll show you exactly with my Crystal Clear Critique method of drawing on top of your reference photo and your portrait in progress, while explaining how to improve an area you’re struggling with. You’ll know exactly what to do to get your sketch or painting back on track.
Getting a Critique is Easy & Effective:
Step 1: In the critique, you email me ([email protected]) a photo of your work in progress, and the reference photo(s) you’re working with, along with your comments on what you’d like addressed or any frustrations you have.
Step 2: I’ll set your portrait up on my video screen and set up the recording.
Step 3: Then I compare and contrast your painting with the reference photo, literally showing you gently (but clearly) what’s working and what could use improvement. This is all on a private, personalized video, not in a group setting. So you never have to feel awkward as if anyone else is judging your work!
Step 4: I send the recorded video back to you (usually within 24 hours or less), where you can access it online via a personalized link, just for you. The critique will typically be about 15 minutes long.
Step 5: You take whatever suggestions you like from my critique, and incorporate them into the painting. Your painting looks great. You feel great about it. You finish the sign the painting and hang it up, send it to the client, or give it to that loved one!
Will it Work?
You might be thinking, “Matt, I know you can teach this stuff, but will this course work for me?” I want to ensure you that it will: if you watch the lessons, put them into practice, and ask me any questions if you aren’t sure about something.
I can’t promise you’ll paint a portrait like Rembrandt. That’s just not a realistic goal starting out. But I can guarantee that your portraits, and more specifically, your ability to paint wrinkles WILL improve as a result of taking this course.
Here’s just a small sampling of comments I receive from my students. It makes my day!
“Wow! This class is one of the most amazing classes I have ever attended. I really felt like I was present in the classroom. You have taught each and every important part of gridding so well. And your lively talks kept us all smiling all the time. Thanks a lot for the excellent advices.”
–Aastha Thakur
“Just a quick thank you for your help. I had written down the colors that you used for your glazing technique on portraits and I can’t believe how much easier it is for me now. I have been dreading this portrait that I volunteered for since last year… I was using too opaque of colors and it caused me to be nervous to lay down any paint in fear that I would make a mistake. The glazing technique is more forgiving and it was like it flowed off my paintbrush. I’ve had blending gel but never really used it so now I’m going to buy stock in it. LOL. I can say that this portrait I’ve done is my best and I have an emotional bond with it because of the circumstances.”
–Keri Sparenga
–Kelly Dywer
Enroll Today!
I feel so blessed that I can paint and teach portrait painting for a living, and to hear back from my students is extra special to me. These are the kinds of results that most of my students are experiencing, not just a select few. Now, just in case you’re still wanting a little extra assurance, I get you. I want to take away all your risk by promising you a bold satisfaction guarantee…
My Win-Win 30-Day Satisfaction Guarantee
Try the course for 30 days. Get some quick wins by trying out a few of the techniques. And if for some reason, you don’t see either the value of what I’m teaching or don’t feel like you’re getting the results you wanted, just email me and let me know. I will gladly refund your entire enrollment fee back, no questions asked.
However…
I only ask one thing: that you watch the lessons. Why? Because I know if you do, and utilize the techniques I teach you, they will work. If you are patient with yourself and consistently practice what you learn, you will see improvement.
Here’s how it will be a win for both of us: If you go through the course, and put the techniques to use, you’ll be able to paint a realistic portrait you can be proud of. And it will be a win for me, because I’ll be happy to see the amazing paintings you create. I’ll let other potential students know they can do it too–which will most likely increase enrollments in the class.
I will do everything I can to help you learn how to paint realistic wrinkles in acrylic. That’s my promise to you.
Imagine what it would feel like to finally paint a portrait that looks real…
…and looks like the person.
A portrait you can be proud to hang on your wall or give as a high quality, unique gift.
Enroll Today!
Let me know if you have any questions, and I look forward to teaching you within the course!
All the best,
P.S. Because of different time zones and schedules of potential students all over the world, we will not be doing live classes. But you will get immediate access to the lessons, after I upload them weekly on Wednesdays, starting June 6.
Enroll today. See you inside the course!
Enroll Today!
