Archive Monthly Archives: November 2018

How To Do Layers With the Glazing Technique?
Unlocking the secrets to depth and color in acrylic painting
Acrylic painting offers artists a versatile medium, allowing for various techniques to create depth, shading, and vibrant colors. Among these techniques, the glazing method stands out for its ability to build up layers of color, enhancing the painting’s visual complexity. In this blog post, we will delve into how to do layers with the glazing technique, exploring color selection, layering strategies, and tips to achieve a professional finish.
I have a student named Holly, who has just started painting portraits in acrylic. She is currently working on one of her brother, and she was unsure of how to continue after beginning the glazing process. With her permission, I’m going to share her portrait with you. We all know what it feels like to get stuck during painting, especially when starting out…
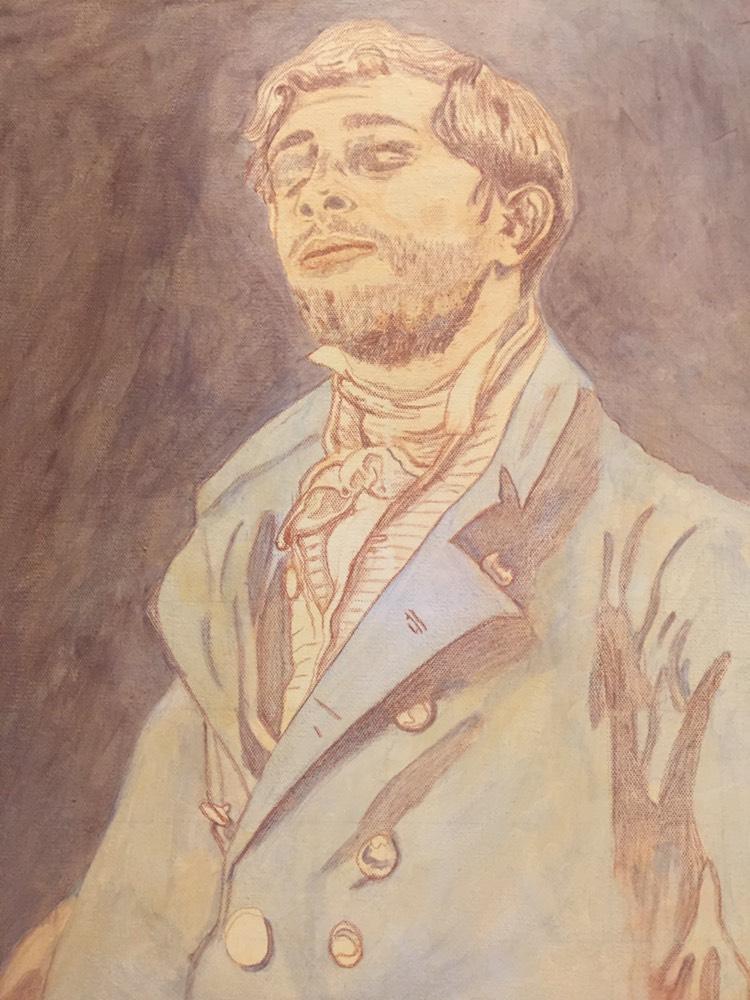
Hi Matt,Thank you for your advice and the progress photos you sent of your artwork. That really helped. I’ve watched a lot of the student videos and I’m trying to apply everything to my painting. I feel like it looks kind of terrible so far so maybe I’m not doing it right. I’m worried about painting any more shadow in on his face because it looks bad – especially his eyes. I definitely feel like I don’t know what I’m doing. Haha. I don’t know what to do about his hair or face. And the white shirt with the dark creases. And the brass jacket buttons. I’m following your list of paint colors to use for the skin tones off of your skin tone video and that is very helpful. But I just feel kind of lost as to the layering process. For instance, for the face, I don’t know how many layers of shadows I’m supposed to do before I move onto layers of midtones. And how many layers of midtones do I do before I move onto highlights? And when I’m painting the midtones, do I paint over the shadow areas as well? Or only paint on the midtone areas?Thank you so much for your help!Holly
What is Glazing?
Glazing is a technique where a thin, transparent layer of paint is applied over a dried layer of paint. This process can be repeated multiple times, gradually building up the desired color and intensity. The final appearance of the artwork results from the interplay of colors beneath the glaze, creating a sense of depth and luminosity that cannot be achieved with opaque paint alone.
Choosing Colors for Shadows, Midtones, and Highlights
One of the most critical aspects of mastering the glazing technique is selecting the right colors for different areas of your painting. This can be particularly challenging when working with shadows, midtones, and highlights.
1. Shadows
When creating shadows, it is essential to choose colors that will blend well with the underlying layers. The shadows should be darker but also retain a sense of warmth or coolness depending on the lighting in your scene. For instance, using a mixture of raw umber dark and a hint of blue can create realistic shadows, providing depth without overpowering the other colors.
2. Midtones
Midtones serve as the bridge between the shadows and highlights. It is essential to mix colors that complement both extremes. For instance, when painting skin tones, a blend of yellow ochre and a touch of red can create a balanced midtone that will seamlessly transition between the shadows and highlights.
3. Highlights
Highlights add life to your painting, drawing the viewer’s eye. To achieve this, consider using lighter versions of your base colors mixed with titanium white or a light yellow. However, ensure that these highlights are still somewhat transparent to maintain the glazing effect.
Layering Process in the Glazing Technique
Once you have selected your colors, it’s time to start layering them using the glazing technique. Here’s a step-by-step approach to help you navigate the process effectively:
Step 1: Prepare Your Canvas
Begin by preparing your canvas with a base layer of acrylic paint. This initial layer should be dry before you start glazing. It can be beneficial to work on a toned canvas, which can help unify the painting’s overall tone.
Step 2: Apply the First Glaze
Using a soft brush, apply your first glaze. This layer should be thin and transparent. A mixture of matte medium with your chosen paint can help achieve the desired transparency. Start with your shadow color, working it into the areas where you want to establish depth.
Step 3: Let It Dry
Allow your glaze to dry completely before adding additional layers. This is crucial, as working on a wet layer can disturb your previous work and muddy your colors.
Step 4: Build Up Midtones
Once the first layer is dry, repeat the glazing process with your midtone color. Apply it over the areas where you want to create form and dimension, using a clean brush to blend the edges.
Step 5: Add Highlights
After your midtones have dried, apply your highlight color using the same glazing technique. This layer should be more transparent than your midtones and should enhance the overall brightness of your painting without losing depth.
Step 6: Repeat as Necessary
The glazing process can take several layers to achieve the desired effect. Don’t be afraid to go back and forth between shadows, midtones, and highlights, building up layers until you reach your goal. Each application should add depth and richness to the final piece.
Tips and Techniques for Effective Glazing
- Use High-Quality Paints: The quality of your paint can significantly affect your glazing results. Invest in artist-grade acrylics to ensure better transparency and mixing capabilities.
- Maintain a Light Touch: When applying glazes, use a gentle hand. It’s easier to add more layers than to remove excess paint.
- Test on a Palette: Before applying any glaze to your painting, test your colors on a palette or scrap canvas. This will give you a better idea of how they will interact.
- Layer Order Matters: Always start with the darkest colors and work towards the lightest. This approach helps maintain control over the overall value and temperature of your painting.
- Keep Brushes Clean: Regularly clean your brushes to avoid muddying your colors. Using separate brushes for each color can also be beneficial.
- Be Patient: Glazing is a slow process that requires patience. Allow each layer to dry fully before proceeding to the next to achieve the best results.
- Practice: The more you practice glazing, the more comfortable you will become with the technique. Experiment with different colors and layering styles to find what works best for you.
Conclusion
The glazing technique is an invaluable method for any acrylic painter looking to enhance the depth and vibrancy of their work. By understanding how to effectively layer colors, choose the right tones for shadows, midtones, and highlights, and employing the right techniques, artists can achieve stunning results that will captivate viewers.
As you embark on your glazing journey, remember to take your time and enjoy the process. Each layer contributes to the overall beauty of your painting, revealing the complexity of color and depth that acrylics can offer. Happy painting!
LEARN MORE
- How to Paint Foliage Using the Acrylic Glazing Technique
- How to Trace for an Accurate Portrait Sketch
- How to Paint Realistic Eyes in Your Acrylic Portrait
- How to Add Raw Umber Dark & Ultramarine Blue to Your Portrait
- How to Make Your Own Raw Umber Dark
- How to Paint Realistic Trees & Grass in Your Acrylic
- How to Block In Skin Tone Values Using Glazing Technique
- How to Paint Vibrant Reds in Your Acrylic Portrait
- How to Glaze Background Colors & More Acrylic Portrait
- How to Paint White Clothing in Your Acrylic Portrait
- How to Easily Transition from a Sketch to a Painting
- How to Block In Shading & Skin Tones in Your Acrylic
- How to Build Up Color on Acrylic Pet Portrait
- How to Build Up Form on Clothing with Acrylic
- How to Paint Dark Clothing Using Acrylic Glazing Technique
- How to Paint a 24 x 30 Acrylic With 30 People
- How to Do Smooth Shading with Acrylic
- How to Sketch an Acrylic Portrait with a Grid
Read more about how to paint a portrait that you can surely be proud of!

P.S. Did you find this post helpful or encouraging? If so, send it on ahead! Let others know with the share buttons below. I’d love to hear your comments. Thank you so much! Also, do you have a question on acrylic portrait painting you’d like answered? Let me know, and I’d be happy to help!

How to Varnish Your Painting
Protect and enhance your artwork: A step-by-step guide to varnishing your painting for a lasting finish.
It was a large portrait on hardboard, about 48″ tall. Having just done some mural work with a well known muralist, I attempted to copy his method of using a household paint roller and a clear coat.
It was a disaster.
The medium looked so milky white while it was drying, that I started to panic like Rowan Atkinson did in the movie “Bean” when he sneezed on Whistler’s Mother. I tried to clean off the half dried medium with a damp towel. To my dismay, the medium started globbing up and totally distorted the fine detail work on the surface. Some areas had no varnish. Other areas were covered with a streaky, bumpy film. My painting was a hideous mess.
I said I would never varnish a painting again.
Except that I did.
I knew I needed to learn how to do it correctly in order to protect my paintings from dust and debris, saturate the colors and dark values more, and give it a uniform finish.
What I’m going to teach you is the process I learned basically from trial and error over the years.
I’m not scared to varnish any more. But I like to say a quick prayer before I put brush to canvas, because if you don’t varnish correctly, you can mess up a good painting very quickly!
Here’s a video that will show you the correct way to do it…
Here are the steps, simplified.
- Use acrylic matte varnish. Not matte medium. (unless you want a flat finish) Matte varnish dries to a satin sheen and looks fantastic. If you want a little more saturation on your dark values and colors, you can add some gloss medium to your matte varnish and mix them together very thoroughly.
- Put your painting on a flat table, or slightly angled. Don’t varnish the painting on a vertical easel or you could get drips and it will look terrible.
- Use a 1″ or larger flat brush that’s in good condition. Put your varnish in a cup or container than is wide enough to accommodate the brush.
- Dip the brush into the varnish and apply from top down, left to right, overlapping slightly. Do not overbrush!
- Continue the process all the way down and when you’re done, leave it alone for a couple hours. It should dry completely clear.
That’s all there is to it!
What do you think? What are YOUR experiences with varnishing? Do you have any stories–or tips–to share? Do you avoid varnishing completely?
Let me know how this tutorial helps.
All the best,
- How to Paint Foliage Using the Acrylic Glazing Technique
- How to Trace for an Accurate Portrait Sketch
- How to Paint Realistic Eyes in Your Acrylic Portrait
- How to Add Raw Umber Dark & Ultramarine Blue to Your Portrait
- How to Make Your Own Raw Umber Dark
- How to Paint Realistic Trees & Grass in Your Acrylic
- How to Block In Skin Tone Values Using Glazing Technique
- How to Paint Vibrant Reds in Your Acrylic Portrait
- How to Glaze Background Colors & More Acrylic Portrait
- How to Paint White Clothing in Your Acrylic Portrait
- How to Easily Transition from a Sketch to a Painting
- How to Block In Shading & Skin Tones in Your Acrylic
- How to Build Up Color on Acrylic Pet Portrait
- How to Build Up Form on Clothing with Acrylic
- How to Paint Dark Clothing Using Acrylic Glazing Technique
- How to Paint a 24 x 30 Acrylic With 30 People
- How to Do Smooth Shading with Acrylic
- How to Sketch an Acrylic Portrait with a Grid
Read more about how to paint a portrait that you can surely be proud of!
P.S. Did you find this post helpful or encouraging? If so, send it on ahead! Let others know with the share buttons below. I’d love to hear your comments. Thank you so much! Also, do you have a question on acrylic portrait painting you’d like answered? Let me know, and I’d be happy to help!