Category Archives for Painting Wrinkles

How to Paint Wrinkles Realistically using Mid-tones
Learn the mid-tones for realistic wrinkles in acrylic portraits
Painting realistic wrinkles can be a challenging yet rewarding aspect of portrait painting. Also, wrinkles add character and depth to a subject’s face, capturing the essence of age, emotion, and experience. In this tutorial, we’ll focus on learning how to paint wrinkles realistically using mid-tone. Additionally, by the end of this lesson, you’ll be able to blend shadows, highlights, and mid-tones seamlessly, giving your portraits a lifelike quality.
Step 1: Assessing the Overall Values
Before diving into the wrinkles, it’s essential to ensure that the overall values in your portrait are balanced. Start by observing the relationship between different areas of the face, particularly the darker values and mid-tones.
Firstly, the artist begins by adjusting the darker areas on the subject’s forehead, bringing them more in line with the mid-tone values of the surrounding skin. This step is crucial because the contrast between dark and light areas will significantly impact the realism of the wrinkles.
Step 2: Mixing the Right Colors
To achieve realistic wrinkles, you need to mix colors that blend well with the existing skin tones. And then, the artist uses a mix of raw umber dark, alizarine crimson, and a tiny bit of ultramarine blue. These colors help create a rich, slightly cooler mid-tone that contrasts nicely with the warmer highlights.
Tip: Adjust the color mix as needed to match the specific tones of your subject’s skin. A touch of ultramarine blue can help neutralize overly warm areas, while alizarine crimson can add a subtle pinkish hue.
Step 3: Blending and Feathering
Once the correct color is mixed, the artist applies the paint in light, controlled strokes, blending it into the surrounding areas while the paint is still wet. This technique, known as feathering, helps soften the transitions between different values, making the wrinkles appear more natural.
For instance, when darkening the area around the subject’s eyes and glasses, the artist uses a size 10 or 12 round brush. The key here is to work in layers, gradually building up the darkness to avoid harsh lines that could make the wrinkles look unnatural.
Technique: Use very light, quick strokes to blend the edges of your brushwork into the surrounding skin tones. This technique helps create a smooth transition between mid-tones and shadows.
Step 4: Defining Specific Wrinkles
With the mid-tones and darker values in place, it’s time to focus on individual wrinkles. The artist begins by emphasizing the frown lines, also known as the glabellar furrows, which run vertically between the eyebrows. By darkening these lines slightly and softening them with a finger, the artist adds depth without making them too harsh.
Next, the artist works on the crow’s feet around the eyes and the vertical neck furrows, known as platysmal bands. Using a smaller brush, these wrinkles are gently dabbed in, with the artist paying close attention to how the values change along each line.
Tip: Wrinkles are rarely uniform in color or depth. Pay attention to how some areas are darker or lighter than others, and adjust your brushwork accordingly to capture these subtle variations.
Step 5: Adding Gradation and Dimension
To enhance the three-dimensionality of the wrinkles, the artist focuses on creating smooth gradations between the mid-tones and highlights. For example, when working on the nasolabial fold (the line that runs from the side of the nose to the corner of the mouth), the artist darkens the edge that touches the highlight and feathers it into the surrounding mid-tone.
This careful blending creates a subtle shadow that adds depth, making the wrinkle appear more realistic. The artist also adjusts the color slightly, adding more raw Sienna to achieve a golden tone that complements the surrounding skin.
Technique: Use a small brush to add gradations along the edges of wrinkles, blending them into the mid-tones. This technique helps create the illusion of depth and makes the wrinkles appear more natural.
Step 6: Refining and Adjusting
As the portrait progresses, it’s essential to step back and assess the overall effect. The artist notes that certain areas may need to be lightened or darkened to achieve the desired balance. For example, after working on the nasolabial fold, the artist adjusts the glaze to avoid making the area too dark.
Additionally, the artist revisits areas like the jowls and the mouth, refining the shadows and highlights to ensure they blend seamlessly with the mid-tones. This process of continuous refinement is key to achieving a realistic, cohesive portrait.
Tip: Don’t be afraid to make adjustments as you work. Painting wrinkles is an iterative process, and small tweaks can make a big difference in the final result.
Tips
Basically, painting realistic wrinkles requires patience, precision, and a keen eye for detail. So, by mastering mid-tone techniques, you can create lifelike portraits that capture the essence of your subject. Also, always remember to balance your values, blend carefully, and pay attention to the subtle variations in color and depth that make each wrinkle unique.
Read more about my additional resources, tutorials, to learn more and check out my free courses here.. Whether you’re a beginner or an experienced artist, there’s always something new to learn and apply to your paintings. Happy painting!
- Sketching Your Painting Accurately
- Beginning a Pet Portrait in Acrylic
- The Mystery of Realism in Painting
- Apply A Burnt Sienna Glaze to a Portrait
- Learn How to Sketch a Portrait Freehand in 45 Minutes
- Adding highlights to your acrylic painting
- 5 Excellent Reasons to Use Aluminum Foil
- Paint Realistic Wrinkles in Acrylic
- Painting Clothing in an Acrylic Portrait
- Paint a Cloudy Sky Acrylic
- How to add Semi-Opaque Highlights
- How to Enhance the Contrast in Your Acrylic
- How to Add Glaze to Your Acrylic Painting
- Paint Realistic Reflections on Eyeglasses in an Acrylic Portrait
- Build Up Depth on Your Acrylic Portrait Backgrounds
- How Do You Do Layers With the Glazing Technique?
- Learn How to Paint Wrinkles in Acrylic
Read more about how to paint a portrait that you can surely be proud of!
I’d love to hear your thoughts on this video. Please share it with your friends and family. Let me know if you have any further questions. I’ll greatly help you.
If you’d like to learn more, sign up for my free email tips and video class today.
Learn How to Paint Acrylic Portraits With My Free Mini-Video Course!
Thank you so much for taking the time to read this tutorial and watch the video. That means a lot to me. I hope you find it very helpful in your portrait painting.
Yours for Better Portraits,

P.S. Did you find this post helpful or encouraging? If so, send it on ahead! Let others know with the share buttons below. I’d love to hear your comments. Thank you so much! Also, do you have a question on acrylic portrait painting you’d like answered? Let me know, and I’d be happy to help!

5 Steps on How to Paint Wrinkles in Acrylic
There’s nothing quite as difficult as painting wrinkles. There’s so many details and shapes to get right, and how do you shade them in? That’s what I want to answer in today’s post.
Learning how to paint wrinkles is a crucial skill for adding realism and depth to your acrylic portraits. Capturing the fine lines and textures of wrinkles can make a painting truly lifelike, conveying the story and character of your subject. With techniques like layering, shading, and glazing. This topic of wrinkles has come up a few times since I started teaching portrait painting two years ago, and most recently when a student asked me how to do it. I shared briefly the steps how in my previous article, “7 Questions About Portrait Painting, Answered.”
Now I want to dive a little deeper.
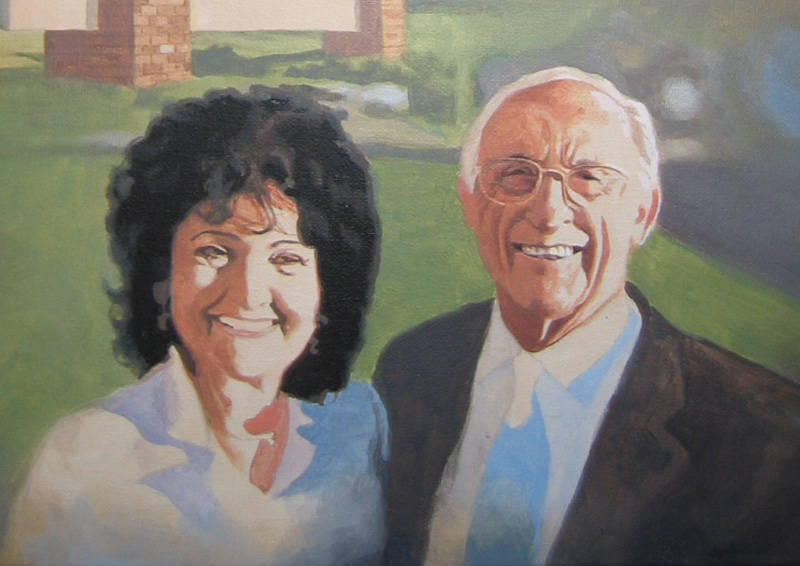
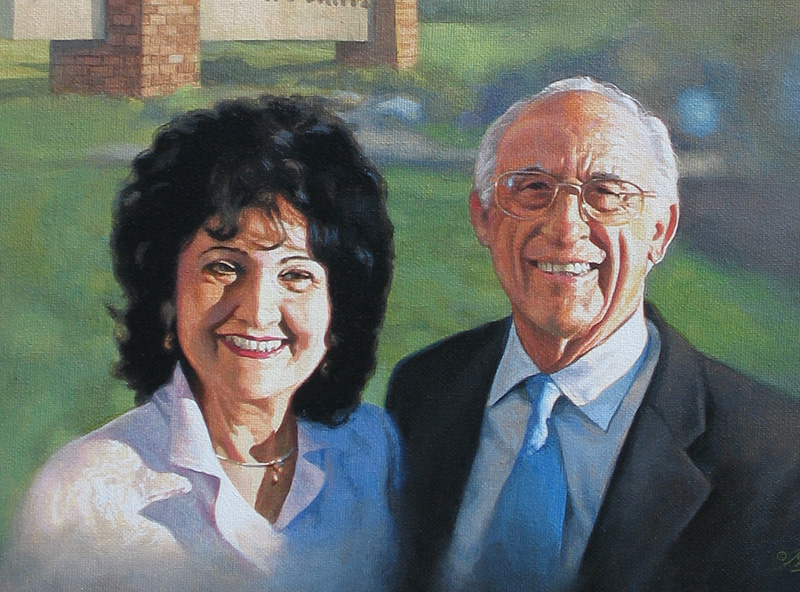
For an example, I’m going to use one of my favorite paintings–a portrait I did for my pastor, Philip Palser, of Bethel Church in Eau Claire, Wis., to commemorate his 80th birthday. As I write, he is turning 93 this month!
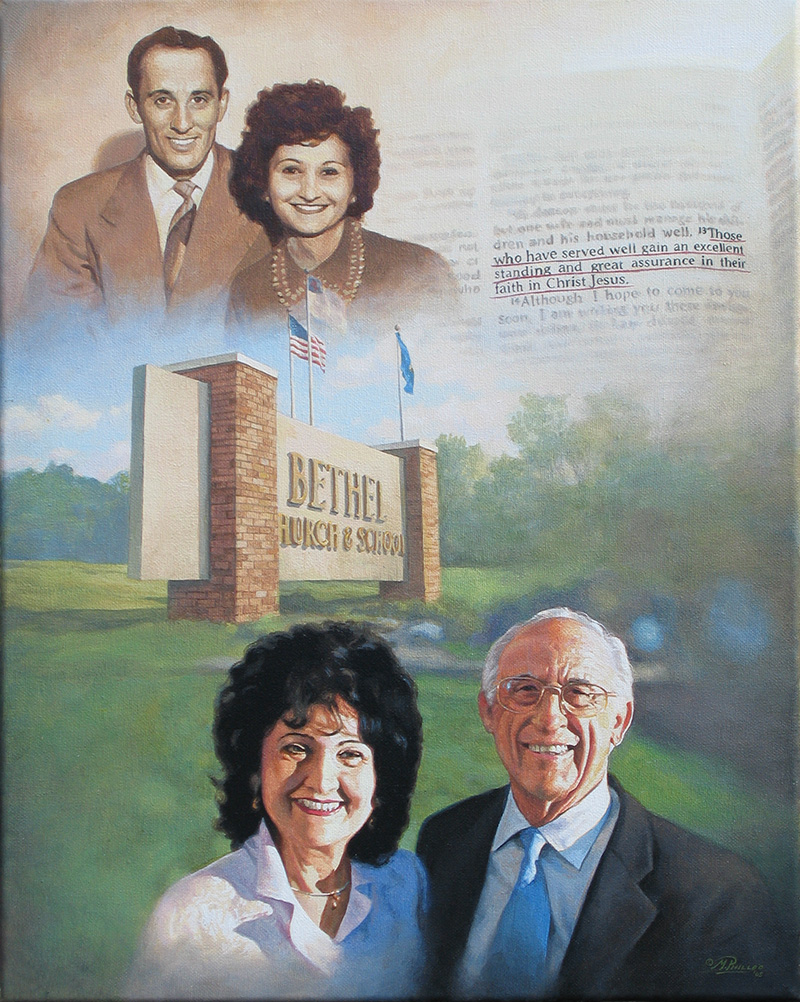
Portrait of Pastor & Mrs. Philip Palser of Bethel Church, Eau Claire, Wis., 16″ x 20″ acrylic on canvas, by artist Matt Philleo to commemorate Pastor’s 80th birthday.
He actually doesn’t have to many more wrinkles than what he had 13 years ago. But they may have deepened a bit with age, signifying his experience. 🙂 Both he and his wife are in amazing health for their age.
Now back to the topic of painting wrinkles…
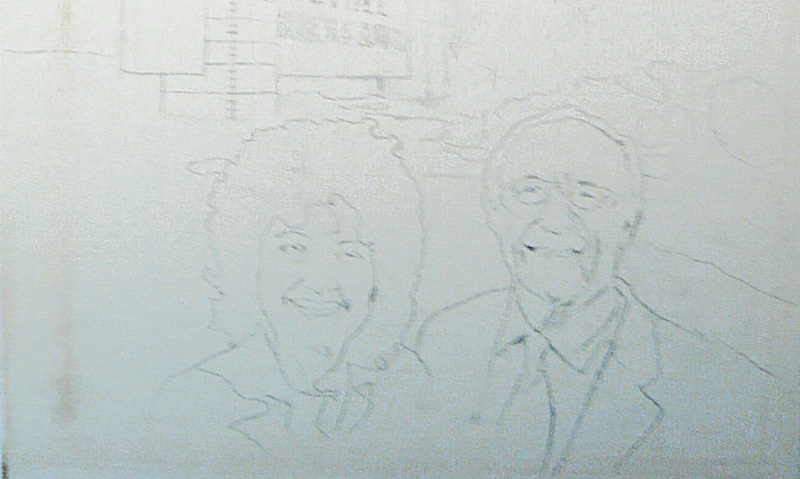
I’m going to show you just the portion of when they are older–mostly concentrating just on my pastor’s face, because his wrinkles are more apparent.
Step 1: the Sketch
I started with a sketch outlining the major details–such as the the creases around the mouth and the major wrinkles in the forehead.
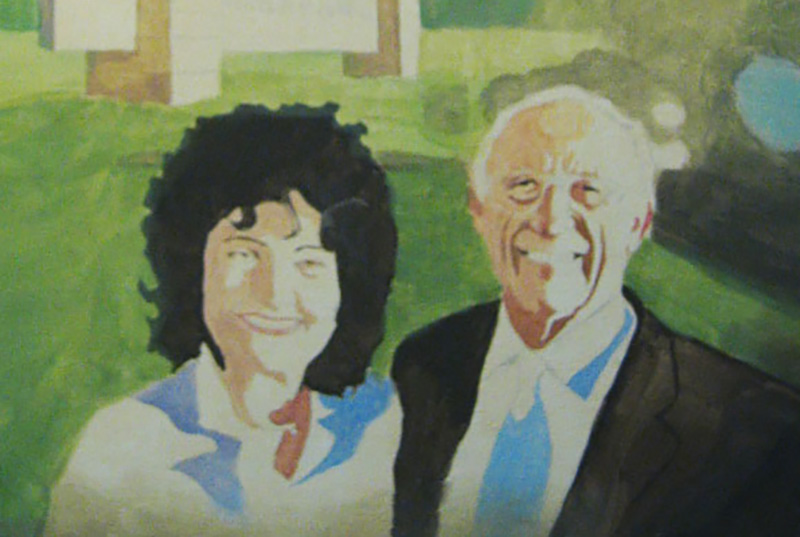
Step 2: Blocking in the Values
Next, I filled in the major values, without a lot of fuss. It is important to accurately define the shapes of the predominant shadows, and put them in their place. They need to stay within their pre-defined boundaries, which ideally would be outlined in the sketch. Now, of course strong lighting–in this case, from the sun–makes this a lot easier.
You may not always have control over this in your portraits, especially if you’re doing a commissioned portrait painting from a photo. But if you can, choose a photo that has strong lighting with a lot of contrast. It really helps model the face, emphasizing its three dimensional form.
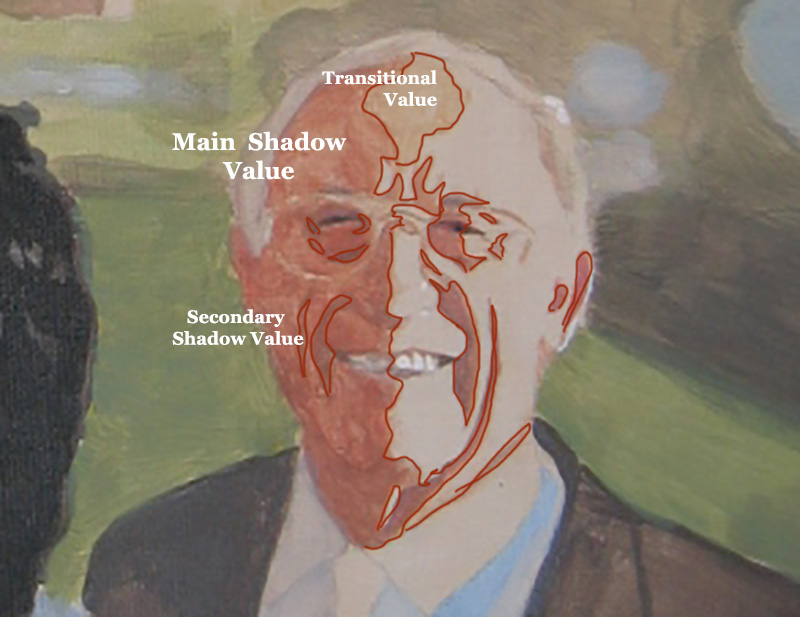
Step 3: Strengthening the Shadows
In this step, I am taking what I did in the previous step and darkening everything. I use burnt sienna and raw umber dark to strengthen the contrast. The vertical wrinkles especially in the man’s forehead and the horizontal crows-feet wrinkles by his eyes are more apparent now. But they are still pretty basic. I did paint in just a slight gradation on the wrinkles that run from the nose to the mouth. But it’s still pretty simple.
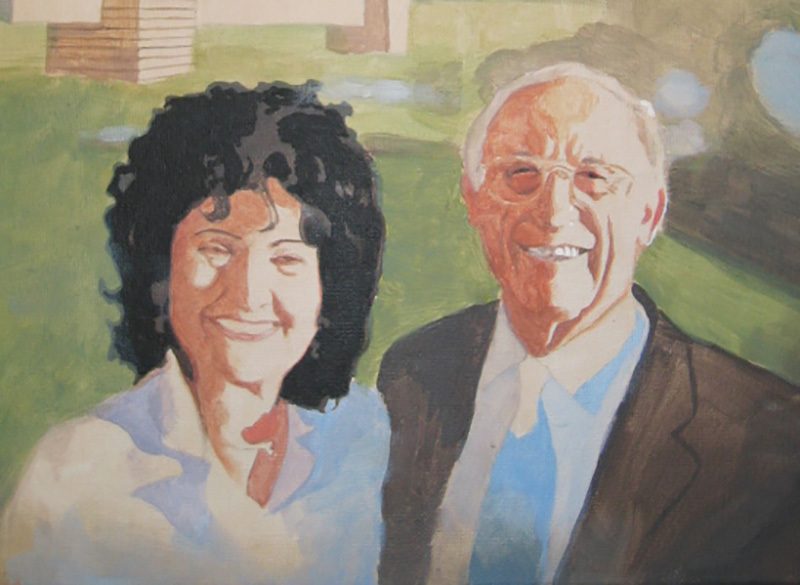
To explain, I broke down the shadows into three categories: the main shadow value, the secondary shadow value, and then the transitional value. These are terms I’ve made up just to differentiate between everything. If you keep things simple to begin with and build on a firm foundation, you will find it a lot easier to achieve the realism you’re shooting for.
It makes me think of a verse where Jesus says, “Anyone who listens to my teaching and follows it is wise, like a person who builds a house on solid rock.” (Matthew 7:24)
If you can teach yourself to see these abstract shapes within your reference photo, and then replicate them on your canvas, you will experience amazing growth in your skills as a portrait painter.
After getting these values locked in, the trick is to bridge them together with some shading and gradation. Notice the highlighted part of his face is flat.
That is OK.
Later, I’ll paint more depth in that area, but for now, it’s not necessary.
Would you like to learn more about how to paint wrinkles? If so, let me know by clicking the button below, and I’ll create a video tutorial/ course for you!
Step 4: Bridging the Gaps
Although I try to give these stages precise beginnings and endings, I don’t want you to think that I am only “bridging the gaps”–transitioning between values only in this stage. But it is at this time, that I’m concentrating on that the most. You can see I added more detail to the transitional value on his forehead.
And then, in the image below, you can see how I added more of the secondary value (the same value that’s within the wrinkles on the shadow side) to the vertical wrinkles between his eyebrow ridge and the crease alongside his mouth. Now what that does is add another layer of depth to the wrinkles.
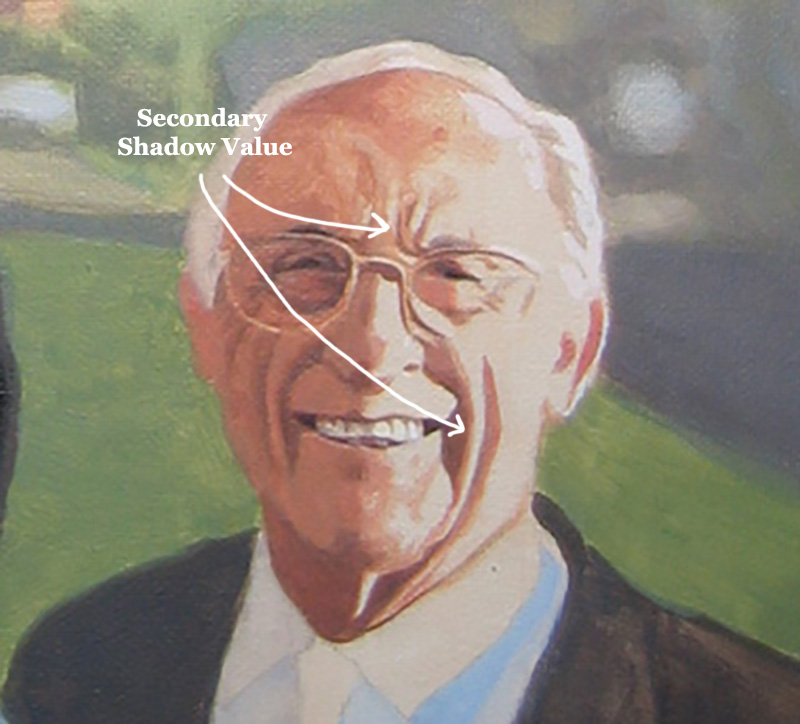
And now also, the underside of the wrinkles look like they’re catching some light from the highlighted part of the face. And that increases the realism.
Step 5: Smoothing out and Finishing With Detail
In this step, I take what I built in the previous foundation, and embellish it. When you have a good foundation and you bring it far enough along, the structure of the wrinkles can just about stand up on their own. But by adding some more shading, we can really make it look nice–like putting on the trim. 🙂
What I did here was add highlights on top of the main highlighted area. This give us one more layer of depth to the face. I put the detail in for the horizontal wrinkles in the forehead as well as some highlights that heightened the creases running alongside the mouth. Some of the thin areas of the forehead wrinkles that you would think would be painted with small round brush were actually created by painting the lighter value and “closing them in.”
However, I would use a small brush to refine them if necessary.
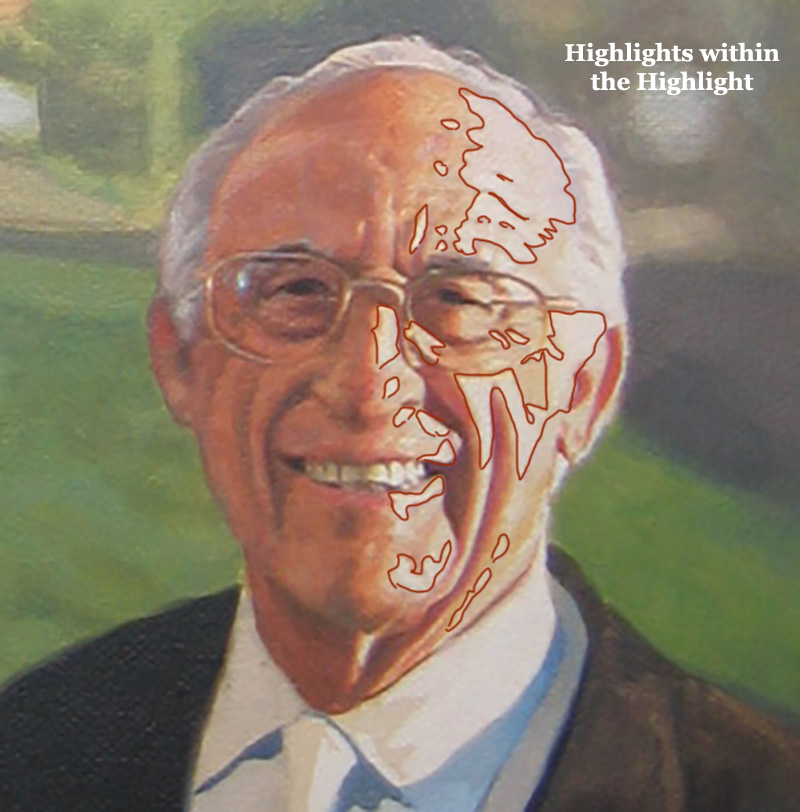
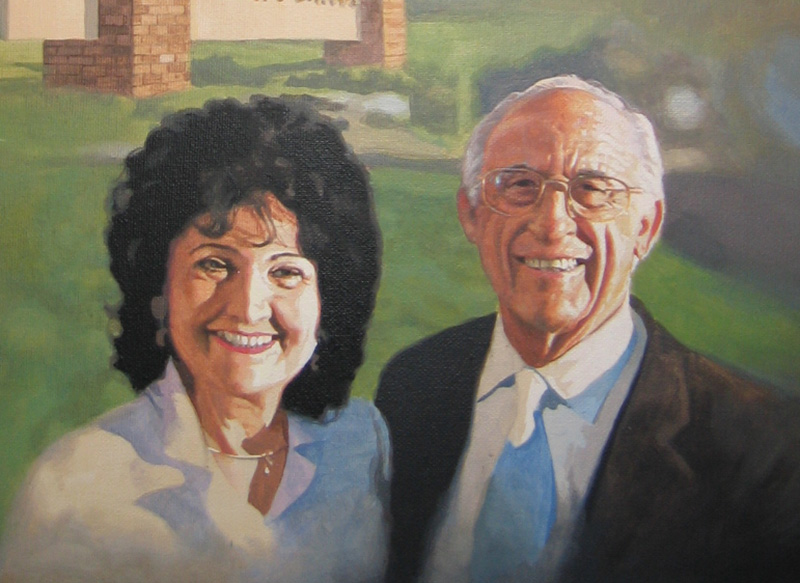
Here is a detail image of the final painting…
How to Paint Wrinkles in an Acrylic Portrait, with step-by-step tutorial, based off 16″ x 20″ acrylic on canvas portrait by Matt Philleo, final
That’s it for now. Hope you found this tutorial helpful. Let me know if you’re interested in learning more on how to paint realistic wrinkles in acrylic. As I write this, I’m considering doing an online course on the topic. But I need to hear from you first, to see if it’s something you would find interesting and benefit from. Let me know!
Have a blessed day, enjoy painting, enjoy life,

P.S. Did you find this post helpful or encouraging? If so, send it on ahead! Let others know with the share buttons below. I’d love to hear your comments. Thank you so much! Also, do you have a question on acrylic portrait painting you’d like answered? Let me know, and I’d be happy to help!