All posts by Matt Philleo

[PORTRAIT CHALLENGE] Masterclass Lesson #2: Sketching Your Portrait for a Firm Foundation
Masterclass Lesson #2 for the Acrylic Portrait Painting Challenge is open!
In this lesson, you will learn how to draw an accurate sketch that will help keep you from getting frustrated while painting. You will also be set up to create a portrait with realistic proportions, and a true likeness—where it really looks like the person you’re trying to paint.
That’s the kind of portrait you’ll be proud to show, sell, or give as an exquisite gift!
Just as a contractor wouldn’t build a house without a proper foundation, you shouldn’t paint a portrait without one either. A rock-solid sketch is the best way to establish a firm foundation for the rest of your portrait to be built upon. Take your time to do it right, and you will set yourself up for success, and avoid a lot of potential hassle later.
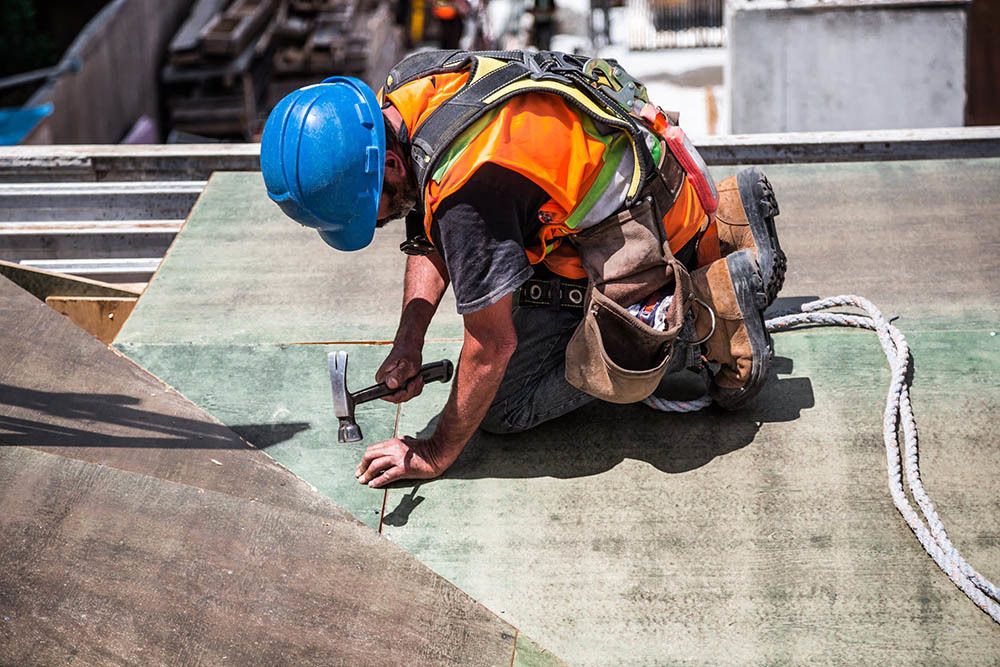
Sketching as a firm foundation for your portrait.
In our previous step, I showed you how to prepare your canvas for the sketch by creating a well-formed grid.
If you followed my instruction, you will have sealed that grid with first a layer of matte medium. Then you followed up with a roughly 50%/50% mixture of acrylic matte medium and white acrylic gesso, and let it dry for at least a couple of hours.
Now, you have a canvas that is ready to sketch upon. The matte medium/ gesso layer provides not only a barrier to the grid so you can’t erase it while sketching, but it also gives the canvas the perfect texture to sketch with a colored pencil. Back in 2017, I discovered that colored pencil erases like a dream on a properly prepared canvas. And you can seal it in without minimal loss of detail to your sketch.
Try it, and you’ll find out how fun it can be to sketch on your canvas. 🙂 You’ll never want to go back to graphite pencil again!
Another benefit: you can pick any colored pencil hue you want to match the skin tone of the subject. Remember, with my glazing technique, you will be able to see through the paint layers, down to the colored pencil until you have enough layers to cover it up. And in a few areas, even when your painting is finished, the colored pencil will shine through a bit. So pick a brown color that works best for you. Sepia, Chocolate, brown ochre, and terra cotta are all good colors for sketching.
Ready to go?
Now, before we begin…
Are you registered for the challenge?
If not, register below for FREE and I’ll send you:
- a downloadable/ printable”Welcome Kit” with a Supplies List and a Palette Color Layout Guide.
- high-resolution images of the photo we’ll be painting from for this challenge.
- each new lesson that comes out in this Masterclass series.
- a link to my private Facebook group, where you can do this challenge with other artists, get feedback and help on your portrait, and not feel alone.
REGISTER TODAY. The challenge is ongoing, something you can do at your own pace. It’s not too late to enter!
Register for the Challenge!Here’s the steps to creating a masterful sketch, a firm foundation for your painting.
- Set up your tablet (Kindle, iPad, etc) or printed reference photo next to your canvas, and display the gridded reference photo. Need something to hold your tablet up? My free course shows you how to make your own Reference Photo Holder) The reference photo is your blueprint to paint a portrait from your photo. It’s what your finished painting should look like.
- Sketch the outline first. Pay attention to where you are placing your lines. Try to see the grid squares as fractions. (“the line will intersect here at 1/4 of the way up, or 1/2 of the way over, etc”
- Fill in the features, loosely: eyes, nose, mouth, etc. The eyes are the most important feature, so really make sure you capture the shapes of not only the eyes, but the eyelids and eyebrows.
- Delineate the tonal values. Shade in the areas that are darker, and pay attention to exact forms that the shadows create. Try to think of them as abstract shapes like stretched out triangles, oblong ovals, squished rectangles, for example. As you fill in these values, the planes of the face will start to emerge. You will create a convincing sense of three-dimensional form.
- Refine your sketch and add any missing detail. Step back a bit and make sure you have the proportions correct. The grid will have done the “heavy lifting” for you, by keeping your lines pretty accurate. But you might need to erase and redraw some of the features for greater accuracy. Finish up with the wrinkles in the clothing and on the hat, if needed.
Watch my in-depth Masterclass acrylic online tutorial below to see these steps in action.
After learning from this video, You’ll know exactly how to do it.
Before you watch, I want you to know that this lesson is VERY in depth. It’s one hour long! But please, make the investment in your art talent, grab a cup of coffee or tea, and watch the whole thing. If you do, I promise that you will have greater clarity on how to begin an acrylic portrait from here on out. Every portrait you do will be that much better.
Here’s the video…
Acrylic Portrait Challenge Masterclass Lesson #2: Sketching Your Portrait for a Firm Foundation
Is it done?
How accurate does it need to be? You only need to have a likeness 90% of the way there to have a fantastic sketch.
It doesn’t have to be perfect. The painted layers will dial in the likeness the rest of the way. You don’t need to make this sketch into a drawing. Meaning, you don’t need to shade in everything to the point that it looks like a finished drawing that you could hang on your wall.
No.
The sketch is for YOUR benefit…and also that of the portrait!
It doesn’t have to amaze others at this stage. It just needs to be accurate. It needs to describe the form, the contours, the three-dimensionality of the subject with line and value. You simply need to make yourself a guide so you know where to place your glazes when you segue into the painting process.
Now the painting, when it is finished, let THAT amaze others! (and you 🙂 )
There you have it! Now you know exactly how to create a great sketch for your portrait, a firm foundation you can build the rest of your portrait upon. The next step is to seal in your sketch and ease your portrait into a painting with the first few glazes.
I’ll see you in our next class! Until then have a blessed day and use that talent God gave you to its fullest!
Yours for Better Portraits,
![]()
If you found this post helpful or encouraging, would you send it on ahead? Let others know with the share buttons below. I’d love to hear your comments. Thank you so much!
Let me know if you have any questions about the challenge that I didn’t answer. Leave your question in the comments below and I’ll get back to you!
[PORTRAIT CHALLENGE] Masterclass Lesson #1: Gridding Your Canvas for an Accurate Sketch
I’m so excited to be teaching you the first Masterclass Lesson for the Acrylic Portrait Painting Challenge!
Again, if you are taking the challenge, I commend you. It’s not easy to paint a portrait. Many artists desire to do it, but never actually begin, because it’s difficult to paint a fellow human being accurately. It’s my goal to show you how to do it, so you can paint an amazing portrait from a photo you’ll be proud to show others.
Now, you might feel like rushing this step, but I encourage you to start slowly and build a good foundation for your portrait. You’ll be glad you did.
Before we begin…
Are you registered for the challenge?
If not, register below for FREE and I’ll send you a “Welcome Kit” with a Supplies List and a Palette Color Layout Guide. I’ll also send you high-resolution images of the photo we’ll be painting from for this challenge. (It’s not too late to enter!)
Register for the Challenge!In this video lesson and tutorial, you will learn how to create a grid for your canvas. If you have several years of freehand drawing experience, you could skip this step and start sketching right away, but from my experience in teaching, most artists are not ready to do an accurate sketch for their portrait.
So, most likely, the grid method will be best for you. It allows you to create accurate proportions while still compelling you to use your hand-eye coordination and spatial perception to draw shapes and detailed forms. And that’s how I will be teaching this portrait demonstration for you.
There’s three steps to creating the grid in preparation for sketching:
- Draw it.
- Seal it.
- Mute it.
I’ll show you how, step-by-step, in this video lesson…
And now you know how to create a grid on your canvas, and you’re ready for the next step: sketching the subject! I look forward to being your guide for the rest of this adventure.
I’ll see you in our next class! Until then…
Yours for Better Portraits,
![]()
If you found this post helpful or encouraging, would you send it on ahead? Let others know with the share buttons below. I’d love to hear your comments. Thank you so much!
Let me know if you have any questions about the challenge that I didn’t answer. Leave your question in the comments below and I’ll get back to you!

[ACRYLIC PORTRAIT PAINTING CHALLENGE] What We Will be Painting!
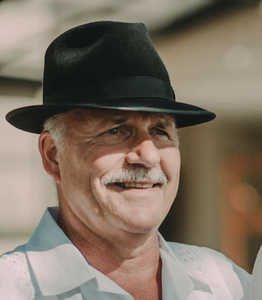
Here is the reference photo we will be painting from for the challenge!!
I’m excited! What a photo–from the challenging and interesting 3/4 angle of the head, to the light and shadow, the pleasant expression, the form of the hat, the blurry background, it will make for a great painting!
And we will be doing it together!
Realistic Acrylic Portrait Painting Challenge
To get the version with a grid overlay, plus the supplies list and all the instructional videos, REGISTER here>>> https://realisticacrylic.com/acrylic-portrait-painting-challenge/
Yours for Better Portraits,
![]()
If you found this post helpful or encouraging, would you send it on ahead? Let others know with the share buttons below. I’d love to hear your comments. Thank you so much!
Let me know if you have any questions about the challenge that I didn’t answer. Leave your question in the comments below and I’ll get back to you!

Portrait Painting Challenge, Q & A
It’s been an exciting week so far with so many people signing up for the Acrylic Portrait Painting Challenge!
With that, I’ve received a lot of questions. I want to take a moment and answer some of them, so that if you it’s your question too, well, you’ll have an answer! Some of the questions are ones that I am anticipating as well….
1. When does the challenge actually start?
Right now, people in my Facebook group are voting for their favorite image until tonight. Once we have the final reference photo, selected, I’ll put a grid overlay on it, and then email it to you here tomorrow (4/8). We will begin the next day, Thursday, April 9th.
2. What if I’m not on Facebook? Can I still participate?
Yes! You can still paint along with us, and keep in touch with me via email. Click here to REGISTER and get your “Welcome Kit” with the supplies list. It’s not too late.
3. What if the photo I like most doesn’t get picked?
Well, I set this challenge up in a democratic way, so that everyone would get involved and vote collectively as a group. Unfortunately, we won’t all get to paint a portrait from the photo we liked most, myself included. But I think we can still recognize the value of painting the final choice image, because all of them are fantastic options, with their own unique qualities.
Also: I will be saving these “runner-up” images for a future challenge or painting class. So I think we’ll have another shot at painting them!
4. Where are you posting the step-by-step demonstration videos?
I will be posting them to Realistic Acrylic Portrait School, on my blog. The videos will be hosted on my YouTube channel, Fine Art by Matt Philleo
5. Is this free?
Yes, the challenge, the Welcome Kit, the video lessons, all of that is free. I want to bless you during this challenging time and allow as many to participate as possible. I will have some additional benefits for you if you are a Realistic Acrylic All-Access Member. If you want to check that out and consider joining if you aren’t already a member, click here to learn more.
6. I can’t find some of the colors on the supplies list. Are there substitutes?
Yes. If you look at the last page of my Welcome Kit, you will see an image of my palette, with all the colors arranged it. Look at it and match up a color that you have on hand that looks close. For example, Raw Umber mixed with a little Ivory Black should work as a substitute for Raw Umber Dark.
7. I can’t find Organic Red Orange on Nova Color’s website. Where is it?
That is my mistake. It is actually called, “Organic Pyrrole Orange.” I have called it Organic Red Orange for the longest time, because it is truly a red-orange pigment, and it differentiates it from other straight red or orange colors on my palette.
8. How often are you going to post instructional videos?
On an almost daily basis. You will be hearing from me very often. If for some reason you feel you are getting too many emails, you can opt-out of the challenge here, and I will not email you anything more about the challenge, no hard feelings. 🙂 And you will still be on my art tips newsletter.
9. What if I get behind on the challenge?
No worries. This is not a race. Think of it more like a group painting party, but where the doors never close. 🙂 You can just keep working at your own pace. The videos will still be there for you to access later.
10. When will the challenge end?
I am shooting to have it done by the end of April, but we are getting started a bit later than I thought. So it might go into the first week of May. I’ll be keeping in touch with you to let you know when we get closer to that time.
Okay, that’s it for now!
I hope this clears up any questions you have. But if you have more questions, shoot me an email and let me know. I’ll be happy to answer you personally.
I’m so excited to start the challenge with you. Look for an email from me tomorrow with the announcement on the reference photo we will be painting from, and a downloadable version with a grid overlay that you can paint from.
Look forward to seeing you in the challenge!
Yours for Better Portraits,
![]()
If you found this post helpful or encouraging, would you send it on ahead? Let others know with the share buttons below. I’d love to hear your comments. Thank you so much!
Let me know if you have any questions about the challenge that I didn’t answer. Leave your question in the comments below and I’ll get back to you!

3 Reasons to take the Acrylic Portrait Painting Challenge!
As I type this, we’re in the middle of the COVID-19 crisis. You know that.
Every challenge presents opportunities. This is one of those occasions. Many of us have more time on our hands, so I decided to open up a portrait painting challenge!
Why not use this extra time to create something beautiful—an acrylic portrait we can be proud of. I want to give you three reasons why you should take the challenge…
- You’ll have the opportunity to walk away with a fantastic acrylic painting you can be proud to show others.
- You will sharpen your skills as a portrait painting artist that you can use for future portraits.
- You will be able to encourage other artists in a sense of community, and that will help you feel connected in a time of isolation.
This challenge is FREE to join and I also plan on teaching you step-by-step, with video instruction, precisely how to paint the portrait.
Would you like to join me and many other artists on this challenge?
Great! Watch this video…
Then, sign up for the challenge below.
I’m interested in the challenge!Look forward to seeing you in the challenge!
![]()
Matt
If you found this post helpful or encouraging, would you send it on ahead? Let others know with the share buttons below. I’d love to hear your comments. Thank you so much!

5 Steps on How to Paint a Vibrant Acrylic Portrait
Learn the classical glazing technique for depth and luminosity
Acrylic painting is an exciting medium known for its versatility, but achieving the depth and vibrancy often associated with oil paintings can seem challenging. However, by employing the classical glazing technique, a method favored by old masters like Rembrandt, Titian, and Vermeer then you can produce rich, luminous results with acrylics. This blog post will guide you through 5 essential steps to create a vibrant acrylic portrait using this time-tested method.
This tutorial shows the entire process of painting a portrait. Here are the steps I show in this tutorial:
- Start with a Detailed Sketch.
- Apply the Initial Glaze Layers
- Layer and Build Gradation
- Introduce Vibrant Colors
- Focus on Nuances and Details
1. Start with a Detailed Sketch
Every masterpiece begins with a solid foundation, and in portrait painting, that foundation is the sketch. Before you start adding color to your canvas, take time to create a detailed and accurate sketch of your subject. For this project, an 11×14 portrait of three girls in a park serves as an example.
By using a sepia-tone prismacolor colored pencil, you can establish proportions and likeness. Accuracy in this stage helps set the stage for a calm and confident painting process. Once your sketch is ready, seal it with a clear matte medium. This acts as a protective layer, ensuring that the pencil lines remain intact as you begin adding paint.
- Tip: Use a flat brush (¾ inch to 1 inch wide) to apply the matte medium. Make sure the application is smooth and even, allowing it to dry thoroughly before proceeding to the next step.
2. Apply the Initial Glaze Layers
The heart of this painting method lies in glazing, where thin, transparent layers of paint are applied over one another to build depth and richness. Unlike traditional opaque acrylic painting, the classical glazing technique requires a mixture of 95% matte medium to 5% paint. This creates a very light wash that enables you to gradually build colors without overwhelming the canvas.
Begin by mixing raw umber dark with ultramarine blue to create lifelike skin tones and shadow areas. These first layers will be almost imperceptible, but they provide a strong base for the layers that follow.
- Tip: The first layers of glaze should be incredibly light. This allows for adjustments in color or value without the need to paint over mistakes. The glazing method helps avoid the common frustration of muddy colors often encountered in acrylic painting.
3. Layer and Build Gradation
Once the initial glaze is applied, it’s time to focus on layering. As you build up more layers, you’ll notice how the painting starts to take on a more vibrant and realistic appearance. The goal here is to create a seamless transition between light and dark values, blending tones smoothly to replicate the natural shading found in your reference photo.
In this step, more raw umber dark and ultramarine blue are used to deepen the shadows on the forehead and hair. This layering process helps achieve the subtle gradation required for realistic portraits.
- Technique: As you layer, ensure that each glaze is thin and transparent. Too much paint in a single layer can cause the painting to look heavy and lose the delicate transparency that glazing provides.
4. Introduce Vibrant Colors
To make your portrait truly vibrant, it’s essential to introduce bold colors into the glazing process. In this example, a dash of Liquitex hot pink was added to the dress to intensify the color and give it a glowing effect. The key is to use these bright colors sparingly, applying them in thin layers so that they blend harmoniously with the existing hues.
When applying glazes to areas like the clothing, make sure to leave the white areas exposed. This technique, known as “preserving the luminosity,” ensures that highlights remain bright and eye-catching, adding to the overall vibrancy of the portrait.
- Tip: When adding vibrant glazes, thin the paint with medium and apply it cautiously. This helps prevent overpowering the existing layers while enhancing the color saturation.
5. Focus on Nuances and Details
The final step in this process involves refining the smaller details and nuances that bring a portrait to life. For example, the highlights in the hair, shadows in the creases of clothing, and the subtle changes in skin tone around the eyes require careful attention.
In the final layers, you can also experiment with a semi-opaque mixture, using titanium white, raw umber dark, and organic red-orange to add warmth and depth to the skin tones. With each new layer, the portrait takes on more life, depth, and realism. At this stage, it’s important to use more opaque layers sparingly, as glazing is best suited for large areas, while more detailed parts, such as fingernails or eyes, may benefit from a slightly thicker application of paint.
- Technique: If you notice that certain areas appear too flat or lack depth, consider adding a dark glaze to emphasize the shadows. Because mixing ultramarine blue with raw umber dark creates a rich, deep tone perfect for refining these darker areas without relying on black paint.
Conclusion: Patience Is Key
As you add each layer of glaze, then always remember that patience is vital. Because acrylic glazing requires multiple layers, sometimes ten or more to achieve the desired depth and luminosity. Each layer builds upon the last, contributing to the portrait’s final vibrancy. While it may take time, the results are well worth the effort.
By following these five steps, you can create a stunning acrylic portrait with vibrant colors and lifelike depth, all while employing the classical glazing technique favored by the old masters.
For further resources and guides, visit realisticacrylic.com and check out my free courses to enhance your acrylic painting journey.
- How to Paint Foliage Using the Acrylic Glazing Technique
- How to Trace for an Accurate Portrait Sketch
- How to Paint Realistic Eyes in Your Acrylic Portrait
- How to Add Raw Umber Dark & Ultramarine Blue to Your Portrait
- How to Make Your Own Raw Umber Dark
- How to Paint Realistic Trees & Grass in Your Acrylic
- How to Block In Skin Tone Values Using Glazing Technique
- How to Paint Vibrant Reds in Your Acrylic Portrait
- How to Glaze Background Colors & More Acrylic Portrait
- How to Paint White Clothing in Your Acrylic Portrait
- How to Easily Transition from a Sketch to a Painting
- How to Block In Shading & Skin Tones in Your Acrylic
- How to Build Up Color on Acrylic Pet Portrait
- How to Build Up Form on Clothing with Acrylic
- How to Paint Dark Clothing Using Acrylic Glazing Technique
- How to Paint a 24 x 30 Acrylic With 30 People
- How to Do Smooth Shading with Acrylic
- How to Sketch an Acrylic Portrait with a Grid
Read more about how to paint a portrait that you can surely be proud of!
I’d love to hear your thoughts about this video. Please share it with your friends and family. Let me know if you have any further questions. I’ll greatly help you.
If you’d like to learn more, sign up for my free email tips and video class today.
Learn How to Paint Acrylic Portraits With My Free Mini-Video Course!
Thank you so much for taking the time to read this tutorial and watch the video. That means a lot to me. I hope you find it very helpful in your portrait painting.
Yours for Better Portraits,

P.S. Did you find this post helpful or encouraging? If so, send it on ahead! Let others know with the share buttons below. I’d love to hear your comments. Thank you so much! Also, do you have a question on acrylic portrait painting you’d like answered? Let me know, and I’d be happy to help!

How to Paint Realistic Clothing in Acrylic Portrait
Learn the art of painting realistic folds and fabrics with acrylic in portraiture
Painting realistic clothing in an acrylic portrait can be both a challenge and an opportunity to showcase your skills. Fabric, with its intricate folds, highlights, and then textures, adds depth and movement to the subject. In this tutorial, we’ll walk you through step-by-step instructions on how to paint clothing using acrylics, focusing on shadows, mid-tones, highlights, and fabric types such as lace and tulle. Whether you’re painting a simple dress or more complex ruffles, this guide will equip you with the techniques to bring realism into your acrylic portrait.
Step 1: Preparing Your Palette for Clothing Colors
Before you begin painting the fabric in your portrait, it’s essential to select the right colors. In the video, Matt Philleo uses a combination of alizarin crimson, naphthol red, and a touch of hot pink to capture the vibrant tones of the fabric. To get started:
- Choose your base colors: Mix naphthol red and alizarin crimson for a rich fabric color. For lighter areas, use titanium white to brighten the colors.
- Adjust for highlights and shadows: Use more titanium white to lighten the tones for highlights, and for shadows, add more dark tones such as burnt umber or a touch of black to deepen the values.
Remember, painting clothing isn’t just about matching the color exactly but also capturing the texture and form of the fabric.
Step 2: Blocking in Shadows and Mid-Tones
In this case, one of the key techniques in painting fabric is establishing strong contrasts between shadows and highlights. I start by darkening certain areas to bring depth to the folds in the clothing. Here’s how you can do it:
- Identify the shadows: Begin by applying darker colors to areas where the fabric folds. Because this will create the illusion of depth.
- Blend into mid-tones: Gradually soften the dark shadows into mid-tones using a mix of your base colors with of course a touch of matte medium. The medium will thin the paint, making the transitions smoother and less stark.
Use a round brush for this process, as it helps you cover larger areas and also create sharp, precise lines when needed. I also recommend using a versatile brush that can handle both wide strokes and fine details, especially for painting small portraits.
Step 3: Adding Highlights for Realism
Painting highlights on fabric helps to capture the sheen and texture of the material. In the video, I will highlight the edges of the fabric folds, then create contrast against the shadows. Here’s how to add highlight effectively:
- Use opaque layers: When you reach this stage, start adding opaque layers with titanium white mixed with your base color (e.g., hot pink or naphthol red).
- Focus on the light source: Pay attention to the direction of your light source. For outdoor scenes, as Matt points out, cooler light often creates cooler highlights, so adjust the warmth of your lighter tones accordingly.
Using these lighter tones, gently brush over the highest points of the fabric folds where the light hits. This will give the illusion of three-dimensional texture, making the fabric appear realistic.
Step 4: Handling Different Textures—Lace and Ruffles
When painting more complex textures like lace or tulle, attention to detail becomes crucial. I’ll demonstrates painting lace-like fabric (also known as tulle) in the video by focusing on its intricate, airy texture. To capture such details:
- Paint in negative space: Instead of painting every single lace pattern, leave certain areas untouched to mimic the holes and transparency of the fabric. This “negative space” technique saves time while maintaining the fabric’s appearance.
- Create patterns with light strokes: For ruffles or lace, use very light, almost feathery strokes. This gives the fabric its delicate, flowing look.
For the ruffled parts, focus on the edges where the fabric folds over itself, using slightly darker shadows to accentuate the depth and highlights to make the texture stand out.
Step 5: Building Up Layers for More Depth
Acrylic glazing is an excellent technique to add depth to fabric. As your painting progresses, I gradually builds up layers using matte medium to retain some transparency in each layer. Because this technique allows underlying colors to show through, adding a sense of richness to the fabric.
- Layer gradually: Don’t rush the process. Build up thin layers of paint over time, adding opacity and detail as needed.
- Keep adjusting tones: Constantly adjust your color mixes with matte medium, darkening some areas and lightening others to create a balance of highlights, mid-tones, and shadows.
This layering process not only adds depth but also gives the painting a more polished, professional look, making the clothing appear realistic and multi-dimensional.
Step 6: Detailing the Final Touches
Once the fabric’s main areas are established, it’s time to focus on the finer details. In the video, I’ll show you how to fine-tune small creases and folds in the clothing. To do this:
- Use a smaller brush: A smaller brush will give you more control to add fine details, such as thin lines for wrinkles or subtle highlights along fabric edges.
- Final highlights and shadows: At this stage, you should focus on reinforcing the most prominent highlights and deepening the darkest shadows. This contrast will give the fabric a more realistic appearance.
Pro Tips for Painting Clothing in Acrylic Portraits
- Use transition colors: Blend colors smoothly between highlights and shadows to avoid a harsh look.
- Work in thin layers: Acrylics dry quickly, so work with thin, transparent layers to build up color and depth without creating a heavy texture.
- Experiment with brushes: A versatile round brush like the one I use that allows for both wide coverage and detailed work.
Conclusion
Painting clothing in an acrylic portrait requires attention to detail, patience, and a good understanding of how light interacts with fabric. By following these steps preparing your palette, blocking in shadows and mid-tones, adding highlights, handling textures, and building up layers you’ll be able to paint realistic clothing with ease. Remember to take your time and adjust colors as you go to create depth and realism in the fabric.
With practice, you’ll master the art of painting clothing in acrylic portraits, bringing your work to life with vibrant colors and textures that draw the viewer’s eye.
For further resources and guides, visit realisticacrylic.com and check out my free courses to enhance your acrylic painting journey.
- How to Paint Foliage Using the Acrylic Glazing Technique
- How to Trace for an Accurate Portrait Sketch
- How to Paint Realistic Eyes in Your Acrylic Portrait
- How to Add Raw Umber Dark & Ultramarine Blue to Your Portrait
- How to Make Your Own Raw Umber Dark
- How to Paint Realistic Trees & Grass in Your Acrylic
- How to Block In Skin Tone Values Using Glazing Technique
- How to Paint Vibrant Reds in Your Acrylic Portrait
- How to Glaze Background Colors & More Acrylic Portrait
- How to Paint White Clothing in Your Acrylic Portrait
- How to Easily Transition from a Sketch to a Painting
- How to Block In Shading & Skin Tones in Your Acrylic
- How to Build Up Color on Acrylic Pet Portrait
- How to Build Up Form on Clothing with Acrylic
- How to Paint Dark Clothing Using Acrylic Glazing Technique
- How to Paint a 24 x 30 Acrylic With 30 People
- How to Do Smooth Shading with Acrylic
- How to Sketch an Acrylic Portrait with a Grid
Read more about how to paint a portrait that you can surely be proud of!
I’d love to hear your thoughts about this video. Please share it with your friends and family. Let me know if you have any further questions. I’ll greatly help you.
If you’d like to learn more, sign up for my free email tips and video class today.
Learn How to Paint Acrylic Portraits With My Free Mini-Video Course!
Thank you so much for taking the time to read this tutorial and watch the video. That means a lot to me. I hope you find it very helpful in your portrait painting.
Yours for Better Portraits,
P.S. Did you find this post helpful or encouraging? If so, send it on ahead! Let others know with the share buttons below. I’d love to hear your comments. Thank you so much! Also, do you have a question on acrylic portrait painting you’d like answered? Let me know, and I’d be happy to help!

How to Paint a Realistic Mustache in Acrylic Portrait
Step-by-step guide to paint a lifelike mustache in your acrylic portrait with ease.
Achieving realism in a portrait requires attention to detail, especially when it comes to facial features like mustaches. In this guide, we will explore the step-by-step process of how to paint a realistic mustache in acrylic portrait.
Preparation: Setting the Foundation
Before diving into the mustache details, it is essential to have a strong foundation. This means the portrait’s basic values and underpainting should already be established. The key here is to ensure the right light and shadow balance, especially around the mouth and upper lip area.
Materials Needed:
- Titanium white: To create highlights.
- Raw umber dark: For adding depth to shadows.
- Indian yellow: To create natural warm tones.
- Matte medium: To thin the paint for smooth application.
- Size 8 round brush: Ideal for detailing and creating fine lines.
Step 1: Start with Base Layers
Begin by thinning out your titanium white with matte medium. Then add a small amount of raw umber dark and Indian yellow to create a subtle hue. Also, using your size 8 round brush, you can bring it to a chisel edge for precise strokes.
It is important to start with some base layers of paint before adding any detail. Because these layers help create a three-dimensional effect and establish the direction and placement of the mustache.
Step 2: Block in the Mustache Hairs
Once the base is set, it’s time to start picking out individual hairs. This layer is more about refining the mustache’s texture and creating a natural flow. The technique is to avoid making the hair uniform. Instead, examine your reference photo carefully and note the irregularities and directions in which the hairs grow.
When painting more lifelike, it varies on the brushstrokes in different directions. And then you can have some hairs cross over each other or even extend past the upper lip slightly.
Tip: Don’t aim for perfection with each hair. What matters is the overall impression of the mustache.
Step 3: Focus on Highlights and Shadows
During this stage, the mustache will need to appear more defined. Then pay close attention to where light is hitting the hair and where shadows are forming.
- Highlights: For the lighter hairs, use a mix of titanium white with a touch of raw umber to avoid making them too bright. And then adding matte medium will create a translucent effect that gives the hairs a softer appearance. This is essential for portraying finer hairs and giving the mustache a more natural look.
- Shadows: Towards the bottom of the mustache, each hair will cast a shadow on the hair beneath it. This can be achieved by mixing raw umber dark with the base color, creating a more pronounced shadow effect.
Step 4: Add Nuances for Depth
As you continue, it is also crucial to add some depth and nuance by including small pockets where the skin beneath the mustache is visible. This gives the mustache a more realistic appearance, as it doesn’t look like a flat shape, but rather, individual hairs growing from the skin.
Tip: To avoid the mustache looking too uniform, ensure there are spots where the skin shows through the hair. This not only creates depth but also keeps the painting from appearing too rigid.
Step 5: Blending and Detailing
If any part of the mustache appears too harsh, lightly dab the area with your finger or blend it with a dry brush. Then the idea is to soften any overly defined strokes and make the hairs appear more naturally integrated into the face.
Additionally, darken a few sections towards the edges where the hairs thicken. Adjust the tones subtly to suggest the transition from thicker hairs at the center to finer, lighter hairs towards the outer edges.
Step 6: Final Highlights for Depth
In the last stages, take straight titanium white and add a few highlights to the topmost layer of the mustache. These highlights will catch the light, adding a touch of realism. However, be mindful not to overdo this step.
Placing these small highlights on the lighter side of the mustache (usually where light is hitting) will add depth and dimension. Focus on areas where the mustache might catch the most light, such as the tips of individual hairs or the outer edge.
Technique Recap: Important Tips
- Use a Reference Photo: Always have a clear reference photo when painting a mustache. This helps you capture the unique characteristics and flow of the mustache, ensuring it looks natural.
- Layer Your Paint: Don’t rush into details too quickly. Begin with base layers to build up depth gradually. Adding layers of thin, translucent paint will help create the texture and realism you’re aiming for.
- Mix Colors for Realism: Avoid using pure white or pure black. Mix titanium white with raw umber or Indian yellow to soften the brightness, and add raw umber dark to create natural shadows.
- Vary Hair Directions: A mustache doesn’t have hairs growing in just one direction. Ensure that the hairs have some variation by crosshatching and layering.
- Thin the Paint: Use matte medium to thin the paint. This not only helps in creating translucent effects but also prevents the painting from looking too heavy or artificial.
- Dab for Subtle Effects: When blending, gently dab with your finger or a clean brush. This softens the edges and makes the mustache look more organic.
Conclusion
Painting a realistic mustache in an acrylic portrait involves patience and attention to detail. Then, by focusing on layering, highlights, shadows, and texture, you can create a lifelike mustache that adds character to your portrait. Remember, then the key is in the subtle nuances the tiny details that make the painting come alive. So next time you’re working on an acrylic portrait, use these techniques to bring out the best in your subject’s mustache.
If this tutorial was helpful, don’t forget to leave a comment or ask any questions. Happy painting!
By following these tips, you’ll be able to paint a realistic mustache that enhances the overall look of your acrylic portrait.
If you’re looking for more instructional videos on how to improve your acrylic painting, visit www.realisticacrylic.com for more tutorials and check out my free courses here. .
- How to Paint Foliage Using the Acrylic Glazing Technique
- How to Trace for an Accurate Portrait Sketch
- How to Paint Realistic Eyes in Your Acrylic Portrait
- How to Add Raw Umber Dark & Ultramarine Blue to Your Portrait
- How to Make Your Own Raw Umber Dark
- How to Paint Realistic Trees & Grass in Your Acrylic
- How to Block In Skin Tone Values Using Glazing Technique
- How to Paint Vibrant Reds in Your Acrylic Portrait
- How to Glaze Background Colors & More Acrylic Portrait
- How to Paint White Clothing in Your Acrylic Portrait
- How to Easily Transition from a Sketch to a Painting
- How to Block In Shading & Skin Tones in Your Acrylic
- How to Build Up Color on Acrylic Pet Portrait
- How to Build Up Form on Clothing with Acrylic
- How to Paint Dark Clothing Using Acrylic Glazing Technique
- How to Paint a 24 x 30 Acrylic With 30 People
- How to Do Smooth Shading with Acrylic
- How to Sketch an Acrylic Portrait with a Grid
Read more about how to paint a portrait that you can surely be proud of!
I’d love to hear your thoughts about this video. Please share it with your friends and family. Let me know if you have any further questions. I’ll greatly help you.
If you’d like to learn more, sign up for my free email tips and video class today.
Learn How to Paint Acrylic Portraits With My Free Mini-Video Course!
Thank you so much for taking the time to read this tutorial and watch the video. That means a lot to me. I hope you find it very helpful in your portrait painting.
Yours for Better Portraits,
P.S. Did you find this post helpful or encouraging? If so, send it on ahead! Let others know with the share buttons below. I’d love to hear your comments. Thank you so much! Also, do you have a question on acrylic portrait painting you’d like answered? Let me know, and I’d be happy to help!

Why Teeth are Not White and How to Paint Them Realistically
Discover why teeth in portraits should not be painted white and learn how to achieve realistic results in acrylic painting
When painting portraits, especially in acrylics, artists often encounter a common misconception: that teeth should be painted pure white. However, this approach can lead to unrealistic and unnatural results. In this blog post, we’ll explore why teeth are not actually white and how to paint them realistically in your portraits. This guide will help you create a more lifelike appearance in your acrylic paintings by adjusting the way you depict teeth.
Why Are Teeth Not White in Portraits?
One of the biggest mistakes beginner artists make is painting teeth too white in their portraits. While it’s easy to assume that teeth are white, the reality is far from it. Teeth are not naturally as bright as we imagine them. When you compare a piece of white paper next to the teeth in your reference photo, you will notice a significant difference in value. Even in the best lighting conditions, teeth tend to appear darker due to various factors.
Light and Shadows Affect Teeth Color
A key reason why teeth are not as white as you think is because of the shadows cast by the mouth, lips, and other surrounding features. When you observe a person, you’ll notice that these shadows darken the teeth significantly. Even in bright lighting, the teeth may still appear off-white rather than pure white. For instance, mustaches or beards can further reduce the perceived brightness of teeth, making them look even darker.
How to Paint Teeth Realistically in Acrylic
When painting teeth in a portrait, it’s essential to capture this balance between light and shadow. Here’s a step-by-step guide to help you create a more natural depiction of teeth:
1. Analyze Your Reference Photo
Before applying any paint, take a close look at your reference photo. Hold a piece of white paper up to the teeth and notice the difference in value. This will give you a clear idea of how much darker the teeth are compared to pure white. Observing this contrast will help you determine the right shades to use in your painting.
2. Use Off-White Tones
Instead of using pure white, opt for off-white tones to depict the teeth. Colors such as a soft ivory, light gray, or a pale beige are excellent choices. Mixing a touch of raw umber or burnt sienna into your white paint can help you achieve a more realistic tone for the teeth.
3. Add Shadows for Depth
The shadows cast by the lips and mouth should not be overlooked. Use darker tones around the edges of the teeth to emphasize the depth created by these shadows. You can blend a mix of dark brown or blue-gray tones to add subtle shadows, making the teeth recede naturally into the mouth.
4. Highlight Selectively
While teeth are not pure white, they do have highlights in certain areas where light directly hits them. These highlights can be painted with white, but should only be applied sparingly. Focus on small areas, such as the tips of the teeth or the spots where light reflects the most. By adding these highlights carefully, you’ll make the teeth appear shiny and dimensional without them looking unnaturally bright.
5. Blend for a Smooth Transition
Teeth have a smooth surface, so it’s important to blend the colors and shades gently. Avoid harsh lines or abrupt transitions between shadows and highlights. Use a soft brush to blend the darker tones into the lighter areas for a seamless finish.
Common Mistakes to Avoid
When it comes to painting teeth realistically, there are a few common pitfalls to watch out for:
- Avoid using pure white for the entire tooth surface. This can make the teeth appear flat and unnatural.
- Don’t ignore the shadows around the mouth and lips. These shadows are what give the teeth depth and realism.
- Don’t over-highlight the teeth. Applying too much white will make them stand out unnaturally. Only use highlights in select areas where light naturally hits.
Tips for Achieving Lifelike Results
Here are some additional tips to ensure your teeth look realistic in your acrylic portrait:
- Layer your colors: Start with darker tones for the base of the teeth and gradually layer lighter shades on top to build depth.
- Use small brushes: Precision is key when painting teeth, so opt for small, fine-tipped brushes to work on the details.
- Work with a reference: Always keep a reference photo handy to guide you in accurately capturing the teeth’s value and shading.
Conclusion
Teeth in a portrait should never be painted stark white. Understanding the role of light, shadows, and the natural off-white color of teeth is crucial for creating a realistic portrait. By following the techniques outlined in this post, using off white tones, incorporating shadows, and highlighting selectively, you can paint teeth that look natural and lifelike in your acrylic portraits.
For more tips and tutorials on painting realistic acrylic portraits, visit RealisticAcrylic.com and check out our other tutorials for more insights into mastering portrait painting.
As you can see, teeth are darker value, and you can often achieve it by using a mixture of raw umber and titanium white for the shadows, raw sienna-titanium white for the mid-tones and titanium white-slight bit of indian yellow only for the highlights.
It all comes down to painting correct tonal value–that is, the correct level of light and dark. If you’d like a tool to help you with that, then I have something for you…
I created a tool that you can use to measure the tonal value of any area of your portrait in question against your reference photo. I call it the “Value Checker.” Download and print a copy for yourself today and apply it to the portrait you are currently working on. And you will see an immediate improvement in the realism!
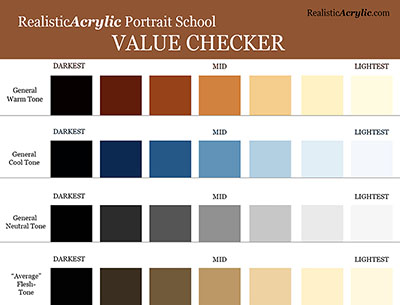
Get the full-resolution 8 1/2″ x 11″ version below…
Get the Value Checker ToolLet me know how this helps! What did you think of this tip on NOT painting teeth white? Did it surprise you?
I’d love to hear how your art journey is going. Shoot me an email and let me know. Or leave a comment. Be blessed in your portrait painting!
Yours for Better Portraits,

Matt
If you found this post helpful or encouraging, would you send it on ahead? Let others know with the share buttons below. I’d love to hear your comments. Thank you so much!

How to Paint Dog and the Foot: Time-Lapse Acrylic Portrait
Learn the acrylic glazing technique to capture realistic pet portraits
I’ll do that by sharing with you a recent acrylic portrait I did, capturing an experience of a woman who was hiking with her dog, and ended up laying down in the snow!
She wanted me to capture that moment of her dog and her foot shown as she snapped the photo from the ground.
This was an 11 x 14, acrylic on canvas, shown in a 5 minute- timelapse format. I painted it using the acrylic glazing technique, where we mix small amounts of paint into large amounts of clear acrylic medium to make the layers translucent, building up amazing depth and luminosity.
Creating a beautiful pet portrait is a fulfilling and meaningful way to immortalize a cherished companion. In this time-lapse tutorial, we explore the process of painting a dog alongside a boot in a snowy environment. This painting captures a special moment where the subject hiked with her dog and playfully fell into the snow. Using the acrylic glazing technique, this tutorial demonstrates how to gradually build up layers, create texture, and capture fine details with accuracy.
In this guide, you will learn about the specific techniques used, from glazing to color mixing, that help achieve a realistic result in acrylic painting. Let’s break down this tutorial, showing you how to paint your dog and foot with depth and detail.
Understanding the Acrylic Glazing Technique
Acrylic glazing is a key technique in this portrait. Because it involves mixing layers of pure acrylic pigment with a medium like matte medium to create translucent layers. So these layers allow you to build up depth and gradually develop the painting without overwhelming the canvas with opaque paint.
When painting a complex scene like this one, it’s essential to apply very light, translucent layers. This enables you to bring every part of the canvas together gradually rather than focusing on one section at a time. The layers should be so thin that the initial strokes remain visible, contributing to the painting’s overall texture.
The glazing technique is ideal for pet portraits and snowy scenes because it lets you replicate the soft transitions of light and shadow that define both fur and reflective snow.
Step-by-Step Painting Process
Start with a Light Base Layer The painting begins with a light wash across the entire canvas. The goal here is not to paint the dog and boot in detail right away but to cover the white canvas and establish the overall value and color structure. By applying a diluted base layer, you avoid stark, distracting areas of blank space. The focus during this step is to work simultaneously on the background and foreground, ensuring that the elements come together harmoniously. Using matte medium thins the paint, allowing the first layer to be transparent and soft.
Layering for Depth Once the light base layer is in place, you can begin layering darker tones. In this tutorial, I use various earth tones such as burnt sienna, raw umber, and raw sienna to add depth to the dog’s fur and the boot. Ultramarine blue is also introduced to darken the areas that need shadow and contrast. When mixing black for the darker areas, the artist combines brown and blue instead of using black directly from the tube. This creates a more nuanced black that maintains richness, avoiding the flatness that comes with premixed black paint.
Building Fur Texture As the layers progress, more details are added to the dog’s muzzle and fur. Instead of trying to paint each strand of fur, I look at the light and dark patterns within his reference image. By carefully observing these patterns, he replicates them with thin brushstrokes, building up the texture without overwhelming the painting with too many details at once. As with many realistic pet portraits, fur should look natural and soft. Glazing helps create that smoothness by allowing you to gradually adjust light and shadow.
Painting the Boot The foot in the painting is treated with the same method as the dog. By beginning with large, simple shapes and then layering on details, the boot emerges naturally within the scene. When painting objects like a boot, it’s important to consider how light interacts with them. Here, the boot is partially illuminated by sunlight and partially in shadow, giving it dimension and form. I carefully adjust these areas with each new glaze, slowly refining the foot’s shape.
Capturing the Snow
The background in this painting consists of trees and a snow-covered ground. To portray the soft, reflective quality of snow, the artist uses lighter tones of white and light blue, creating the texture with round and flat brushes. The glazing technique is particularly useful in this context because it allows for delicate adjustments of shading, replicating the subtle shifts in color that occur in snowy environments.
Adding the final touches, small flecks of snow are painted onto the dog’s muzzle using a round brush. This detail brings the painting to life and helps ground the dog within the environment.
The Importance of a Cohesive Process
Throughout the painting process, it’s important to remember that the goal is to work evenly across the entire canvas. By developing the background and foreground together, you ensure that the painting looks cohesive. Just like a Polaroid photo slowly developing, you want the painting to evolve at a steady pace without leaving any glaring unfinished areas.
As you paint, constantly compare different areas to ensure they are progressing at the same rate. This will also help you catch any issues early, allowing for easy adjustments without needing to rework large sections of the painting.
Adding the Finishing Touches
Once the foundational work is done, the final steps are where the painting truly comes to life. This is the “icing on the cake” phase, where you add the smallest details, such as light reflections in the dog’s eyes or highlights on the snow. These finishing touches bring the painting to its full potential.
I use a round brush at this stage to achieve precision in the small details. This ensures that each part of the painting is crisp and well-defined.
Tips and Techniques for Your Acrylic Portrait
- Start Light, Build Gradually: Use thin layers of translucent paint to build depth without losing the underlying structure of your painting.
- Observe Light and Shadow: When painting fur or clothing, focus on the patterns of light and shadow rather than individual details.
- Mix Your Own Black: Create a richer, more dynamic black by mixing ultramarine blue with burnt umber rather than using black straight from the tube.
- Work the Whole Canvas Simultaneously: Develop your background and foreground together to ensure a cohesive, balanced painting.
- Use Reference Photos: Always have a reference photo on hand to guide your colors, light, and shadow accuracy.
- Stay Patient: Building a painting with layers takes time. Don’t rush the process, and enjoy watching the image slowly develop.
By following these techniques and maintaining a steady pace, you can create a realistic pet portrait like the one in this tutorial. Whether you’re painting a dog, a foot, or another subject, remember to start light, build gradually, and enjoy the process of bringing your canvas to life.
Conclusion: Painting a dog and foot in an acrylic portrait requires patience, attention to detail, and a mastery of techniques like glazing. By layering translucent colors and focusing on the overall structure, you can create a realistic and beautiful portrait. If you’d like to see more painting tutorials, be sure to visit Realistic Acrylic for tips, lessons, and guidance on your painting journey.
I hope that this will inspire you in your own painting.
You can take it slow and easy, working the entire canvas in stages. You don’t have to get it right in the first layer. Rather, you can slowly “steer the ship” to the right destination. You adjust for any mistakes and build on your successes in each additional layer.
Enjoy!
- How to Paint Foliage Using the Acrylic Glazing Technique
- How to Trace for an Accurate Portrait Sketch
- How to Paint Realistic Eyes in Your Acrylic Portrait
- How to Add Raw Umber Dark & Ultramarine Blue to Your Portrait
- How to Make Your Own Raw Umber Dark
- How to Paint Realistic Trees & Grass in Your Acrylic
- How to Block In Skin Tone Values Using Glazing Technique
- How to Paint Vibrant Reds in Your Acrylic Portrait
- How to Glaze Background Colors & More Acrylic Portrait
- How to Paint White Clothing in Your Acrylic Portrait
- How to Easily Transition from a Sketch to a Painting
- How to Block In Shading & Skin Tones in Your Acrylic
- How to Build Up Color on Acrylic Pet Portrait
- How to Build Up Form on Clothing with Acrylic
- How to Paint Dark Clothing Using Acrylic Glazing Technique
- How to Paint a 24 x 30 Acrylic With 30 People
- How to Do Smooth Shading with Acrylic
- How to Sketch an Acrylic Portrait with a Grid
Read more about how to paint a portrait that you can surely be proud of!
I’d love to hear your thoughts about this video. Please share it with your friends and family. Let me know if you have any further questions. I’ll greatly help you.
If you’d like to learn more, sign up for my free email tips and video class today.
Learn How to Paint Acrylic Portraits With My Free Mini-Video Course!
Thank you so much for taking the time to read this tutorial and watch the video. That means a lot to me. I hope you find it very helpful in your portrait painting.
Yours for Better Portraits,
P.S. Did you find this post helpful or encouraging? If so, send it on ahead! Let others know with the share buttons below. I’d love to hear your comments. Thank you so much! Also, do you have a question on acrylic portrait painting you’d like answered? Let me know, and I’d be happy to help!