
For those of you that know me, I have long championed the technique of glazing paint onto a white canvas, so that the light reflects through the layers of paint, giving it added luminosity and depth. I still think it’s a fantastic way to paint.
But occasionally, I like to try something new.
A client from Brooklyn, who I am doing portraits of rabbis for, asked me if I ever tried painting on a black canvas. The idea is that if your painting already has a lot of black areas and dark values (which rabbi portraits do with their dark suits and hats), why not start with a black canvas and work the other way out?
So that’s what I did.
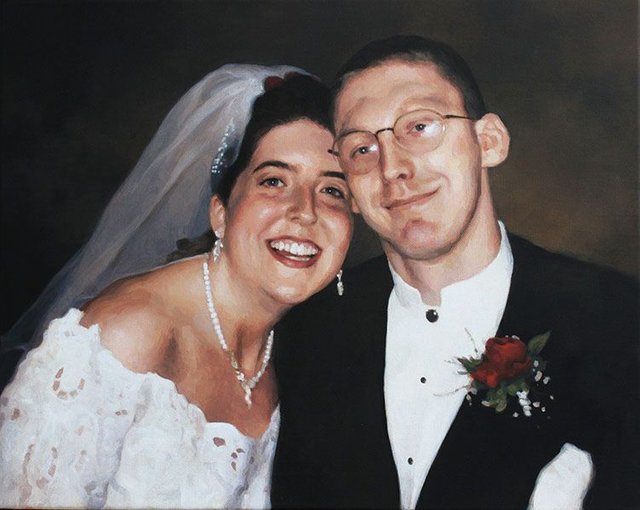
A couple of old high school friends asked me to paint a portrait of them from their wedding day–and I thought, this would be the perfect opportunity to utilize this technique.
Step 1: Toning the Background
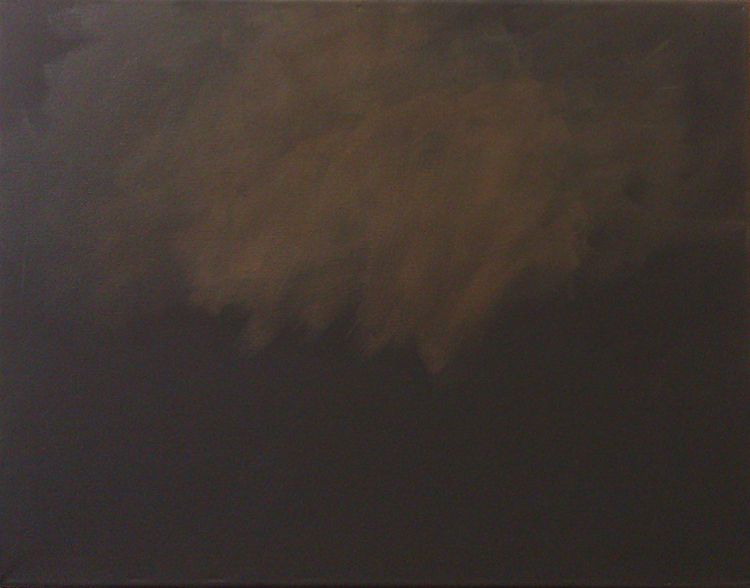
So with that, I bought a 16″ x 20″ canvas already primed with black acrylic gesso. The next step was to tone the background. I used my favorite portrait painting color, raw umber dark and a little bit of raw sienna and burnt sienna, thinned with acrylic medium, applied with a couple layers.
Step 2: Blocking the Forms
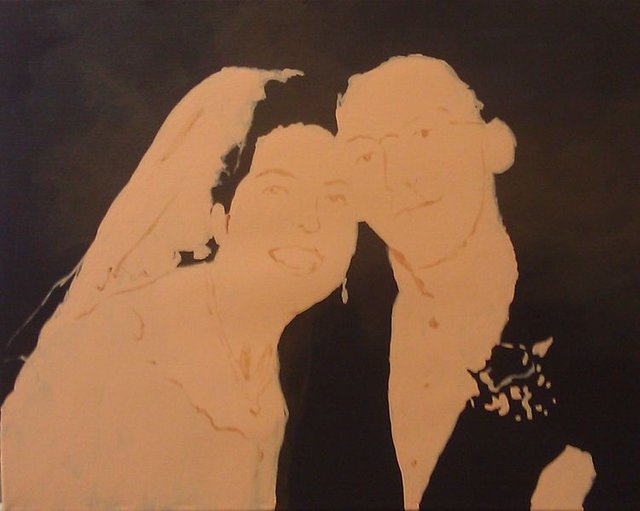
I want to be transparent with my process. Although I utilize many techniques for sketching onto a canvas–from tracing, to using a grid, to freehand sketching, to even painting without a sketch, in this particular painting I used a projector to quickly establish the shapes and forms. I mixed a portrait base tone with titanium white, raw sienna, and burnt sienna and applied it with a couple layers to the canvas, following what I saw in the projection. After the final layer dried, I defined some of the details of the faces and clothing using the portrait tone mixed with burnt sienna and raw umber dark.
Step 3: Building the Foundational Colors and Values
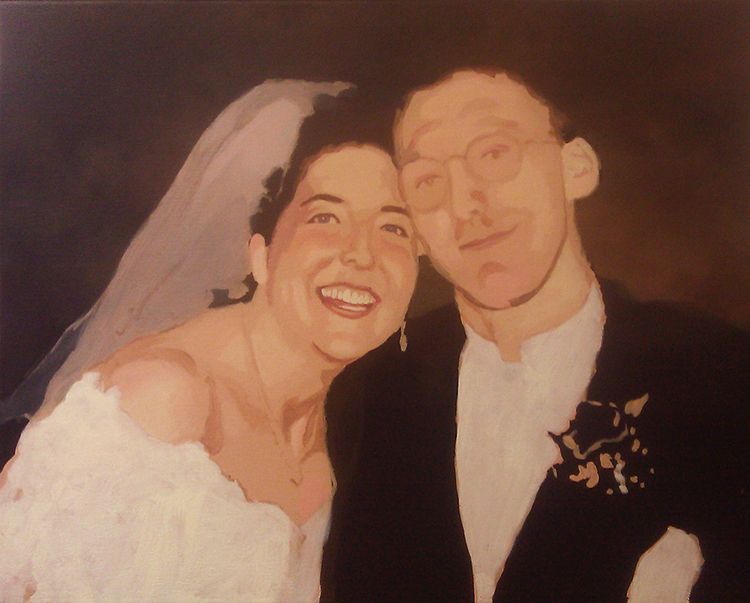
In the next step, I started establishing some tonal values right away with glazes of raw umber dark, and burnt sienna. On the faces, I darkened the details of the eyes, under the chin, added some depth to the faces by establishing the shadows on the sides of the head, with various mixtures of raw umber dark, burnt sienna, and napthol crimson.
Additionally, I painted in the white of the dress with pure titanium white, thinned down with a small portion of medium to give it a translucency effect of white fabric with the skin behind it.
Then I painted in her veil with a mixture of raw umber dark, white, and a tiny bit of ultramarine blue. Most of the cool tones in that veil are achieved by the mixture of the white paint with raw umber dark. Any time you add white paint, you are cooling down the temperature of the color mix, so this can be used intentionally to create that effect.
Finally, I lightened up the background with a few more glazes of raw umber dark, raw sienna, and burnt sienna. This provides more contrast so that the black value of the suit is more clearly outlined.
Step 4: Heightening the Contrast
In this step, I continued to heighten the contrast in the painting all over. I added more glazes of raw umber dark, burnt sienna, and alizarine crimson for the shadow areas, and raw sienna, titanium white, and a tiny bit of indian yellow and organic orange for the highlights. It’s necessary to warm up these highlights with some colors that have more intensity when you mix white into the glaze. (Because I was starting with a medium-value flesh tone as the base, I glazed in reverse for the highlights, moving from that darker value to lighter.)
You can see I darkened in the eyes and added reflections to the eyeballs. That really brought the painting to a higher level, and made me feel good about how it was progressing.
Moving to the other side of the canvas, I introduced red to the boutonniere with napthol red and raw sienna which, mixed together, is very opaque.
Step 5: Adding More Nuances

Here the painting began to really get close to the finish line. I feel like this was the reward for all the tedious work in layering initial values and colors. I kept adding nuances and tones throughout, with various mixtures of raw umber dark, burnt sienna, napthol crimson, raw sienna, titanium white and couple other colors where necessary.
I darkened the veil with some layers of ultramarine blue mixed with ivory black and white, of course, thinned down with clear acrylic matte medium. I wanted to continue to suggest some of the lace in her dress by adding some flesh tone mixture in various patterns.
Sometimes capturing realism is not found in what you put in, but what you leave out.
I could have gone crazy with adding every little texture of the lace and netted tulle openings, but that would be unnecessary. I would likely have distracted from the realism, and certainly draw your attention away from the most important thing; the bride and groom’s faces, exhibiting the joy of the moment of their wonderful day.
Last Step: Adding Final Nuances and Details
When a painting nears completion, you have to balance a couple different factors.
How much more do I need to add to this so it looks fantastic, finished, without going overboard?
What is the deadline?
In this case, I had some wiggle room on the deadline, so that wasn’t a factor. But as a professional portrait painter, I don’t want to take my time adding details that contribute very little to the overall impact of a painting.
But I had a little more work to do. I needed to add in some important jewelry on the veil, her earrings, and define the necklace, as well as some of the buttons on the groom’s shirt. If those details were not there, we can safely say, the client would notice!
In addition to that, I worked all over the painting, adding a few final nuances–heightening the contrast of the teeth, some of those “shiny” highlights on the face that usually glisten due to sweat on the skin, and also some of the details within her dress.
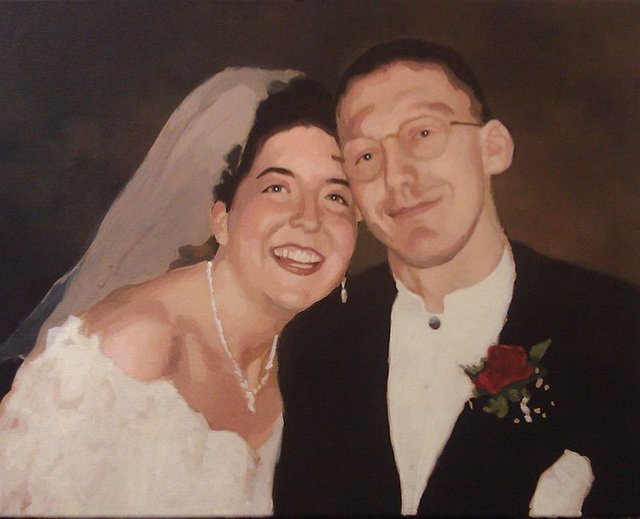
Finally, I signed it and called it done!
I hope you enjoyed this little painting tutorial, and as always, have a blessed day,
- Adding highlights to your acrylic painting
- 5 Excellent Reasons to Use Aluminum Foil
- Paint Realistic Wrinkles in Acrylic
- Painting Clothing in an Acrylic Portrait
- Paint a Cloudy Sky Acrylic
- How to add Semi-Opaque Highlights
- How to Enhance the Contrast in Your Acrylic
- How to Add Glaze to Your Acrylic Painting
- Paint Realistic Reflections on Eyeglasses in an Acrylic Portrait
- Build Up Depth on Your Acrylic Portrait Backgrounds
- How Do You Do Layers With the Glazing Technique?
- Learn How to Paint Wrinkles in Acrylic
Read more about how to paint a portrait that you can surely be proud of!

If you like this post, please share and leave a comment. Thanks!