- You are here:
- Home »
- Blog »
- Video Tutorial »
- Why Teeth are Not White and How to Paint Them Realistically

Why Teeth are Not White and How to Paint Them Realistically
Discover why teeth in portraits should not be painted white and learn how to achieve realistic results in acrylic painting
When painting portraits, especially in acrylics, artists often encounter a common misconception: that teeth should be painted pure white. However, this approach can lead to unrealistic and unnatural results. In this blog post, we’ll explore why teeth are not actually white and how to paint them realistically in your portraits. This guide will help you create a more lifelike appearance in your acrylic paintings by adjusting the way you depict teeth.
Why Are Teeth Not White in Portraits?
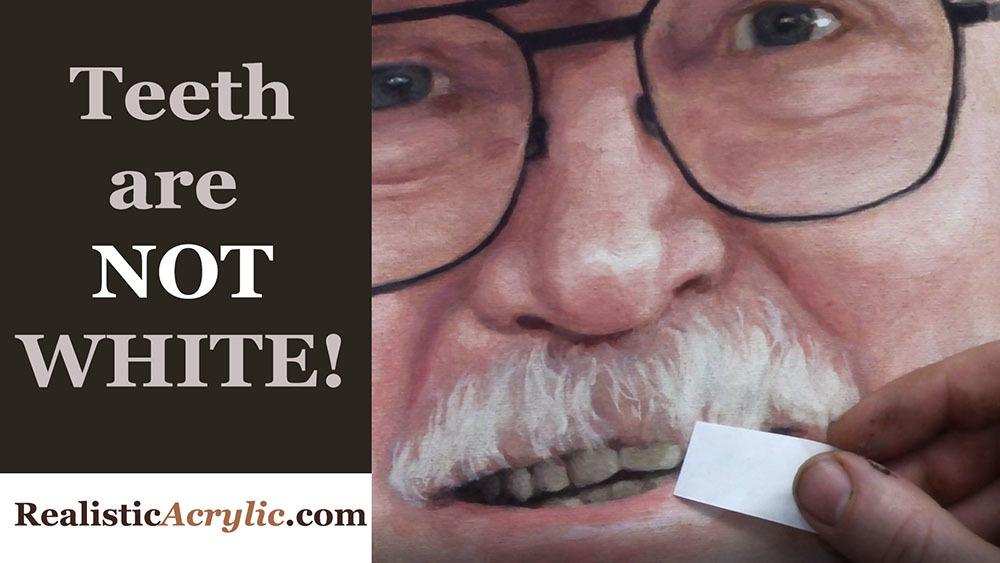
One of the biggest mistakes beginner artists make is painting teeth too white in their portraits. While it’s easy to assume that teeth are white, the reality is far from it. Teeth are not naturally as bright as we imagine them. When you compare a piece of white paper next to the teeth in your reference photo, you will notice a significant difference in value. Even in the best lighting conditions, teeth tend to appear darker due to various factors.
Light and Shadows Affect Teeth Color
A key reason why teeth are not as white as you think is because of the shadows cast by the mouth, lips, and other surrounding features. When you observe a person, you’ll notice that these shadows darken the teeth significantly. Even in bright lighting, the teeth may still appear off-white rather than pure white. For instance, mustaches or beards can further reduce the perceived brightness of teeth, making them look even darker.
How to Paint Teeth Realistically in Acrylic
When painting teeth in a portrait, it’s essential to capture this balance between light and shadow. Here’s a step-by-step guide to help you create a more natural depiction of teeth:
1. Analyze Your Reference Photo
Before applying any paint, take a close look at your reference photo. Hold a piece of white paper up to the teeth and notice the difference in value. This will give you a clear idea of how much darker the teeth are compared to pure white. Observing this contrast will help you determine the right shades to use in your painting.
2. Use Off-White Tones
Instead of using pure white, opt for off-white tones to depict the teeth. Colors such as a soft ivory, light gray, or a pale beige are excellent choices. Mixing a touch of raw umber or burnt sienna into your white paint can help you achieve a more realistic tone for the teeth.
3. Add Shadows for Depth
The shadows cast by the lips and mouth should not be overlooked. Use darker tones around the edges of the teeth to emphasize the depth created by these shadows. You can blend a mix of dark brown or blue-gray tones to add subtle shadows, making the teeth recede naturally into the mouth.
4. Highlight Selectively
While teeth are not pure white, they do have highlights in certain areas where light directly hits them. These highlights can be painted with white, but should only be applied sparingly. Focus on small areas, such as the tips of the teeth or the spots where light reflects the most. By adding these highlights carefully, you’ll make the teeth appear shiny and dimensional without them looking unnaturally bright.
5. Blend for a Smooth Transition
Teeth have a smooth surface, so it’s important to blend the colors and shades gently. Avoid harsh lines or abrupt transitions between shadows and highlights. Use a soft brush to blend the darker tones into the lighter areas for a seamless finish.
Common Mistakes to Avoid
When it comes to painting teeth realistically, there are a few common pitfalls to watch out for:
- Avoid using pure white for the entire tooth surface. This can make the teeth appear flat and unnatural.
- Don’t ignore the shadows around the mouth and lips. These shadows are what give the teeth depth and realism.
- Don’t over-highlight the teeth. Applying too much white will make them stand out unnaturally. Only use highlights in select areas where light naturally hits.
Tips for Achieving Lifelike Results
Here are some additional tips to ensure your teeth look realistic in your acrylic portrait:
- Layer your colors: Start with darker tones for the base of the teeth and gradually layer lighter shades on top to build depth.
- Use small brushes: Precision is key when painting teeth, so opt for small, fine-tipped brushes to work on the details.
- Work with a reference: Always keep a reference photo handy to guide you in accurately capturing the teeth’s value and shading.
Conclusion
Teeth in a portrait should never be painted stark white. Understanding the role of light, shadows, and the natural off-white color of teeth is crucial for creating a realistic portrait. By following the techniques outlined in this post, using off white tones, incorporating shadows, and highlighting selectively, you can paint teeth that look natural and lifelike in your acrylic portraits.
For more tips and tutorials on painting realistic acrylic portraits, visit RealisticAcrylic.com and check out our other tutorials for more insights into mastering portrait painting.
As you can see, teeth are darker value, and you can often achieve it by using a mixture of raw umber and titanium white for the shadows, raw sienna-titanium white for the mid-tones and titanium white-slight bit of indian yellow only for the highlights.
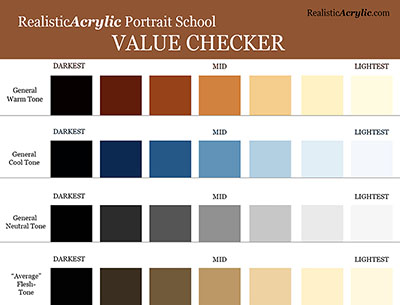
It all comes down to painting correct tonal value–that is, the correct level of light and dark. If you’d like a tool to help you with that, then I have something for you…
I created a tool that you can use to measure the tonal value of any area of your portrait in question against your reference photo. I call it the “Value Checker.” Download and print a copy for yourself today and apply it to the portrait you are currently working on. And you will see an immediate improvement in the realism!
Get the full-resolution 8 1/2″ x 11″ version below…
Get the Value Checker ToolLet me know how this helps! What did you think of this tip on NOT painting teeth white? Did it surprise you?
I’d love to hear how your art journey is going. Shoot me an email and let me know. Or leave a comment. Be blessed in your portrait painting!
Yours for Better Portraits,

Matt
If you found this post helpful or encouraging, would you send it on ahead? Let others know with the share buttons below. I’d love to hear your comments. Thank you so much!

