- You are here:
- Home »
- Blog »
- Written Tutorial »
- [PORTRAIT CHALLENGE] Masterclass Lesson #6: Creating Smooth Blending and Skin Tones

[PORTRAIT CHALLENGE] Masterclass Lesson #6: Creating Smooth Blending and Skin Tones
The Acrylic Portrait Painting Challenge Masterclass, Lesson #6, is out!
In our last lesson, I showed you how to add depth to the dark value of the hat, shadowed areas of the face, and some of the darker areas within the background.
Now that we have a good underpainting foundation in place, it’s time to transition into the “middle” portion of the painting. In other words, we’re working our way towards what the final surface of the portrait will look like.
I want to show you specifically how to create smooth blending and establish realistic skin tones.
It’s important to think of this process like outlining the boundaries of a nation, state (province) or county.
I know, we shouldn’t mix geography with art lessons, but I think this metaphor will help you understand the concept I’m trying to get across…
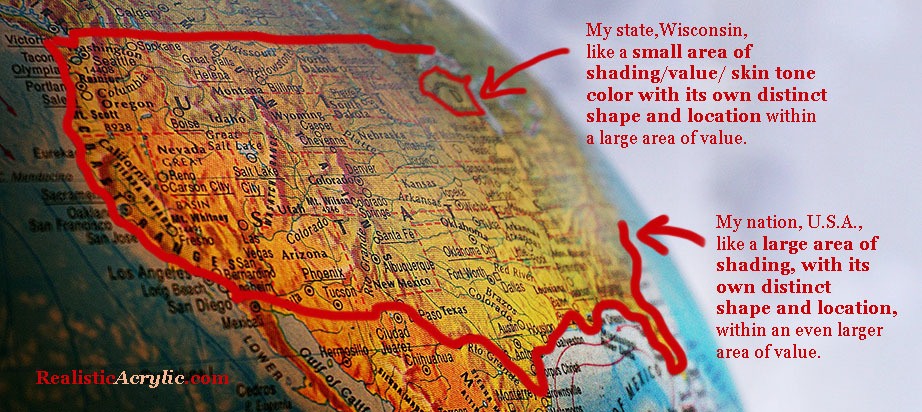
How a US map is like color, shading, and value in an acrylic portrait
I live in the state of Wisconsin, U.S.A. It has its own distinct shape and location within the United States of America. Now, the U.S.A. has its own distinct shape and location within the continent of North America.
In the same way, in a portrait, you may have a small area of value/ skin tone with its own distinct shape and location within the larger area of value/ skin tone. What you want to do is pay attention to the boundary lines on these specific shapes by studying your reference photo.
You won’t see a sharp line you will on a map, unfortunately. But you will see a marked difference where one value/ color ends and another begins.
How to use the idea of a map to improve the realism on your acrylic portrait
You will see a shape emerge. Note that shape.
Then transfer what you see onto your painting. It’s as simple (and challenging!) as that.
You will see shapes within shapes within shapes. The more you can train your eyes to spot these shapes, the better you will become at realistic painting. That’s half the battle. The other half is technique: getting the paint to do what you want it to do.
This concept of “Nations and States” is powerful once you get a hold of it and use it regularly in your acrylic portrait painting! Now, let’s get onto the lesson…
What we want to do at this stage:
Begin the process of adding smooth shading and skin tones throughout the portrait.
We will be adding:
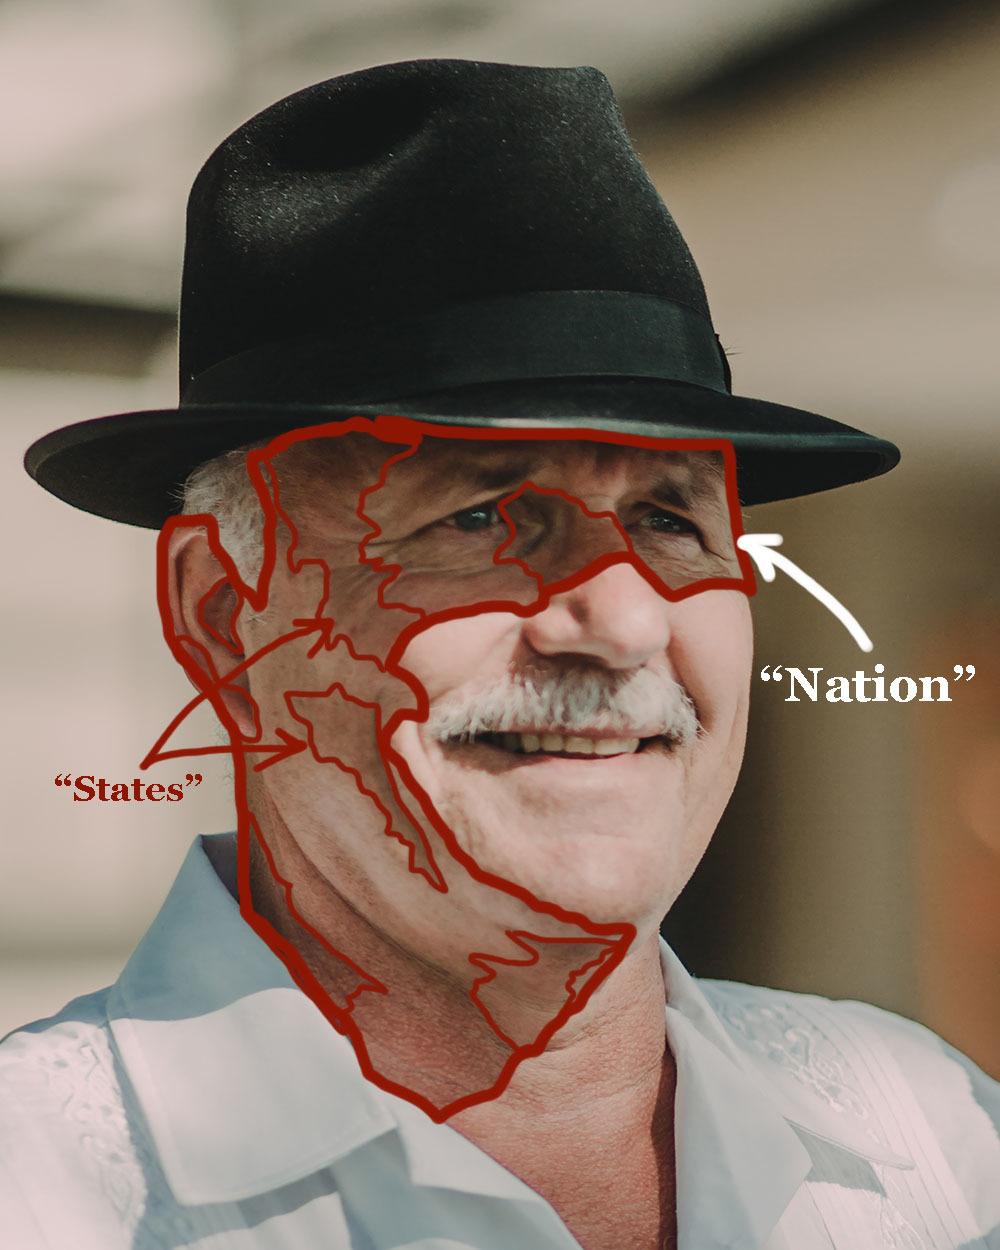
- a large “warming” glaze to the entire shadow area of the man’s face.
- glaze on the highlighted area of the face, adding depth and the beginning of skin tones, so the area is not just plain white or off white.
- small glazes (“states”) on the shadow side (“nation”) of the face to further define the pinkish skin tones.
We will do this using the acrylic glazing technique, where we mix a TINY amount of acrylic paint into a LARGE amount of clear acrylic matte medium. It’s best to go very, very light when you start your painting. You should just barely see a difference. However, at this stage you will getting a bit more opaque, because you have enough layers down already to give you some smoothness in the overall appearance.
Also, as always, make sure you rinse your brush off thoroughly between glazes. Any extra water in the heel of the brush may cause your glazes to drip or get streaky.
Here’s how to do it:
STEP ONE
- First, mix the “warming glaze” for the shadow side of the face: Use raw sienna and mix with a large amount of matte medium (10% paint to 90% medium) as shown in the video lesson. “Scoop” a large amount of glaze onto your 3/4″or 1″ flat brush. A few of the glazes will get a little darker, with ratios of as much as 30% paint to 70% medium. Make sure you watch the video to know where and when to change the ratio. “Next, glaze
- Glaze on the highlight side of face, to “tie-in” with the shadow side, develop mid-tones and create depth: Use raw sienna and organic pyrrole orange (or a cadmium orange) and mix it 5% paint to 95% matte medium. Test the glaze and see if you need to add more pigment or more medium. You should just barely see a difference in what you apply.
- Add small glazes in specific locations (“states”) on the shadow side of face using organic pyrrole orange, raw sienna, and a bit of alizarine crimson if needed to darken the glaze without adding too much chromatic intensity.
STEP TWO
- Add another layer of shading to the man’s hat and the background: Use raw umber dark, ultramarine blue, and a touch of alizarine crimson. How much of each? It depends on what the hat looks like right now as you paint. Is it too bluish? Add more raw umber dark. Is it too brownish? Add more ultramarine blue. Is it too greenish? Add alizarine crimson—just a pinch.
- Take the same glaze you used for the hat and add some shadows below his hat: Because it is right underneath the brim of his hat, the shadows will be quite dark in value. Add a bit of raw umber dark (or raw umber) and a bit of alizarin crimson if necessary to warm up the glaze, especially as you transition into the lighter parts of the skin tones.
- Clean off your brush and apply a blue glaze to the highlighted areas in his shirt: Mix ultramarine blue and phthalo blue (just a bit—it’s a VERY strong pigment) into a large amount of matte medium (95% to 5%, ratio to start with, and test to see if you need to change it) We want to bridge the gap between the shadows and the highlights, adding much-needed depth to this area of the painting.
STEP THREE
- Repeat Step 1, with slight adjustments. Follow the video for more detailed instruction.
Ready to paint?
Now, before you begin…(Yes, still need to ask, because some folks are just discovering these Masterclass lessons 🙂 )
Are you registered for the challenge?
If not, register below for FREE and I’ll send you:
- a downloadable/ printable”Welcome Kit” with a Supplies List and a Palette Color Layout Guide.
- high-resolution images of the photo we’ll be painting from for this challenge.
- each new lesson that comes out in this Masterclass series.
- a link to my private Facebook group, where you can do this challenge with other artists, get feedback and help on your portrait, and not feel alone.
REGISTER TODAY. The challenge is ongoing, something you can do at your own pace. It’s not too late to enter!
Register for the Challenge!
Watch my in-depth Masterclass acrylic online tutorial below to see these steps in action.
After learning from this video, you’ll know exactly how to do it.
Make sure to watch the ENTIRE video first before diving into the painting. It will be worth it to do that. Then, I’d like you to go back and refer to whatever steps you need to as you paint. That way, you won’t miss any of the instruction and tips that will help you make this portrait your very best.
Here’s the video…
[PORTRAIT CHALLENGE] Masterclass Lesson #6: Creating Smooth Blending and Skin Tones
Moving Forward…
If you have gotten this far in the challenge, I’m proud of you! It’s not easy to try something new, especially during a challenging time (COVID-19 as I write) but you are making a difference in your own life by developing the talent God gave you and you will be making a difference in others lives when you freely share the beautiful artwork you create with those you love or want to impact.
I’ll see you in our next class! What is it going to be? Painting fantastic facial features. I’m excited to share that with you! Until then, be blessed in your painting and you and your family stay safe and healthy.
Yours for Better Portraits,
![]()
If you found this post helpful or encouraging, would you send it on ahead? Let others know with the share buttons below. I’d love to hear your comments. Thank you so much!
Let me know if you have any questions about the challenge that I didn’t answer. Leave your question in the comments below and I’ll get back to you!