Archive Monthly Archives: February 2022

How to Adjust the Eyes in an Acrylic Portrait
Discover the key techniques for correcting and enhancing eye details in acrylic portraits
Creating Realism Through Eye Adjustments
When painting an acrylic portrait, one of the most challenging yet crucial aspects to master is capturing the eyes accurately. Because the eyes are the focal point of a portrait, and even small misalignments or incorrect proportions can alter the entire mood of the painting. And then in this post, we’ll guide you step-by-step on how to adjust the eyes in an acrylic portrait, focusing on enhancing the visual weight, perfecting the line thickness, and making necessary corrections to achieve a realistic look.
Understanding the Importance of Corrections in Portraiture
All artists, no matter their skill level, face challenges when working on detailed aspects like the eyes. The good news is that making corrections is a natural part of the painting process. Then learning how to modify and improve your work ensures your portrait becomes more lifelike.
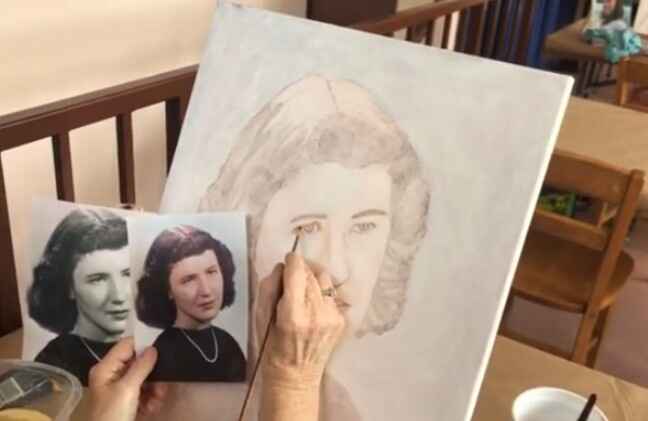
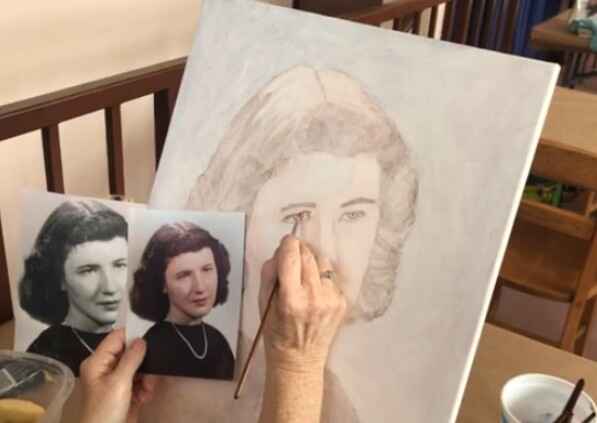
In this video tutorial, I guide a fellow artist through adjusting the eyes in an acrylic portrait. Then the process includes thickening specific lines and matching the eye shape more closely to the reference photo. Because by understanding how to use these techniques, you’ll be able to refine your own portraits and create more accurate and convincing results.

Step-by-Step Guide to Adjusting the Eyes
1. Assess the Current Eye Shape
Then begin by evaluating the current state of the eyes in your portrait. Compare them carefully with your reference photo, paying close attention to the upper eyelids, irises, and overall proportions. Sometimes, even slight inaccuracies in these areas can make the eyes appear flat or misaligned. In the video below, we noticed the eye shape needed more refinement to match the model.
2. Thicken the Eyelid Line for Visual Weight
To reduce scalloping (uneven curves), start by thickening the line above the upper eyelid. This technique creates a more defined and realistic appearance. Using a small brush, gently add a second layer of paint to the eyelid, focusing on the area right above the iris. Thickening this line helps give the eyes more visual weight, making them stand out naturally against the surrounding facial features.
Tip: Avoid following the original line exactly. Instead, round off the edges slightly to create a smoother transition.
3. Round Off the Eye Shape
Sometimes the eyes can look too flat, especially if the lines are too straight or rigid. To fix this, gradually round off the shape of the eye. This can be done by adding subtle curves to the top and bottom eyelids. When rounding the eye, pay special attention to the middle area directly above the iris, as this part often needs extra thickness to mimic the natural curvature of the eye.
Technique: Use a fine brush to apply thin layers of paint. It’s essential to work in small increments to prevent over-adjustment. This ensures you maintain control over the changes you’re making.
4. Matching the Painting to the Reference Photo
One of the best ways to achieve accuracy in portrait painting is by continuously comparing your work to the reference photo. For many artists, this process can involve placing the reference photo directly next to the canvas, or even taping it onto the canvas for easy comparison.
In the video below, I advised to keep checking how the thickened lines and rounded shapes brought the portrait closer to the reference. Each adjustment, no matter how small, contributed to a more accurate representation of the subject.
5. Adjusting the Opposite Eye
Once one eye has been corrected, it’s important to adjust the opposite eye to ensure symmetry. In this case, the same technique was applied to both eyes: adding more weight to the top of the eyelid and rounding off the edges.
Tip: Work on both eyes alternately rather than finishing one completely before starting the other. This method helps maintain balance and consistency between the two.
6. Darkening and Extending the Eyelid Shadow
To add depth to the eyes, focus on darkening the shadow underneath the eyelids. Shadows are crucial for conveying three-dimensionality and creating a sense of depth in your portrait. Use a darker tone than the skin color, and apply it lightly under the lower eyelid to enhance the eye’s form.
The artist also extended the shadow slightly to the outer edge of the eye, creating a more natural flow. This step helps to reinforce the illusion of light and shadow interacting with the contours of the face.
Technique: Use glazing to gradually build up darker tones, applying thin layers to ensure a smooth blend with the surrounding skin tones.
Common Mistakes to Avoid
While adjusting the eyes in your acrylic portrait, there are some common pitfalls to watch out for:
- Overcorrecting: It’s easy to make too many changes, which can throw off the overall proportions. Work incrementally, making small adjustments, and step back frequently to evaluate your progress.
- Inconsistent Line Thickness: When thickening the lines around the eyes, ensure consistency. If one eye has a significantly thicker line than the other, it will look disproportionate.
- Neglecting Symmetry: Symmetry is key in portraiture. Although no face is perfectly symmetrical, large discrepancies in the eyes will be noticeable. Make sure both eyes align properly with one another.
Final Touches and Review
After making all necessary adjustments, take a final look at your work from a distance. This will give you a fresh perspective on how the eyes fit within the portrait as a whole. If needed, you can further tweak the thickness of the lines or refine the shadowing to enhance realism.
In the video, the artist took a step back and reviewed their work after the adjustments were made, noticing a significant improvement in the likeness of the subject. With a few final touches, such as subtle darkening of the outer corners of the eyes, the portrait came together beautifully.
Bringing Your Portrait to Life Through Eye Adjustments
Adjusting the eyes in an acrylic portrait requires patience, practice, and attention to detail. By thickening the lines, rounding off the shapes, and carefully comparing your work to a reference photo, you can significantly improve the realism of your portrait. These techniques allow you to correct minor errors and bring your artwork to life.
By following the steps outlined here, you will be able to refine your skills and produce more convincing and engaging acrylic portraits. Keep practicing, and soon you’ll master the art of adjusting the eyes in your paintings with ease.
If you’re looking for more instructional videos on how to improve your acrylic painting, visit www.realisticacrylic.com for more tutorials and check out my free courses here. .
LEARN MORE
- How to Paint Foliage Using the Acrylic Glazing Technique
- How to Trace for an Accurate Portrait Sketch
- How to Paint Realistic Eyes in Your Acrylic Portrait
- How to Add Raw Umber Dark & Ultramarine Blue to Your Portrait
- How to Make Your Own Raw Umber Dark
- How to Paint Realistic Trees & Grass in Your Acrylic
- How to Block In Skin Tone Values Using Glazing Technique
- How to Paint Vibrant Reds in Your Acrylic Portrait
- How to Glaze Background Colors & More Acrylic Portrait
- How to Paint White Clothing in Your Acrylic Portrait
- How to Easily Transition from a Sketch to a Painting
- How to Block In Shading & Skin Tones in Your Acrylic
- How to Build Up Color on Acrylic Pet Portrait
- How to Build Up Form on Clothing with Acrylic
- How to Paint Dark Clothing Using Acrylic Glazing Technique
- How to Paint a 24 x 30 Acrylic With 30 People
- How to Do Smooth Shading with Acrylic
- How to Sketch an Acrylic Portrait with a Grid
Read more about how to paint a portrait that you can surely be proud of!
I’d love to hear your thoughts about this video. Please share it with your friends and family. Let me know if you have any further questions. I’ll greatly help you.
If you’d like to learn more, sign up for my free email tips and video class today.
Learn How to Paint Acrylic Portraits With My Free Mini-Video Course!
Thank you so much for taking the time to read this tutorial and watch the video. That means a lot to me. I hope you find it very helpful in your portrait painting.
Yours for Better Portraits,

P.S. Did you find this post helpful or encouraging? If so, send it on ahead! Let others know with the share buttons below. I’d love to hear your comments. Thank you so much! Also, do you have a question on acrylic portrait painting you’d like answered? Let me know, and I’d be happy to help!
