- You are here:
- Home »
- Blog »
- Video Tutorial »
- Learn How to Finish your Portrait with Glazing Technique

Learn How to Finish your Portrait with Glazing Technique
A step-by-step breakdown of subtle glazing, final adjustments, and professional finishing touches that bring an acrylic portrait to life.
Finishing an acrylic portrait is often where a painting either comes together or falls flat. At this stage, the drawing is already established, the values are mostly correct, and the likeness is present. However, realism is still refined through subtle decisions. This is where the glazing technique becomes essential.
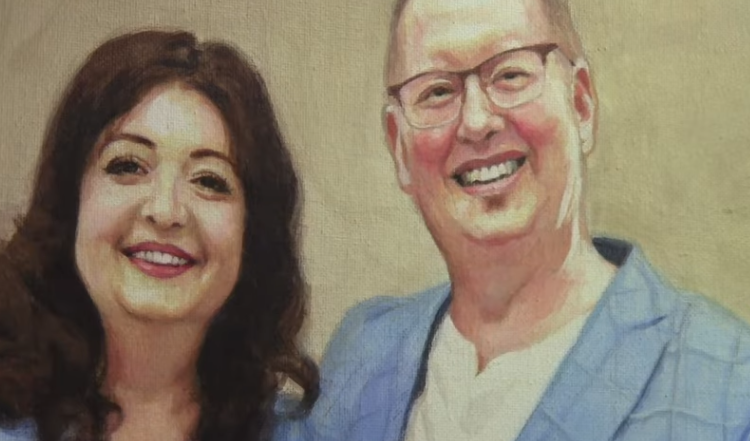
In this lesson, the final stage of a 16 x 20 acrylic portrait of a couple is demonstrated. Rather than making major changes, the focus is placed on small adjustments. These adjustments include nuanced shading, softened transitions, and carefully placed highlights. Through glazing, depth is increased without overpowering the work that has already been done.
What follows is a detailed breakdown of how an acrylic portrait can be finished using controlled glazes, intentional color choices, and thoughtful final touches.
Understanding the Role of Glazing Technique in the Final Stage
Glazing is the process of applying thin, semi-transparent layers of paint over dry areas. In acrylic portrait painting, this method allows color and value to be adjusted gradually. Because the underlying layers remain visible, the portrait retains its structure while gaining richness and realism.
At the finishing stage, glazing is not used to repaint forms. Instead, it is used to enhance them. Shadows are deepened slightly. Warmth is added where skin meets hair. Highlights are refined so forms appear more dimensional. As a result, the portrait begins to feel cohesive rather than pieced together.
It should be noted that restraint is critical. Each glaze is applied lightly, then evaluated. Because acrylics dry quickly, changes can be made efficiently, but overworking must be avoided.
Palette Setup and Color Selection
Before any finishing work is done, the palette is prepared with a consistent set of colors. This consistency ensures harmony across the portrait.
The colors used include:
- Raw Umber Dark
- Burnt Sienna
- Raw Sienna
- Phthalo Blue
- Ultramarine Blue
- Alizarine Crimson
- Natural Red
- Organic Orange
- Indian Yellow
- Titanium White
These colors allow for a wide range of skin tones, warm shadows, and cool accents. Throughout the finishing process, small variations of these colors are mixed rather than introducing new pigments. Because of this, the portrait maintains visual unity.
Refining Forehead and Temple Shadows
One of the first areas addressed is the forehead and temple. At this stage, the values are already correct, but they can be strengthened subtly.
A semi-opaque glaze is mixed using raw umber dark, burnt sienna, and a touch of titanium white. This mixture is applied lightly near the temple and along the side of the forehead. The goal is not to darken dramatically, but to suggest form and depth.
Additionally, warmth is introduced beneath the hairline using organic orange, Indian yellow, and titanium white. This step is especially important. When hair meets skin, a shadow is naturally cast. Without this transition, the hair can appear pasted onto the head.
By glazing warm tones under the hairline, a believable shadow is created. As a result, the hair appears to sit naturally on the skull rather than float above it.
Creating Transitions Along the Jaw and Neck
Next, attention is given to the jawline, neck, and upper chest area. These transitions are often overlooked, yet they play a major role in realism.
A thin glaze is applied along the edge of the jaw to soften the transition between light and shadow. This helps define the structure of the face while keeping the edge from looking too sharp.
Similarly, light shading is added to the neck and upper chest. Because the head casts a shadow downward, this area benefits from a gentle darkening. The glaze is blended carefully so no harsh lines remain.
Through these adjustments, the head appears more convincingly connected to the body.
Subtle Shading on Hands and Fingers with Glazing Technique
The hands are treated with the same care as the face. Light shading is added to the fingers using thin glazes. Rather than outlining forms, shadows are suggested with gradual value shifts.
These glazes are blended softly, allowing the underlying paint to show through. As a result, the hands retain a natural look without appearing overworked.
Refining Facial Features on the Second Subject using Glazing Technique
For the second figure, attention is focused on blending skin tones and enhancing projection.
A small amount of shading is added beneath the lower lip. This creates the illusion that the chin projects forward. Without this shadow, the face can appear flat. Titanium white and raw sienna are primarily used, allowing for subtle control.
Once the shadows are adjusted, highlights are refined. Titanium white mixed with a touch of Indian yellow is applied sparingly to the nose, cheek, and chin. These highlights are kept small. Because of this, they enhance form rather than distract from it.
Each highlight is placed with intention, then blended gently at the edges.
Enhancing Highlights on the Male Portrait
The male subject receives similar treatment. Highlights are added to the nose and forehead to increase dimensional. Again, restraint is emphasized. Only a small amount of paint is needed.
Additional warmth is introduced to the ear using organic orange mixed with titanium white. This combination creates a natural pink tone that works well for ears in many cases.
The ear is then refined with both highlights and shadows. Titanium white is added to the lower lobe, while darker tones are used sparingly to increase contrast. These adjustments help the ear sit naturally within the head.
Increasing Contrast Around Facial Details
As the portrait nears completion, contrast is selectively increased.
The glasses frame is darkened slightly using raw umber dark and alizarine crimson. Because, this helps separate the glasses from the face without overpowering the surrounding areas.
The small gap between the teeth and the mouth is filled in using a darker mixture of raw umber dark, ultramarine blue, and natural red. This area is intentionally kept dark. Because of this, the mouth appears more defined and realistic.
Additional contrast is added around the eyes and nostrils. These dark accents are blended outward so they transition smoothly into surrounding skin tones.
Adjusting Shadows Around the Nose and Glasses
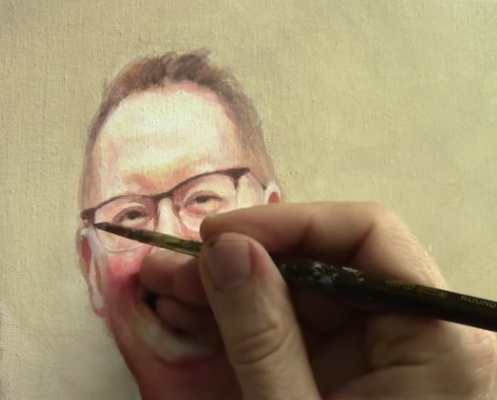
A thin glaze of burnt sienna is applied beneath the nostril and blended downward. Because, this subtle adjustment helps the nose feel more three-dimensional.
Shading is also added beneath the glasses frame where it meets the hair and ear. This small detail adds realism by suggesting contact and cast shadow. Even though it is a minor adjustment, it has a noticeable impact.
Final Clothing and Background Touch-Ups
Before signing the painting, small touch-ups are addressed. A missing area in the dress is filled using ultramarine blue, alizarine crimson, and a touch of phthalo blue. The value is adjusted carefully so it matches the surrounding fabric.
Titanium white is added gradually to lighten the area until it blends seamlessly. Any small splotches or inconsistencies are corrected at this stage.
Because these changes are minor, they are handled quickly and with confidence.
Signing the Acrylic Portrait
The final step is signing the painting. A color similar to the background is mixed using raw umber dark and a touch of titanium white. This ensures the signature is visible without drawing unnecessary attention.
A small round brush is used, and the signature is placed in the lower right corner. If visual weight had been present in that area, the signature would have been moved. In this case, the right corner provides balance.
The full name is signed clearly, completing the painting.
Tips and Techniques for Finishing Acrylic Portraits with Glazing
- Thin glazes should be used rather than thick paint
- Warm tones under hairlines create natural shadows
- Highlights should be small and intentional
- Contrast should be increased selectively
- Transitions matter more than sharp edges
- Final details should enhance, not distract
- The signature color should relate to the background
Final Thoughts
Finishing an acrylic portrait using the glazing technique is about refinement rather than reinvention. At this stage, the painting already works. What glazing allows is control. Control over warmth, depth, transitions, and focus.
Through thin, intentional layers, realism is increased without losing freshness. Shadows are softened. Highlights are clarified. Edges are unified. As a result, the portrait feels cohesive and resolved rather than overworked.
When restraint is practiced and each adjustment is evaluated before moving forward, glazing becomes one of the most powerful tools in acrylic portrait painting.
Frequently Asked Questions
What is the glazing technique in acrylic portrait painting?
The glazing technique is the process of applying thin, semi-transparent layers of acrylic paint over dry paint to refine color, depth, and realism without covering underlying details.
When should glazing be used in an acrylic portrait?
Glazing should be used during the final stages of an acrylic portrait, after the drawing, values, and base colors are already established.
Why do acrylic portraits still look flat after glazing?
A portrait can look flat when contrast is too even, highlights are too broad, or shadows are not selectively deepened around key features like the eyes, nose, and mouth.
How thin should an acrylic glaze be?
An acrylic glaze should be thin enough that the paint underneath is clearly visible, with the glaze adjusting tone rather than covering the surface.
Can glazing fix mistakes in an acrylic portrait?
Glazing can correct minor issues such as uneven skin tones or harsh transitions, but it cannot fix major drawing or proportion errors.
What colors are best for glazing skin tones?
Earth tones such as raw umber, burnt sienna, raw sienna, and alizarine crimson are ideal for glazing skin tones, with warm accents added sparingly.
How do you avoid overworking when glazing?
Overworking is avoided by applying one glaze at a time, letting it dry, and reassessing before making additional changes.
Should highlights be glazed or painted opaquely?
Highlights are usually applied more opaquely at the end of the process and should be kept small and intentional.
Where should you sign an acrylic portrait?
An acrylic portrait is usually signed in a low-visual-weight corner using a color that relates to the background.
Is the glazing technique good for beginners?
Yes, glazing is beginner-friendly because it allows gradual adjustments and builds realism without aggressive repainting.
If you want to go deeper into glazing, skin tones, and realistic portrait techniques, more step-by-step training is available.
On realisticacrylic.com, you will find:
- In-depth video tutorials
- Free acrylic portrait classes
- Structured lessons for all skill levels
- Proven techniques for realism and control
Also, these resources are designed to help you paint with confidence and finish your portraits with clarity and intention.
Explore the full library of tutorials and continue building your skills at realisticacrylic.com.
- How to Paint Foliage Using the Acrylic Glazing Technique
- How to Trace for an Accurate Portrait Sketch
- How to Paint Realistic Eyes in Your Acrylic Portrait
- How to Add Raw Umber Dark & Ultramarine Blue to Your Portrait
- How to Make Your Own Raw Umber Dark
- How to Paint Realistic Trees & Grass in Your Acrylic
- How to Block In Skin Tone Values Using Glazing Technique
- How to Paint Vibrant Reds in Your Acrylic Portrait
- How to Glaze Background Colors & More Acrylic Portrait
- How to Paint White Clothing in Your Acrylic Portrait
- How to Easily Transition from a Sketch to a Painting
- How to Block In Shading & Skin Tones in Your Acrylic
- How to Build Up Color on Acrylic Pet Portrait
- How to Build Up Form on Clothing with Acrylic
- How to Paint Dark Clothing Using Acrylic Glazing Technique
- How to Paint a 24 x 30 Acrylic With 30 People
- How to Do Smooth Shading with Acrylic
- How to Sketch an Acrylic Portrait with a Grid
Read more about how to paint a portrait that you can surely be proud of!
I’d love to hear your thoughts on this video. Please share it with your friends and family. Let me know if you have any further questions. I’ll greatly help you.
If you’d like to learn more, sign up for my free email tips and video class today.
Learn How to Paint Acrylic Portraits With My Free Mini-Video Course!Thank you so much for taking the time to read this tutorial and watch the video. That means a lot to me. I hope you find it very helpful in your portrait painting.
Yours for Better Portraits,

P.S. Did you find this post helpful or encouraging? If so, send it in ahead! Let others know with the share buttons below. I’d love to hear your comments. Thank you so much! Also, do you have a question on acrylic portrait painting you’d like answered? Let me know, and I’d be happy to help!