- You are here:
- Home »
- Blog »
- Uncategorized »
- How to Fix a Portrait if You’re Not Happy

How to Fix a Portrait if You’re Not Happy
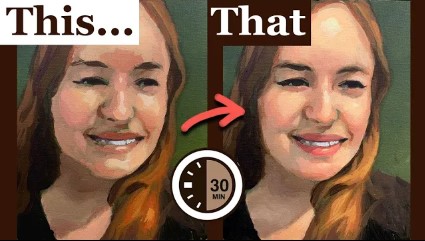
Improve your acrylic portraits with in 30 minutes
Introduction: Mistakes Happen – Here’s How to Fix Them
Even the most experienced artists encounter moments where a painting doesn’t turn out as planned. It’s easy to feel frustrated when your portrait lacks the desired realism or proportions. In this post, I’ll guide you through the process of fixing a portrait that you’re not entirely happy with. Whether it’s adjusting skin tones or correcting facial features, you’ll learn techniques to elevate your painting and bring it closer to your artistic vision.
Step 1: A Fresh Start—Assess and Plan
Before diving in with your paintbrush, take a moment to analyze what needs improvement. Do the eyes look slightly off? Are the skin tones muddy or too stark? Evaluating your painting will help you focus on the areas requiring attention.
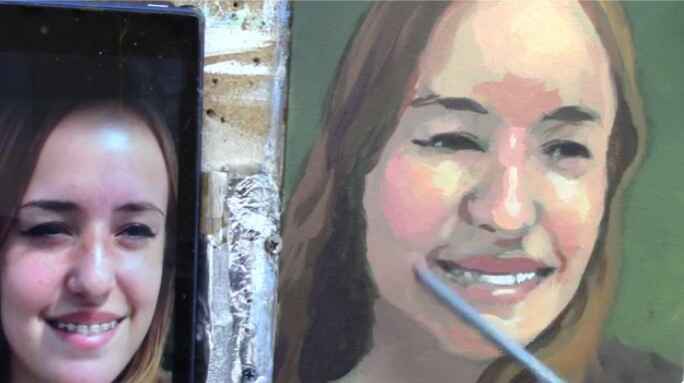
I revisited a previously completed 30-minute portrait. By carefully studying the face, I noticed that the distance between the eyebrows and eyes was too wide, affecting the overall likeness. Correcting proportions and refining features, even after the initial work, is a natural part of the artistic process.
Tip: Use a reference image if you feel lost. This will provide a clearer idea of the adjustments needed, whether it’s the shape of the jawline or skin tone shading.
Step 2: Adjusting Facial Features for Realism

One of the most common issues in portrait painting is inaccurate proportions, especially in the facial features. If the distance between the eyes and eyebrows seems off, it can throw the whole portrait out of balance.
In this portrait, I focused on fixing the eyes and the eyebrows. To start, I used a mix of ivory black and ultramarine blue to redefine the upper eyelid crease. Adding burnt sienna helped tone down the color and add depth. By lowering the eyebrow closer to the eye, the facial expression and overall likeness began to improve dramatically.
Technique: Use a fine, pointed brush for precise work when adjusting the eyes or eyebrows. This will allow you to get clean lines and maintain control over your modifications.
Step 3: Enhancing Skin Tones – Achieving a Natural Glow
Skin tones can be tricky, especially if they’ve turned out too blotchy or chalky. In the video, I needed to soften some areas of the skin while adding warmth to others.
To begin, I mixed titanium white with burnt sienna and raw umber dark to create a base skin tone. Gradually, I added Indian yellow and pyrrole orange to warm up the flesh tones, especially in the forehead and cheeks. This layering technique added a gradient effect, bringing dimension and life to the face.
Tip: When lightening skin tones, avoid using too much white alone, as it can create a chalky effect. Instead, mix in warm colors like Indian yellow or pyrrole orange to maintain a natural appearance.
Step 4: Blending Techniques – Wet on Wet for Smooth Transitions
Blending is an essential skill in acrylic painting, especially when you’re working to fix areas that feel too harsh or unblended. In this portrait, I used the wet-on-wet technique to merge the darker and lighter skin tones. This technique involves working while the paint is still wet, allowing for a seamless transition between colors.
For the neck and chest area, I first applied a base of titanium white mixed with burnt sienna and added raw umber dark for depth. Once the base was down, I blended the colors softly using the edge of a filbert brush. The result was a smoother, more realistic look with better depth and shadow.
Technique: When blending, use a light touch and work in small, circular motions. Don’t press too hard, as this can smear the paint and create unwanted streaks.
Step 5: Adding Highlights – Avoid Chalkiness
Highlights are the final touch that can make your portrait pop. However, it’s essential to be careful with color selection. Adding too much pure white can lead to an unnatural, chalky finish.
In the video, I used a combination of titanium white and Indian yellow for my highlights. The Indian yellow helped to maintain a warmer, more natural glow while still brightening the areas where light would naturally hit, like the forehead and upper cheeks.
Tip: Always mix a bit of a warm color like Indian yellow into your white when applying highlights. This prevents your highlights from looking too stark and helps them blend more harmoniously with the skin tones.
Step 6: Finishing Touches – Fine Details for Likeness
Once the main adjustments have been made, it’s time to step back and look at the fine details. Small tweaks, such as redefining the lips or jawline, can significantly impact the overall realism of the portrait.
In this painting, I worked on refining the jawline using a mix of titanium white and burnt sienna to correct the shape. Subtle strokes on the chin and cheek areas created more depth and better symmetry, which enhanced the likeness of the subject.
Technique: When working on finishing touches, use a small round brush for precision and apply paint sparingly. These final strokes can define your portrait and give it the polished look you desire.
Embrace the Process of Refinement
Fixing a portrait doesn’t have to be a daunting task. In fact, it’s an opportunity to enhance your skills and gain confidence as an artist. By using techniques such as adjusting proportions, improving skin tones, and mastering blending, you can breathe new life into your painting. The key is to approach your work with patience and an open mind, embracing the process of continuous improvement.
If you’re interested in more portrait painting tips, be sure to check out my free guide on fixing muddy skin tones. You’ll learn how to overcome common color mixing issues and elevate your acrylic portraits.
- Sketching Your Painting Accurately
- Beginning a Pet Portrait in Acrylic
- The Mystery of Realism in Painting
- Apply A Burnt Sienna Glaze to a Portrait
- Learn How to Sketch a Portrait Freehand in 45 Minutes
- Adding highlights to your acrylic painting
- 5 Excellent Reasons to Use Aluminum Foil
- Paint Realistic Wrinkles in Acrylic
- Painting Clothing in an Acrylic Portrait
- Paint a Cloudy Sky Acrylic
- How to add Semi-Opaque Highlights
- How to Enhance the Contrast in Your Acrylic
- How to Add Glaze to Your Acrylic Painting
- Paint Realistic Reflections on Eyeglasses in an Acrylic Portrait
- Build Up Depth on Your Acrylic Portrait Backgrounds
- How Do You Do Layers With the Glazing Technique?
- Learn How to Paint Wrinkles in Acrylic
Read more about how to paint a portrait that you can surely be proud of!
I’d love to hear your thoughts on this video. Please share it with your friends and family. Let me know if you have any further questions. I’ll greatly help you.
If you’d like to learn more, sign up for my free email tips and video class today.
Learn How to Paint Acrylic Portraits With My Free Mini-Video Course!
Thank you so much for taking the time to read this tutorial and watch the video. That means a lot to me. I hope you find it very helpful in your portrait painting.
Yours for Better Portraits,

P.S. Did you find this post helpful or encouraging? If so, send it on ahead! Let others know with the share buttons below. I’d love to hear your comments. Thank you so much! Also, do you have a question on acrylic portrait painting you’d like answered? Let me know, and I’d be happy to help!
