- You are here:
- Home »
- Blog »
- Written Tutorial »
- How to Transform Your Acrylic Paintings with Vibrant Colors

How to Transform Your Acrylic Paintings with Vibrant Colors
Learn to create stunning acrylic paintings using advanced glazing techniques
Transform Your Acrylic Paintings with the Glazing Technique: Step-by-Step Guide
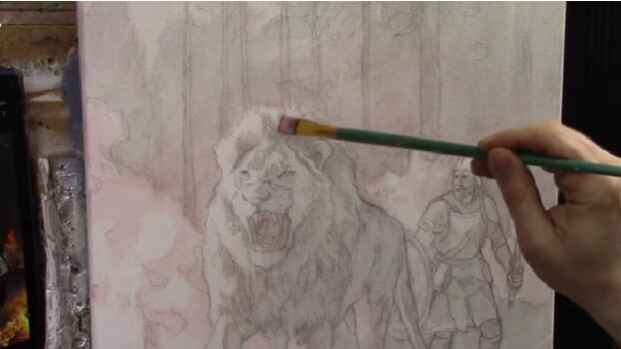
Achieving depth and vibrancy in acrylic paintings can be challenging, but with the right techniques, it becomes an exciting and rewarding process. In my recent tutorial, we continued working on an allegorical painting titled “He Goes Ahead of Us,” depicting a lion and a soldier. This painting symbolizes Jesus fighting our battles, with the lion representing Jesus leading the way.
Understanding the Glazing Technique
The glazing technique involves applying thin layers of paint mixed with a large amount of matte medium. This method builds up depth and luminosity, allowing the underlying layers to show through and creating vibrant, rich colors.
Setting Up the Value Structure
We applied a monochromatic glaze to establish the value structure. A mix of matte medium, raw umber dark, and ultramarine blue was used to create a gray glaze, which was then applied to block in the tonal values throughout the painting.
Adding Organic Orange to My Lion and Soldier Painting
We focused on adding color to our painting using the glazing technique. The key color introduced was organic orange, which adds a warm, vibrant touch to the fiery areas of the painting. This color, mixed with matte medium, creates a translucent glaze that enhances the painting’s luminosity and depth.
Preparing the Glaze
- Select Your Brush:
- Use a flat 5/8 brush for even application.
- Mix the Glaze:
- Combine a small amount of organic orange pigment with a generous amount of matte medium to create a translucent, milky glaze that dries clear.
Applying the Glaze
- Begin with the Fiery Areas:
- Apply the organic orange glaze to the edges and openings of the flames to create dynamic, vibrant effects.
- Build up layers gradually to enhance the luminosity.
- Expand to Other Areas:
- Extend the glaze to other parts of the painting, such as the lion and the soldier, to ensure color harmony and depth.
Tips and Techniques for Effective Glazing
- Use a Reference Photo: Carefully observe your reference photo to accurately place tonal values and colors.
- Apply Thin Layers: Start with light applications of glaze and build up gradually to avoid overpowering the painting.
- Dry Brushing for Shading: Exhaust the paint on the brush to create subtle shading effects.
- Incorporate Color Harmony: Spread the glaze throughout the painting to maintain color unity.
Enhancing the Painting
To create realistic flames, the glaze was applied around the edges and in the openings of the flames. This method enhances luminosity and ensures the fire looks dynamic and vibrant. By layering different colors, such as yellow, on top of the orange glaze, the flames will become even more striking.
Expanding the Glaze to the Background
The warm colors from the fire were extended into the background to capture the effect of the flames lighting up the forest. This creates a cohesive and immersive scene. The glaze was also added to the soldier and the lion, ensuring color harmony throughout the painting.
Detailed Steps in Glazing
- Establish the Darks:
- Apply the glaze in the dark areas first to set the stage for luminosity.
- This step is crucial for achieving a balanced value structure.
- Build the Midtones:
- Gradually apply the glaze to midtone areas, ensuring smooth transitions.
- Use a light touch to avoid overpowering the initial layers.
- Highlight with Light Colors:
- After establishing the darks and midtones, add lighter colors to create highlights.
- Use yellow or other bright colors to enhance the vibrancy of the flames.
Tips for Successful Glazing
- Use Matte Medium Generously: Mix a large amount of matte medium with a small amount of pigment to create a smooth and translucent glaze.
- Build Up in Layers: Gradually build up the glaze in multiple layers to achieve the desired depth and vibrancy.
- Observe and Adjust: Continuously observe your reference photo and adjust the placement of the glaze accordingly.
- Practice Patience: Glazing requires patience and practice, but the results are well worth the effort.
How Do You Make Acrylic Paintings More Vibrant?
To make acrylic paintings more vibrant, mastering the glazing technique is essential. This involves applying thin, translucent layers of paint over a dry layer to create depth and luminosity. Start by mixing a small amount of pigment with a generous amount of matte medium to form a smooth glaze. Apply this in thin layers, building up the color gradually.
Additionally, using high-quality, artist-grade acrylic paints ensures richer, more vibrant colors. Incorporating contrast between light and dark areas, adding bright highlights, and using a limited palette for color harmony are also key strategies. These methods, combined with careful observation of a reference photo and meticulous layering, can transform your acrylic paintings, making them pop with vibrancy and life.
Final Thoughts
The glazing technique is a powerful tool for artists looking to enhance their acrylic paintings. By applying thin, translucent layers of color, you can create depth, vibrancy, and a sense of realism. This method allows for continuous adjustments and refinements, ensuring your painting evolves beautifully.
Watch the video below on how I use the glazing technique to create amazing luminosity in your paintings
By incorporating these techniques and tips into your painting process, you can achieve stunning results that capture the essence and vibrancy of your subject. Keep practicing and experimenting with the glazing technique to unlock your full artistic potential.
LEARN MORE
- Sketching Your Painting Accurately
- Beginning a Pet Portrait in Acrylic
- The Mystery of Realism in Painting
- Apply A Burnt Sienna Glaze to a Portrait
- Learn How to Sketch a Portrait Freehand in 45 Minutes
- Adding highlights to your acrylic painting
- 5 Excellent Reasons to Use Aluminum Foil
- Paint Realistic Wrinkles in Acrylic
- Painting Clothing in an Acrylic Portrait
- Paint a Cloudy Sky Acrylic
- How to add Semi-Opaque Highlights
- How to Enhance the Contrast in Your Acrylic
- How to Add Glaze to Your Acrylic Painting
- Paint Realistic Reflections on Eyeglasses in an Acrylic Portrait
- Build Up Depth on Your Acrylic Portrait Backgrounds
- How Do You Do Layers With the Glazing Technique?
- Learn How to Paint Wrinkles in Acrylic
Read more about how to paint a portrait that you can surely be proud of!
I’d love to hear your thoughts on this video. Please share it with your friends and family. Let me know if you have any further questions. I’ll greatly help you.
If you’d like to learn more, sign up for my free email tips and video class today.
Learn How to Paint Acrylic Portraits With My Free Mini-Video Course!Thank you so much for taking the time to read this tutorial and watch the video. That means a lot to me. I hope you find it very helpful in your portrait painting.
Yours for Better Portraits,

P.S. Did you find this post helpful or encouraging? If so, send it in ahead! Let others know with the share buttons below. I’d love to hear your comments. Thank you so much! Also, do you have a question on acrylic portrait painting you’d like answered? Let me know, and I’d be happy to help!