- You are here:
- Home »
- Blog »
- Uncategorized »
- How to Paint a Young Man with Tie in 30-Minute Acrylic Portrait!

How to Paint a Young Man with Tie in 30-Minute Acrylic Portrait!
A step-by-step acrylic portrait study using an alla prima approach to build strong values, confident brushwork, and realism in a limited time
Painting an acrylic portrait in just 30 minutes may sound intimidating at first. However, when the process is approached as a focused study rather than a finished masterpiece, speed becomes a powerful teacher.
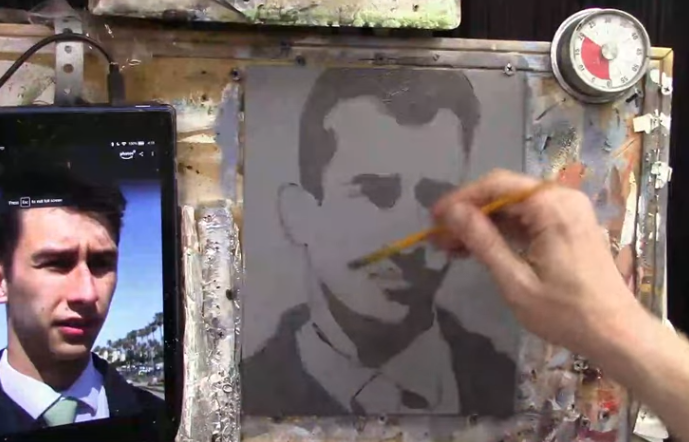
In this portrait exercise, a young man wearing a shirt and tie is painted using strong overhead lighting, bold cast shadows, and an alla prima approach.
This type of time-limited painting is designed to improve efficiency, decision-making, and confidence. Instead of chasing perfection, attention is placed on what truly matters first: composition, values, and clear forms. Over time, these short studies help improve longer, more detailed portraits as well.
Throughout this lesson, the portrait is built from a pre-toned gray surface, using fluid acrylic paint and deliberate brushwork. Each stage builds logically on the previous one, allowing realism to emerge even within a tight time frame.
Why a 30-Minute Acrylic Portrait Study Works
A short portrait session forces simplification. Because time is limited, unnecessary details are avoided and visual priorities are clarified. As a result, the painter is encouraged to see the subject in terms of large shapes and value relationships rather than isolated features.
In addition, painting quickly helps reduce hesitation. Brushstrokes are placed with more confidence, and overworking is naturally minimized. Although the portrait could be developed further with additional layers, the study itself remains valuable as an exercise in observation and control.
Materials and Palette Setup
Before the timer is started, preparation is essential. An 8×10 canvas panel is pre-painted gray to establish a neutral mid-tone. This allows both lights and darks to be judged more accurately.
The acrylic palette includes:
- Ivory Black
- Raw Umber Dark
- Raw Sienna
- Burnt Sienna
- Phthalo Blue
- Ultramarine Blue
- Alizarine Crimson
- Napthol Red
- Organic Orange
- Indian Yellow
- Titanium White
Matte medium is also used to thin the paint without breaking down its binding strength. Because fluid paint moves more easily across the surface, transitions can be created faster and with less effort.
Blocking in the Composition
The first stage of the painting is focused on placement and proportion. Using raw umber dark mixed with matte medium, the head, shoulders, collar, and tie are loosely sketched in. The paint is kept translucent so adjustments can be made easily.
Rather than outlining every feature, the major angles of the face are indicated with short, choppy strokes. The top of the head is intentionally cropped to create a stronger, more modern composition. Throughout this stage, accuracy is approached with flexibility. Precision is not the goal yet. Clarity is.
Special attention is given to eye placement. Because eyes are often placed too high by beginners, they are positioned near the center of the head. This simple correction helps maintain believable proportions from the start.
Establishing the Darkest Values
Once the composition is set, the darkest shadow shapes are blocked in. A mixture of raw umber dark, ivory black, and titanium white is used to create a deep shadow tone. This value is darker than the background, allowing the face to stand out clearly.
These shadows are applied under the brow ridge, along the nose, beneath the eyes, and across the neck. The same color is also used to block in the hair and jacket, keeping the palette unified and efficient.
At this stage, detail is intentionally avoided. The focus remains on grouping shadows into simple, readable shapes. By doing so, the structure of the face begins to emerge naturally.
Adding Variation to the Shadows
To prevent the dark areas from appearing flat, a small amount of ultramarine blue is introduced into the shadow mixture. This subtle shift adds depth and visual interest, especially in the clothing.
Shadows beneath the collar and along the jacket are reinforced, while edges are softened where light gradually transitions into form. Because the paint remains fluid, these blends are achieved quickly without excessive brushing.
Developing the Midtones of the Skin
With the shadows established, attention is turned to the midtones. A flesh tone is mixed using titanium white, raw sienna, burnt sienna, and a small amount of organic orange. This mixture becomes the primary skin color used across the face.
The mid-tone is applied broadly, carefully painted around the shadow shapes rather than over them. Although the background is dark, sufficient opacity is achieved by adjusting the paint mixture and brush pressure.
To indicate form, a slightly darker mid-tone is mixed by adding raw umber dark. This variation is used along the right side of the face and lower planes, where light naturally falls off. These subtle shifts help create a sense of volume without slowing down the process.
Blending Shadows into Midtones
Where shadows meet mid-tones, a transition color is created by mixing the two together. This blended tone is applied along the jawline, cheeks, and lower face, softening edges and increasing realism.
Because acrylics dry quickly, this blending is done efficiently. Rather than chasing perfect gradients, edges are adjusted just enough to suggest form. As a result, the portrait remains fresh and expressive.
Painting the Ear and Facial Accents
The ear is treated with warmer color notes to add life to the portrait. Organic orange and burnt sienna are introduced into the mid-tone mixture, creating a subtle reddish hue. This warmth contrasts nicely with the cooler shadows nearby.
A lighter value is added to the top of the ear to suggest reflected light. Similar warm tones are then used for the lips, tying the facial accents together chromatically.
Although these details are minor, they play an important role in making the portrait feel believable.
Finishing Touches Within the Time Limit
As the timer approaches its end, only essential adjustments are made. Values are checked, edges are clarified, and any overly sharp lines are softened. No attempt is made to refine every feature.
This restraint is intentional. The purpose of a 30-minute portrait is not completeness, but growth. Each study builds skills that carry over into longer, more polished work.
Tips and Techniques for Faster Portrait Painting
- Paint from dark to light to establish structure quickly
- Keep paint fluid using water and matte medium
- Focus on large shapes before small details
- Limit your palette to maintain harmony
- Use short studies to improve efficiency
- Avoid overworking transitions
- Accept imperfection as part of the exercise
Frequently Asked Questions
What is a 30-minute acrylic portrait study?
A 30-minute acrylic portrait study is a timed painting exercise focused on capturing strong values, proportions, and lighting rather than finishing fine details. It is used to improve speed, confidence, and decision-making.
Is alla prima painting suitable for acrylic portraits?
Alla prima painting works well with acrylics when paint is kept fluid and decisions are made quickly. Because layers are applied wet-on-wet, forms are established efficiently.
Why is a gray background used for this portrait?
A gray-toned surface helps both light and dark values stand out more clearly. It allows mid-tones to be judged accurately and speeds up the painting process.
How do you keep acrylic paint workable during fast studies?
Acrylic paint is kept workable by using water, matte medium, and frequent misting of the palette. This prevents the paint from drying too quickly and allows smoother transitions.
What is the most important focus in a 30-minute portrait?
The most important focus is value accuracy. When lights and shadows are placed correctly, likeness and realism are naturally improved, even with minimal detail.
Can this portrait be developed further after 30 minutes?
Yes, the study can be built upon with additional layers, glazing, and refinement. However, it is often best left as-is to preserve freshness and evaluate learning progress.
Are short portrait studies helpful for beginners?
Short portrait studies are very helpful for beginners because they reduce pressure and encourage consistent practice. Over time, efficiency and confidence are strengthened.
Conclusion
Painting a young man with a tie in 30 minutes is a valuable exercise in observation, control, and confidence. By simplifying shapes, prioritizing values, and working with intention, a convincing likeness can be achieved even in a short time.
Although the portrait can be developed further with additional layers, the study itself stands as a powerful learning tool. When practiced consistently, these quick acrylic portraits lead to stronger, more decisive painting in every future project.
- How to Paint Foliage Using the Acrylic Glazing Technique
- How to Trace for an Accurate Portrait Sketch
- How to Paint Realistic Eyes in Your Acrylic Portrait
- How to Add Raw Umber Dark & Ultramarine Blue to Your Portrait
- How to Make Your Own Raw Umber Dark
- How to Paint Realistic Trees & Grass in Your Acrylic
- How to Block In Skin Tone Values Using Glazing Technique
- How to Paint Vibrant Reds in Your Acrylic Portrait
- How to Glaze Background Colors & More Acrylic Portrait
- How to Paint White Clothing in Your Acrylic Portrait
- How to Easily Transition from a Sketch to a Painting
- How to Block In Shading & Skin Tones in Your Acrylic
- How to Build Up Color on Acrylic Pet Portrait
- How to Build Up Form on Clothing with Acrylic
- How to Paint Dark Clothing Using Acrylic Glazing Technique
- How to Paint a 24 x 30 Acrylic With 30 People
- How to Do Smooth Shading with Acrylic
- How to Sketch an Acrylic Portrait with a Grid
Read more about how to paint a portrait that you can surely be proud of!
I’d love to hear your thoughts on this video. Please share it with your friends and family. Let me know if you have any further questions. I’ll greatly help you.
If you’d like to learn more, sign up for my free email tips and video class today.
Learn How to Paint Acrylic Portraits With My Free Mini-Video Course!Thank you so much for taking the time to read this tutorial and watch the video. That means a lot to me. I hope you find it very helpful in your portrait painting.
Yours for Better Portraits,

P.S. Did you find this post helpful or encouraging? If so, send it in ahead! Let others know with the share buttons below. I’d love to hear your comments. Thank you so much! Also, do you have a question on acrylic portrait painting you’d like answered? Let me know, and I’d be happy to help!