- You are here:
- Home »
- Blog »
- Written Tutorial »
- How to do Portrait Adjustments: Here is the Step-by-Step Guide

How to do Portrait Adjustments: Here is the Step-by-Step Guide
Learn how to enhance value and color in your portraits with glazing techniques.
Introduction
Portrait painting is an intricate art that requires attention to detail, especially when it comes to adjusting values and colors. In this free guide, we’ll explore how to make nuanced adjustments to your portrait painting using glazing techniques. And based on insights from a recent tutorial. Whether you’re an experienced artist or a beginner, these tips will help you enhance your portraits and bring them to life.
Here is a step-by-step guide to portrait painting adjustments
Understand the basic of portrait painting adjustment
The key to successful portrait painting adjustments lies in an understanding of value and color. Value refers to the lightness or darkness of a color, while the color itself can be modified with tints (adding white) and shades (adding black). In this tutorial, the focus is on using glazes to make subtle adjustments that can significantly improve the overall look of your portrait.
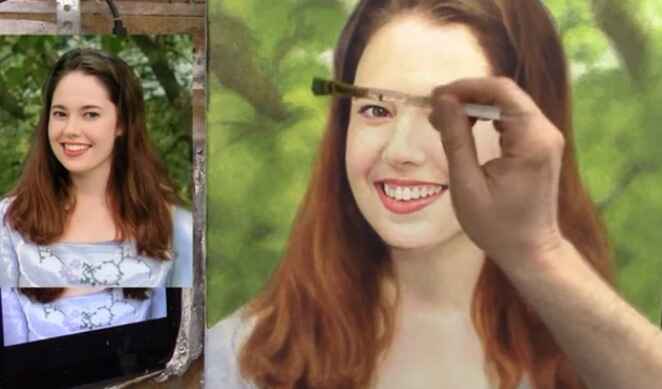
Step 1: Darkening the Right Eyelid Start with the right eyelid by using small round brushes. Mix both raw umber dark with a bit of napthol red and raw sienna. This combination creates a cooler tint that can be applied between the eyebrow and the eye. Transparent glazes can be used at any stage of the painting to add depth and adjust tones without overpowering the existing layers.
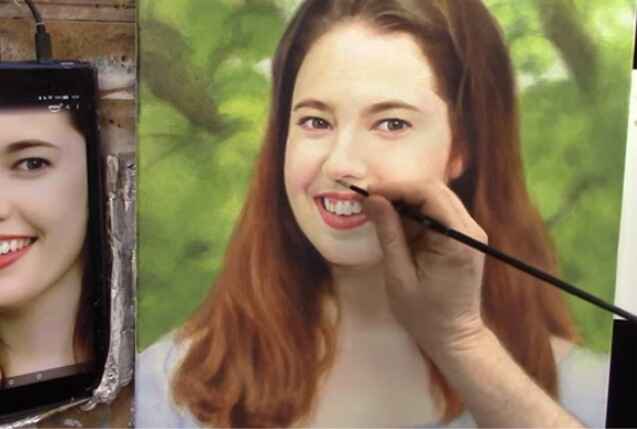
Step 2: Adjusting the Shadow Under the Nose Next, work on darkening the shadow under the nose. Use the same glaze mixture and add a touch of titanium white for smoothness. During this adjustment it requires patience, as it might take several layers to achieve the desired effect. The key is to apply the glaze lightly, blending with your finger to create a natural transition.
Step 3: Enhancing the Background Finally, focus on the background. Use a combination of ultramarine blue, Indian yellow, and raw sienna to create a rich, sap green color. Adding titanium white will cool and smooth out the glaze. Apply this selectively to darken areas and bring out the nuances in the background, creating a realistic depth of field.
Additional Tips:
- Use a value checker tool to evaluate your painting and identify areas needing adjustment. While not mandatory, it can provide an accurate measure for making precise changes. You can check my value checker and get it for free.
- Darker values in your painting should generally be cooler in tone to maintain a balanced look.
- Be patient with the process, as building up layers gradually will yield the best results.
Adjusting values and colors in your portraits can transform them from good to extraordinary. By following these acrylic glazing techniques and being mindful of value and color, you’ll be able to enhance your portraits with ease. Keep practicing and experimenting with different mixtures to find what works best for your unique style. Happy painting!
With these insights and techniques, you’re now equipped to make impactful adjustments to your portrait paintings. Remember, art is a journey, and as a result, each stroke brings you closer to mastering your portrait painting.
Watch the Process
For a detailed guide, watch the complete video tutorial below.
LEARN MORE
- Sketching Your Painting Accurately
- Beginning a Pet Portrait in Acrylic
- The Mystery of Realism in Painting
- Apply A Burnt Sienna Glaze to a Portrait
- Learn How to Sketch a Portrait Freehand in 45 Minutes
- Adding highlights to your acrylic painting
- 5 Excellent Reasons to Use Aluminum Foil
- Paint Realistic Wrinkles in Acrylic
- Painting Clothing in an Acrylic Portrait
- Paint a Cloudy Sky Acrylic
- How to add Semi-Opaque Highlights
- How to Enhance the Contrast in Your Acrylic
- How to Add Glaze to Your Acrylic Painting
- Paint Realistic Reflections on Eyeglasses in an Acrylic Portrait
- Build Up Depth on Your Acrylic Portrait Backgrounds
- How Do You Do Layers With the Glazing Technique?
- Learn How to Paint Wrinkles in Acrylic
Read more about how to paint a portrait that you can surely be proud of!
I’d love to hear your thoughts on this video. Please share it with your friends and family. Let me know if you have any further questions. I’ll greatly help you.
If you’d like to learn more, sign up for my free email tips and video class today.
Learn How to Paint Acrylic Portraits With My Free Mini-Video Course!Thank you so much for taking the time to read this tutorial and watch the video. That means a lot to me. I hope you find it very helpful in your portrait painting.
Yours for Better Portraits,

P.S. Did you find this post helpful or encouraging? If so, send it in ahead! Let others know with the share buttons below. I’d love to hear your comments. Thank you so much! Also, do you have a question on acrylic portrait painting you’d like answered? Let me know, and I’d be happy to help!