- You are here:
- Home »
- Blog »
- Written Tutorial »
- How To Build Depth And Shading In A Narrative Painting

How To Build Depth And Shading In A Narrative Painting
Enhance depth and drama in your paintings with renaissance techniques
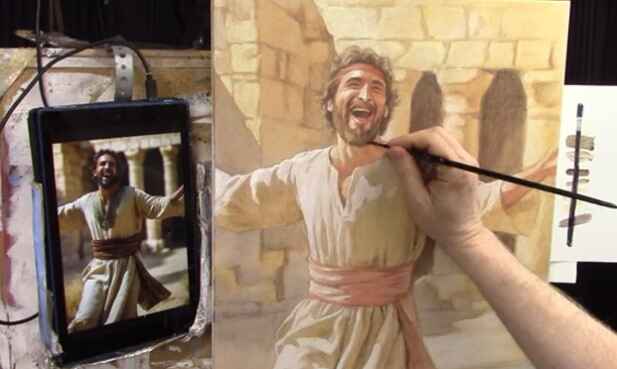
Creating a narrative painting that conveys a powerful story and emotion requires mastering depth and shading. In this tutorial, we will explore how to build up shading and depth in a portrait, focusing on the painting of King David dancing as the Ark of the Covenant enters Jerusalem. Using Renaissance techniques, we’ll transform a monochromatic underpainting into a vibrant, expressive work of art.
Understanding the Basics: The Underpainting
The foundation of this painting begins with a monochromatic underpainting, also known as a “grisaille.” This involves using just three tones: darks, highlights, and midtones. For this portrait, we used a combination of ultramarine blue, organic orange, Napthol red, and burnt sienna to develop the skin tones, contrasting them with the clothing.
Preparing Your Palette
Start by setting up your palette with the following colors:
- Raw Umber Dark
- Burnt Sienna
- Raw Sienna
- Phthalo Blue
- Ultramarine Blue
- Alizarine Crimson
- Napthol Red
- Organic Orange
- Indian Yellow
- Titanium White
Step 1: Monochromatic Underpainting
Start with a monochromatic underpainting, using three different tones: dark tones, highlights, and midtones. This step is crucial as it sets the foundation for the colors and shading that will follow. For this painting, the underpainting is created using raw umber dark, focusing on capturing the facial expressions and basic forms.
Step 2: Adding Color Glazes
With the underpainting complete, begin adding color glazes to develop the skin tones and separate different elements of the painting.
Skin Tones:
- Mix ultramarine blue, organic orange, and Naphthol red with a bit of burnt sienna.
- Apply these glazes to create a natural skin tone, ensuring to differentiate the skin from the clothing.
Hair and Beard:
- Use a mix of raw umber dark, ultramarine blue, and alizarine crimson to darken the beard and shadows inside the temple.
- This mix creates a rich, dark hue that enhances the depth of the facial features.
Step 3: Enhancing Depth with Glazes
The key to achieving depth is the strategic placement of glazes. Use matte medium to thin your paint and create transparent layers.
Eyes and Eyebrows:
- Apply a darker glaze to the eyes and eyebrows using raw umber dark mixed with ultramarine blue and alizarine crimson.
- Focus the glaze on specific areas, such as the middle of the eyebrows, to create a sense of shading and depth.
Nose and Mouth:
- Darken the nasal labial folds and the interior of the mouth with the same glaze mixture.
- This step accentuates the expressions and adds realism to the painting.
Step 4: Balancing Shadows and Highlights
When placing glazes, ensure that the dark values are consistently applied throughout the painting. This consistency is crucial for creating a cohesive look.
Clothing and Background:
- Identify areas in the reference photo where shadows naturally fall, such as above the sash and by the armpits.
- Apply glazes to these areas to enhance the contrast and depth.
Structural Elements:
- Darken areas within the background structure, such as the temple’s pillars, to balance the dark values in the figure.
- Use short, choppy brush strokes to push the paint into the canvas weave, then smooth it out with longer strokes.
Step 5: Customizing Colors and Textures
To achieve the right temperature and tone, customize your black and grey hues by varying the mix of raw umber dark, ultramarine blue, and alizarine crimson.
Temperature Control:
- Test the color mixture on a white card to gauge its warmth or coolness.
- Adjust by adding more ultramarine blue for cooler tones or more raw umber dark and alizarine crimson for warmer hues.
Step 6: Final Touches
As you near completion, focus on the fine details and textures.
Facial Hair:
- Add texture to the mustache and sideburns to ensure they blend naturally with the rest of the beard.
- Use a dry brushing technique to create subtle gradations and shading on the perimeter edges of the face.
Clothing and Accessories:
- Darken areas on the clothing that need more shadow to enhance the three-dimensional effect.
- Use controlled brush strokes to ensure precision and consistency.
Tips and Techniques for Mastering Glazing
- Layering: Build layers gradually to control the depth and richness of colors. Each layer should be thin and transparent.
- Color Mixing: Experiment with different combinations of colors to create custom blacks and grays. This adds uniqueness to your painting.
- Brush Pressure: Vary the pressure on your brush to achieve different textures. Light pressure can create a dry brushing effect, perfect for subtle shading.
- Matte Medium: Use matte medium to thin your paint and create glazes. It helps in achieving smooth transitions and blending.
- Reference Photos: Always use a reference photo to guide your shading and ensure realistic light and shadow play.
Building depth and shading in a narrative painting, like this portrait of King David, requires patience and strategic application of glazes. By following these steps and techniques, you can create paintings that not only tell a story but also captivate viewers with their depth and realism.
LEARN MORE
- Sketching Your Painting Accurately
- Beginning a Pet Portrait in Acrylic
- The Mystery of Realism in Painting
- Apply A Burnt Sienna Glaze to a Portrait
- Learn How to Sketch a Portrait Freehand in 45 Minutes
- Adding highlights to your acrylic painting
- 5 Excellent Reasons to Use Aluminum Foil
- Paint Realistic Wrinkles in Acrylic
- Painting Clothing in an Acrylic Portrait
- Paint a Cloudy Sky Acrylic
- How to add Semi-Opaque Highlights
- How to Enhance the Contrast in Your Acrylic
- How to Add Glaze to Your Acrylic Painting
- Paint Realistic Reflections on Eyeglasses in an Acrylic Portrait
- Build Up Depth on Your Acrylic Portrait Backgrounds
- How Do You Do Layers With the Glazing Technique?
- Learn How to Paint Wrinkles in Acrylic
Read more about how to paint a portrait that you can surely be proud of!
I’d love to hear your thoughts on this video. Please share it with your friends and family. Let me know if you have any further questions. I’ll greatly help you.
If you’d like to learn more, sign up for my free email tips and video class today.
Learn How to Paint Acrylic Portraits With My Free Mini-Video Course!Thank you so much for taking the time to read this tutorial and watch the video. That means a lot to me. I hope you find it very helpful in your portrait painting.
Yours for Better Portraits,

P.S. Did you find this post helpful or encouraging? If so, send it in ahead! Let others know with the share buttons below. I’d love to hear your comments. Thank you so much! Also, do you have a question on acrylic portrait painting you’d like answered? Let me know, and I’d be happy to help!