- You are here:
- Home »
- Blog »
- Written Tutorial »
- How To Adjust Eyes, Mouth, And More In Your Portrait

How To Adjust Eyes, Mouth, And More In Your Portrait
Enhance your portraits with detailed adjustments using the glazing technique
Portrait painting is a journey that involves continuous learning and refinement. One of the key skills to master is the ability to make adjustments to the eyes, mouth, and other facial features. These fine-tuning techniques can significantly enhance the likeness and realism of your portraits. In this blog post, we will explore the glazing technique, a method that allows for precise adjustments and seamless blending. By following this step-by-step guide, you will be able to elevate your acrylic painting skills and achieve a more lifelike finish.
Preparing Your Workspace and Materials
Before diving into the painting process, it is crucial to prepare your workspace and materials. A well-lit area is essential, and all necessary supplies should be within reach. For this session, you will need:
- Acrylic paints (including raw umber, ultramarine blue, and alizarine crimson)
- Matte medium
- A variety of brushes (including a Princeton Velvet Touch size 4)
- A reference photo (preferably a lighter version to see details clearly)
By ensuring that your materials are ready, you will be able to focus entirely on the painting process without interruptions.
Assessing and Adjusting the Reference Image
The first step involves assessing your reference image. If the original photo is too dark, it is recommended to create a lighter version to help identify finer details. This step is essential for making accurate adjustments to the eyes, mouth, and other facial features. In the example discussed, the artist used a 20×24 commission portrait and identified areas that needed slight adjustments for better likeness.
Mixing the Right Colors
Next, it is important to mix your paints to create a rich, almost black color. Combine raw umber, ultramarine blue, and alizarine crimson. Adjust the color temperature as needed to achieve the desired shade. This custom mix will help in fine-tuning the details and nuances of the portrait.
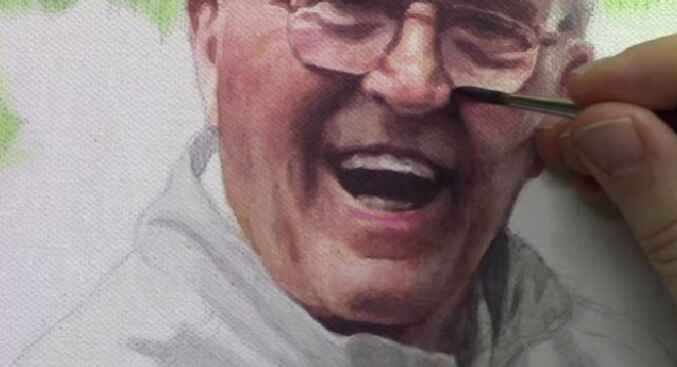
Applying the Glaze
The glazing technique involves applying a thin, translucent layer of paint over the existing layers. The brush should be dipped into clear matte medium and mixed with the custom color to create a translucent glaze. This diluted glaze allows for smoother blending and more precise adjustments. For instance, when adjusting the width of the subject’s mouth, the artist added a bit of darkness to the nasal labial fold and then blended it out using the diluted glaze.
Blending Techniques
Blending is a critical aspect of the glazing technique. To achieve seamless transitions, the following method should be used:
- Apply the glaze to the desired area.
- Dab the surface with a finger or a clean brush to soften the edges.
- Repeat the process as needed to build up the desired opacity and smoothness.
This technique ensures that the adjustments blend naturally with the existing layers, creating a lifelike finish.
Enhancing Facial Features
Pay close attention to key facial features, such as the eyes, nose, and mouth. Small adjustments can significantly impact the overall likeness of the portrait. For example, in the video tutorial below, the artist shifted the eyes slightly to the left and added shading to the tear ducts to enhance realism. Similarly, refining the angles and shading of the mouth can make the smile appear more natural and expressive.
Adjusting the Eyes
The eyes are often referred to as the windows to the soul, making their accuracy crucial in portrait painting. To adjust the eyes:
- Study the reference photo closely to determine the necessary adjustments.
- Apply a translucent glaze to the areas that need modification.
- Blend the glaze smoothly to ensure a natural transition.
- Pay attention to the placement of the iris and the overall shape of the eyes.
These steps will help create a more lifelike and expressive look in the eyes of your portrait.

Refining the Mouth
The mouth is another critical feature that can greatly affect the overall expression of the portrait. To refine the mouth:
- Adjust the shape and angles to match the reference photo.
- Use the glazing technique to add depth and definition to the lips.
- Blend the edges carefully to avoid harsh lines.
- Consider the relationship between the mouth and other facial features, such as the nasal labial fold.
These refinements will help in capturing the true character and emotion of the subject.
Final Touches and Refinements
After making the primary adjustments, it is important to take a step back and assess the portrait as a whole. Look for any areas that need additional refinement. The same glazing and blending techniques should be used to enhance these areas. For instance, adding warmth to the nasal labial fold with a bit of alizarin crimson can help the features blend more harmoniously.
Additional Tips for Realistic Portraits
While the glazing technique is powerful, several other tips can enhance your portraits further. Here are some additional suggestions:
- Use high-quality brushes: Investing in good quality brushes can make a significant difference in the application and blending of paint.
- Work in layers: Building up layers gradually can help achieve depth and realism in your portraits.
- Take breaks: Stepping back from your work periodically allows you to see it with fresh eyes and identify areas that need improvement.
- Study anatomy: A solid understanding of facial anatomy can aid in making more accurate adjustments and creating more lifelike portraits.
By incorporating these tips into your process, you can continue to improve your portrait painting skills and create works of art that truly capture the essence of your subjects.
Additional Resources
By following these steps, precise adjustments can be made to the eyes, mouth, and other facial features in your acrylic portrait. The glazing technique is a powerful tool that allows for subtle yet impactful refinements, enhancing the overall likeness and realism of your artwork.
For more tips and techniques, I recommend you download my free gift for you, a free guide, “Fix Muddy Skin Tones in Your Acrylic Portrait.” This comprehensive resource provides additional insights into correcting common issues and achieving a professional finish. Visit the Realistic Acrylic Portrait School for more tutorials, videos, and free downloadable guides to help you paint a portrait you can be proud of.
For a video tutorial, watch the full video below.
LEARN MORE
- Sketching Your Painting Accurately
- Beginning a Pet Portrait in Acrylic
- The Mystery of Realism in Painting
- Apply A Burnt Sienna Glaze to a Portrait
- Learn How to Sketch a Portrait Freehand in 45 Minutes
- Adding highlights to your acrylic painting
- 5 Excellent Reasons to Use Aluminum Foil
- Paint Realistic Wrinkles in Acrylic
- Painting Clothing in an Acrylic Portrait
- Paint a Cloudy Sky Acrylic
- How to add Semi-Opaque Highlights
- How to Enhance the Contrast in Your Acrylic
- How to Add Glaze to Your Acrylic Painting
- Paint Realistic Reflections on Eyeglasses in an Acrylic Portrait
- Build Up Depth on Your Acrylic Portrait Backgrounds
- How Do You Do Layers With the Glazing Technique?
- Learn How to Paint Wrinkles in Acrylic
Read more about how to paint a portrait that you can surely be proud of!
I’d love to hear your thoughts on this video. Please share it with your friends and family. Let me know if you have any further questions. I’ll greatly help you.
If you’d like to learn more, sign up for my free email tips and video class today.
Learn How to Paint Acrylic Portraits With My Free Mini-Video Course!Thank you so much for taking the time to read this tutorial and watch the video. That means a lot to me. I hope you find it very helpful in your portrait painting.
Yours for Better Portraits,

P.S. Did you find this post helpful or encouraging? If so, send it in ahead! Let others know with the share buttons below. I’d love to hear your comments. Thank you so much! Also, do you have a question on acrylic portrait painting you’d like answered? Let me know, and I’d be happy to help