- You are here:
- Home »
- Blog »
- Written Tutorial »
- How To Add Dark Contrast: Acrylic Grisaille Painting

How To Add Dark Contrast: Acrylic Grisaille Painting
Learn the grisaille that enhances depth and dimension with dark contrast in acrylic painting
Adding dark contrast to your painting is essential for creating depth and dimension, especially in grisaille painting. Grisaille is a monochromatic painting technique that uses shades of gray to create a detailed underpainting, which can then be glazed with color.
This method, reminiscent of the techniques used by the old masters like Caravaggio, allows artists to achieve a high level of realism and tonal complexity. In this tutorial, we will explore how to effectively add dark tonal values to your acrylic grisaille painting, enhancing your portrait with rich contrast.
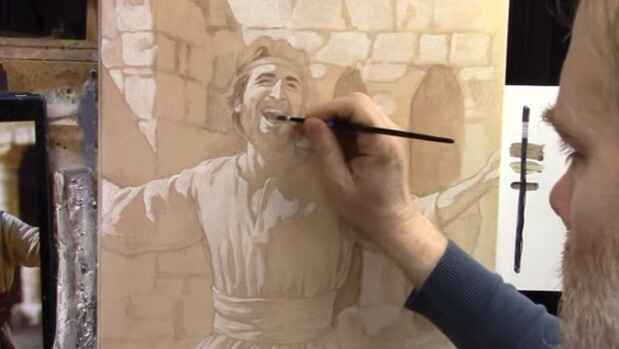
Understanding Grisaille Painting
Grisaille painting involves creating a detailed monochromatic underpainting that serves as a foundation for further color glazes. The technique is particularly useful for developing a strong value structure in your painting. When working with shades of gray, you can focus on the tonal values without the distraction of color, ensuring a solid foundation for your final piece.
Materials Needed
- Acrylic paints: raw umber, ultramarine blue, alizarine crimson, and titanium white
- Matte medium
- Brushes: Flat brushes (size 4), Round brushes (size 0 and 4)
- Palette
- Canvas or painting surface
Step-by-Step Guide on How to Add Darks to Your Acrylic Grisaille Painting
Step 1: Preparing the Underpainting
- Initial Sketch: Begin with a detailed sketch of your subject on your painting surface. This will serve as your guide for the underpainting.
- Ground Layer: Apply a thin, even layer of an earth-tone color (such as raw umber) to your canvas. This serves as the ground layer and helps unify the painting.
- Highlight Layer: Using titanium white, add highlights to your sketch. This step helps establish the lightest areas in your painting, creating a clear distinction between different tonal values.
Step 2: Mixing the Dark Glaze
- Palette Setup: On your palette, mix raw umber, ultramarine blue, and alizarine crimson. Use a larger amount of raw umber compared to the other two pigments.
- Adding Medium: Incorporate matte medium into your mixture. The matte medium helps create a transparent glaze that you can layer over your painting without losing the underlying details.
Step 3: Applying the Dark Glaze
- Glazing Technique: Start applying the dark glaze to the areas of your painting that you have designated as shadows. Use a flat brush for larger areas and a round brush for smaller, more detailed sections.
- Creating Contrast: Focus on building three main tonal values: highlights, midtones, and shadows. This triad simplifies the process and ensures a balanced composition.
- Detailing: Use a smaller round brush (size 0) for intricate details such as facial features, nostrils, and eyelids. This precision helps maintain the realism in your painting.
Step 4: Enhancing Shadows
- Depth in Shadows: Darken the eyes, mouth, and other deep shadow areas to add more depth. These elements create a focal point and enhance the three-dimensionality of your subject.
- Shading and Blending: Smoothly blend the dark glaze into the midtones to avoid harsh transitions. This creates a natural gradient and enhances the realism of your painting.
Step 5: Refining Details
- Facial Features: Continue to refine the details on the face, focusing on the beard, mustache, and hair. Treat these elements as shapes with specific tonal values rather than individual features.
- Clothing and Accessories: Add dark tonal values to the clothing and other accessories. This helps create a cohesive look and ensures that every part of your painting is harmonized in terms of contrast and depth.
Tips and Techniques
- Consistency in Glaze: Ensure that your glaze mixture is consistent throughout the painting process. This prevents unwanted streaks and uneven application.
- Layering: Apply multiple layers of glaze if necessary. Allow each layer to dry completely before adding another to achieve the desired depth.
- Value Shapes: Start on recognizing and painting value shapes rather than specific details. This approach helps maintain the overall structure and coherence of the painting.
- Patience and Precision: Take your time with the detailing process. Patience and precision are key to achieving a realistic and impactful final piece.
By learning this technique of adding dark contrast to acrylic grisaille paintings, you can significantly enhance the depth and dimension of your artwork. This method not only simplifies the painting process but also provides a solid foundation for further color glazes. With practice and attention to detail, you can create stunning, realistic paintings that capture the essence of your subject.
Read more about my additional resources, tutorials, to learn more and check my free courses designed to help you improve your portrait painting skills.
Happy painting, and God bless!.
LEARN MORE
- Sketching Your Painting Accurately
- Beginning a Pet Portrait in Acrylic
- The Mystery of Realism in Painting
- Apply A Burnt Sienna Glaze to a Portrait
- Learn How to Sketch a Portrait Freehand in 45 Minutes
- Adding highlights to your acrylic painting
- 5 Excellent Reasons to Use Aluminum Foil
- Paint Realistic Wrinkles in Acrylic
- Painting Clothing in an Acrylic Portrait
- Paint a Cloudy Sky Acrylic
- How to add Semi-Opaque Highlights
- How to Enhance the Contrast in Your Acrylic
- How to Add Glaze to Your Acrylic Painting
- Paint Realistic Reflections on Eyeglasses in an Acrylic Portrait
- Build Up Depth on Your Acrylic Portrait Backgrounds
- How Do You Do Layers With the Glazing Technique?
- Learn How to Paint Wrinkles in Acrylic
Read more about how to paint a portrait that you can surely be proud of!
I’d love to hear your thoughts on this video. Please share it with your friends and family. Let me know if you have any further questions. I’ll greatly help you.
If you’d like to learn more, sign up for my free email tips and video class today.
Learn How to Paint Acrylic Portraits With My Free Mini-Video Course!Thank you so much for taking the time to read this tutorial and watch the video. That means a lot to me. I hope you find it very helpful in your portrait painting.
Yours for Better Portraits,

P.S. Did you find this post helpful or encouraging? If so, send it in ahead! Let others know with the share buttons below. I’d love to hear your comments. Thank you so much! Also, do you have a question on acrylic portrait painting you’d like answered? Let me know, and I’d be happy to help!