- You are here:
- Home »
- Blog »
- Written Tutorial »
- How to Add Color Glazes in Acrylic to Your Grisaille

How to Add Color Glazes in Acrylic to Your Grisaille
Learn how to enhance your grisaille with color glazes for a vibrant finish
Introduction
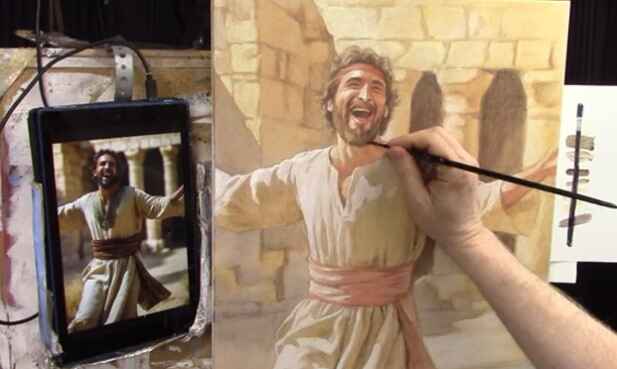
Adding color glazes to a grisaille painting is a transformative technique that can infuse your artwork with vibrant hues and rich textures. This process, rooted in historical painting methods, allows artists to achieve a remarkable depth of color and detail. In this guide, we’ll explore the step-by-step method for applying color glazes over a grisaille base, helping you bring your acrylic paintings to life with stunning results.
Understanding Grisaille
Grisaille is a monochromatic painting technique using shades of gray to create a value study. Historically, Old Masters employed this method to establish the tonal structure of their paintings before applying color. This monochromatic layer acts as a foundation, providing a strong value structure that guides the application of subsequent color layers.
Why Use Grisaille?
Using grisaille as a foundation that allows artists to focus on value and composition without being distracted by color. It’s an effective way to ensure that your painting has a strong structure before introducing color glazes.
Materials Needed
- Acrylic Paints: Titanium White, Raw Umber, Burnt Sienna, Indian Yellow, Ultramarine Blue, Phthalo Blue, Napthol Red
- Matte Medium: To mix with the paint for glazing
- Brushes: Flat and round brushes for different applications
- Palette: For mixing paints and mediums
- White Card: For testing glaze colors
Step-by-Step Guide to Adding Color Glazes
- Prepare Your Grisaille Base
Ensure your grisaille painting is fully dried before beginning the glazing process. The grisaille layer should have clear contrasts between light and dark areas, establishing a solid value foundation. - Mix Your Glaze
Glazing involves mixing a small amount of acrylic paint with a larger quantity of matte medium. The matte medium dilutes the paint, creating a translucent layer that allows the underlying grisaille to show through. For skin tones, mix Burnt Sienna with a touch of Organic Orange and Raw Sienna to create a warm, earthy color. For background elements, combine Raw Sienna and Indian Yellow for a warm, golden hue. - Apply the First Glaze Layer
Start by applying a thin glaze of the mixed color over specific areas, such as skin tones or clothing. Use a light brush with minimal pressure to ensure the glaze is even and translucent. For example, apply a faint Burnt Sienna glaze to the skin areas to introduce warmth and create subtle tonal variations. - Layering and Building Up Color
Allow each glaze layer to dry completely before applying subsequent layers. Build up color gradually, adjusting the intensity as needed. For example, apply additional layers of Raw Sienna to the background to deepen the color and create a more unified look. Incorporate cooler tones like Ultramarine Blue and Phthalo Blue for areas affected by the sky, adding a sense of atmosphere and depth. - Refining Details
Use a smaller brush to apply color glazes to specific details, such as shadows and highlights. For instance, use a mix of Napthol Red and Burnt Sienna for the sash, ensuring a warmer tone in the shadowed areas and a more vibrant color in the highlights. This approach helps to differentiate between various elements and adds richness to the painting. - Blending and Adjusting Colors
As you apply the glazes, step back frequently to assess the overall effect. Adjust colors as needed to ensure harmony and balance. For example, if the background appears too warm, tone it down with a cooler glaze. Conversely, enhance warm areas with additional glazes to achieve the desired effect. - Final Touches
After completing the glazing process, evaluate your painting for any final adjustments. Add finishing touches to enhance specific areas or correct any imbalances. Ensure that the color glazes blend seamlessly with the underlying grisaille, creating a cohesive and vibrant final piece.
Tips for Successful Glazing
- Test Glazes First: Use a white card to test glaze mixtures and ensure the desired color and transparency.
- Work in Thin Layers: Apply glazes in thin, translucent layers to maintain the depth and value of the grisaille layer.
- Allow Drying Time: Ensure each glaze layer is completely dry before applying the next to avoid muddying the colors.
- Use Appropriate Brushes: Choose brushes suitable for glazing to achieve smooth, even applications.
Incorporating color glazes into your grisaille paintings is a powerful technique that adds complexity and vibrancy to your artwork. By following these steps and employing careful color mixing and layering, you can achieve stunning results that bring your acrylic paintings to life. Experiment with different colors and glazes to discover unique effects and enhance your artistic skills.
LEARN MORE
- Sketching Your Painting Accurately
- Beginning a Pet Portrait in Acrylic
- The Mystery of Realism in Painting
- Apply A Burnt Sienna Glaze to a Portrait
- Learn How to Sketch a Portrait Freehand in 45 Minutes
- Adding highlights to your acrylic painting
- 5 Excellent Reasons to Use Aluminum Foil
- Paint Realistic Wrinkles in Acrylic
- Painting Clothing in an Acrylic Portrait
- Paint a Cloudy Sky Acrylic
- How to add Semi-Opaque Highlights
- How to Enhance the Contrast in Your Acrylic
- How to Add Glaze to Your Acrylic Painting
- Paint Realistic Reflections on Eyeglasses in an Acrylic Portrait
- Build Up Depth on Your Acrylic Portrait Backgrounds
- How Do You Do Layers With the Glazing Technique?
- Learn How to Paint Wrinkles in Acrylic
Read more about how to paint a portrait that you can surely be proud of!
I’d love to hear your thoughts on this video. Please share it with your friends and family. Let me know if you have any further questions. I’ll greatly help you.
If you’d like to learn more, sign up for my free email tips and video class today.
Learn How to Paint Acrylic Portraits With My Free Mini-Video Course!Thank you so much for taking the time to read this tutorial and watch the video. That means a lot to me. I hope you find it very helpful in your portrait painting.
Yours for Better Portraits,

P.S. Did you find this post helpful or encouraging? If so, send it in ahead! Let others know with the share buttons below. I’d love to hear your comments. Thank you so much! Also, do you have a question on acrylic portrait painting you’d like answered? Let me know, and I’d be happy to help!