Tag Archives for " realistic acrylic portrait "
How to Paint Smiling Girl in Yellow: 30-Minute Acrylic Portrait
Create a stunning 30-minute acrylic portrait of a smiling girl in yellow with easy-to-follow techniques
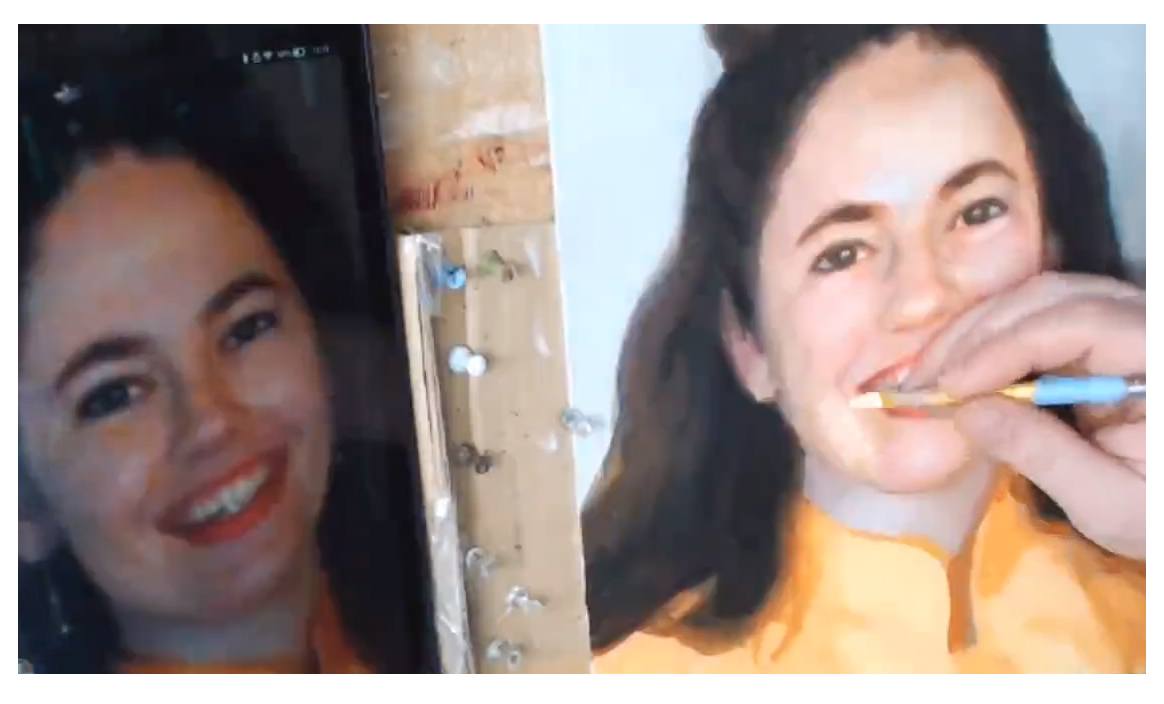
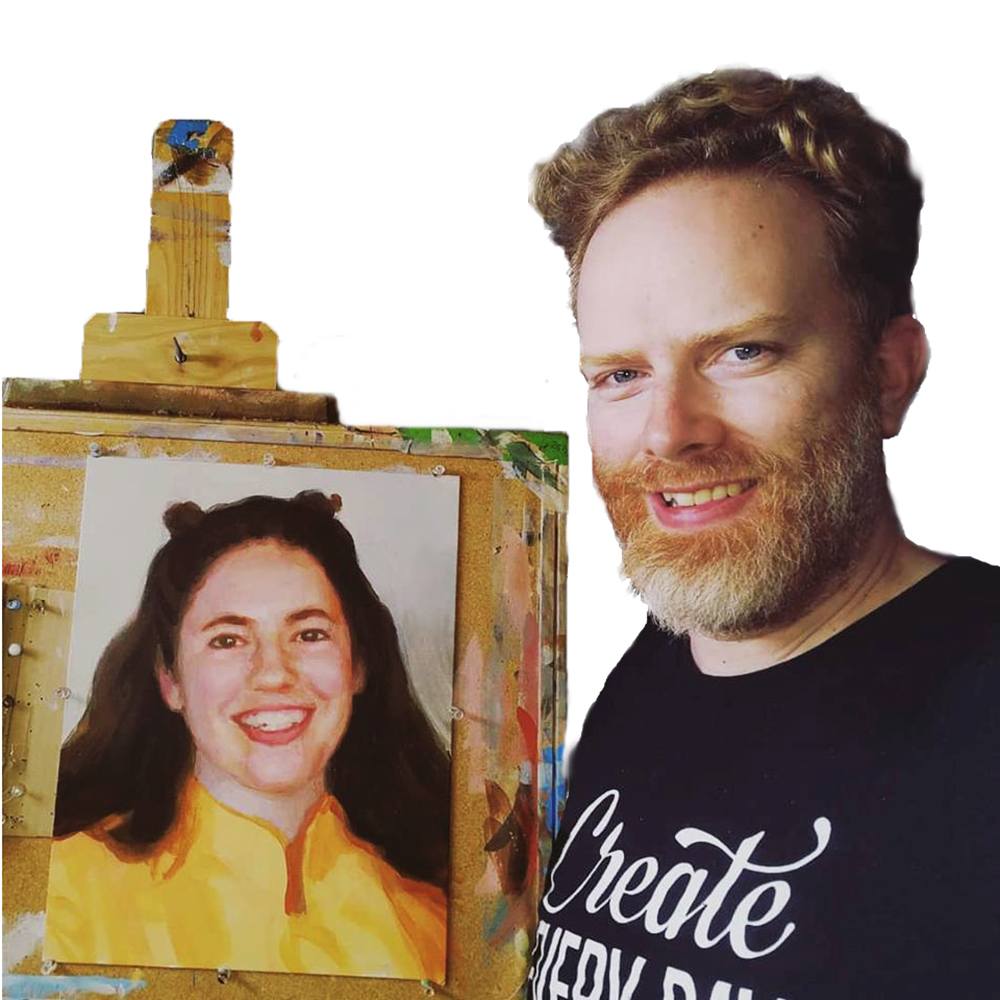
Creating a captivating 30-Minute Acrylic Portrait of a smiling girl in yellow can be a fulfilling and enjoyable artistic endeavor. In just half an hour, you can capture the essence of joy and vibrancy, making this project perfect for artists of all skill levels. Whether you’re a seasoned painter looking for a quick challenge or a beginner eager to experiment with color and expression, this guide will provide you with step-by-step instructions to bring your vision to life on canvas. Let’s dive into the techniques and tips that will help you create a stunning portrait that radiates happiness!
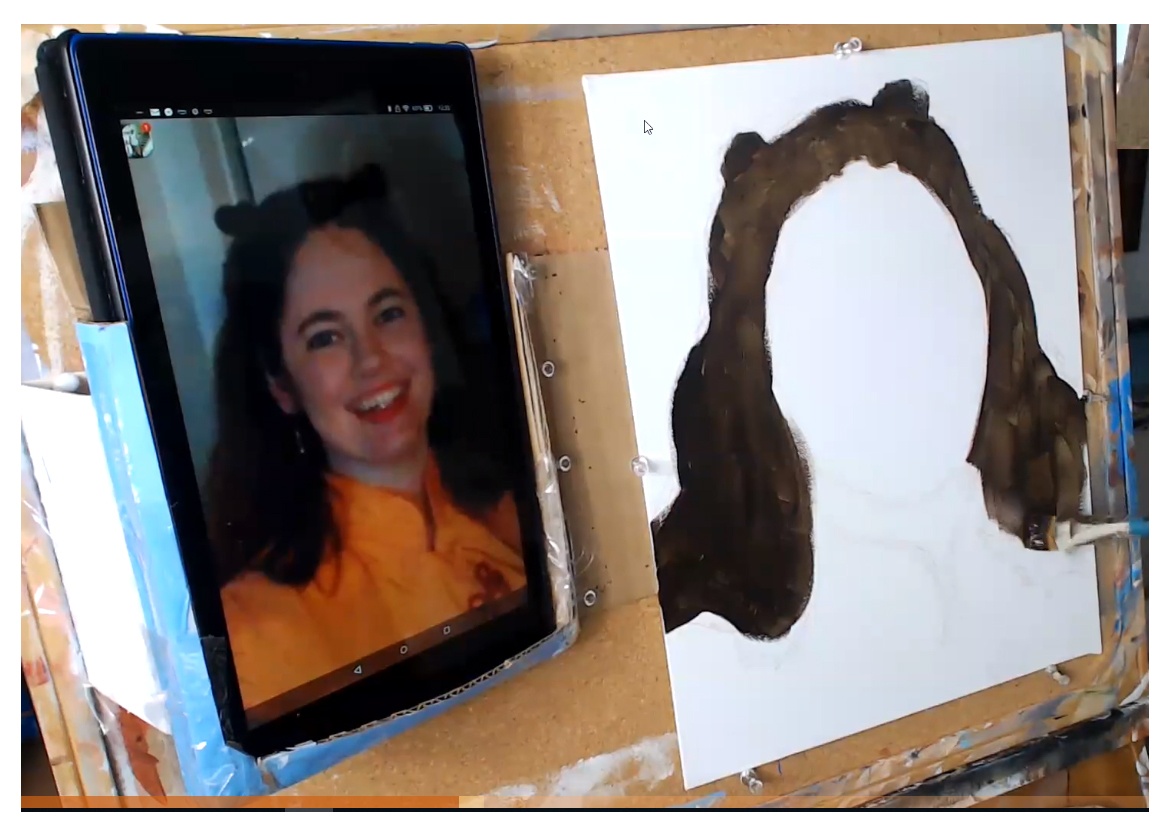
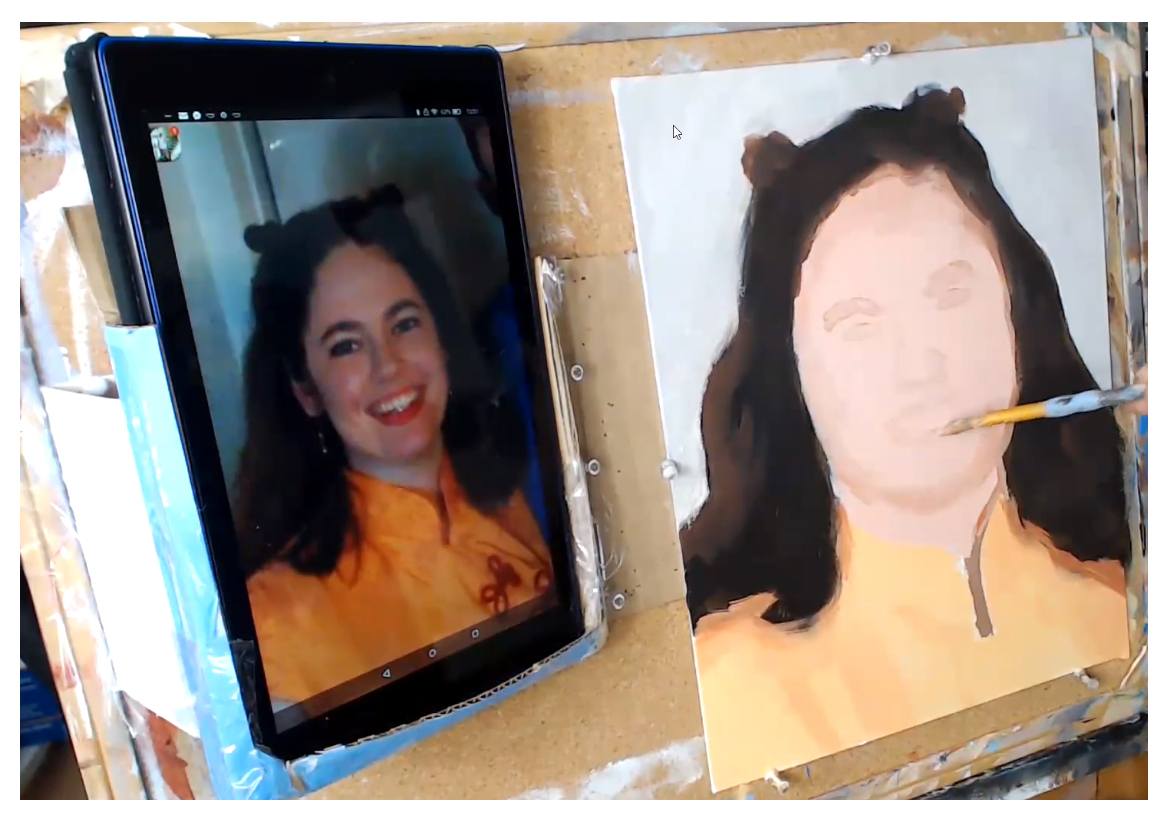
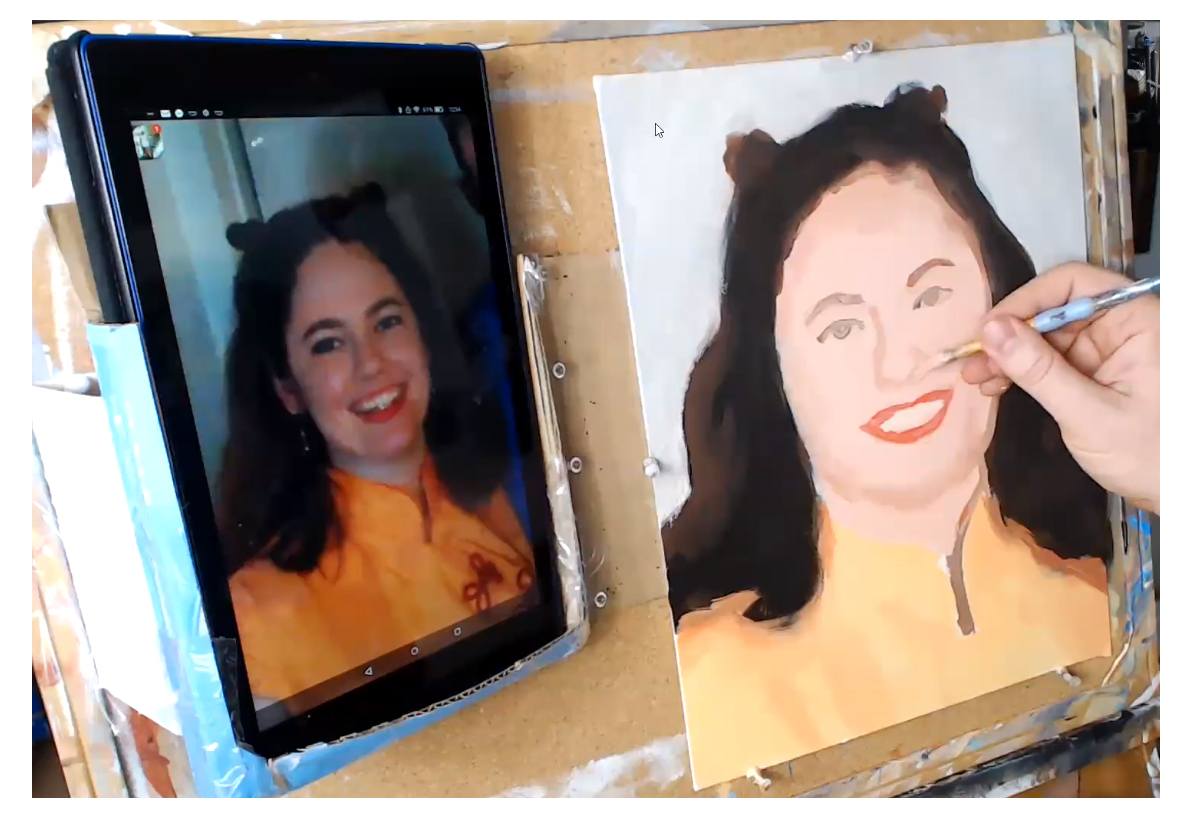
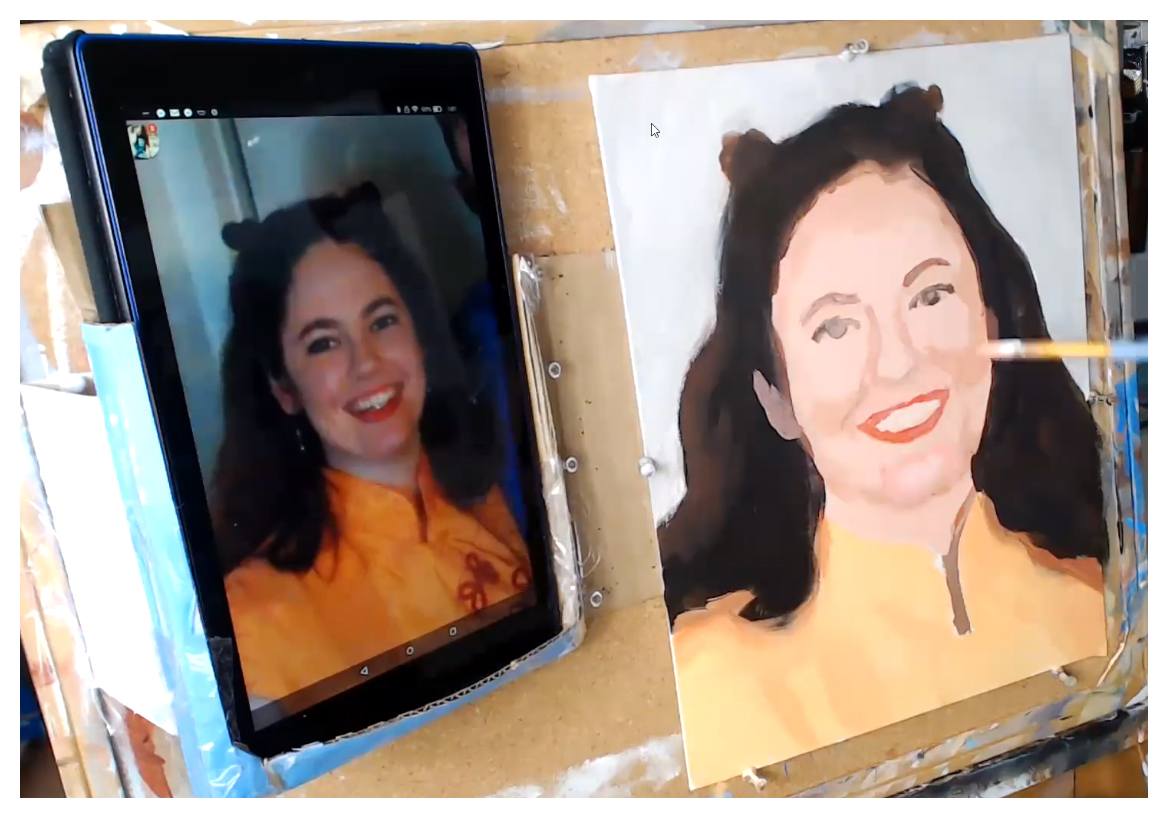
For today’s portrait, I’ll be painting a picture of a young woman ( a still shot image from Ray Comfort’s video interviews ) with a beautiful dark complexion and attractive smile. I like the dark shadows and forms within her face and hair, and I thought it would make for a fantastic little portrait.
This will be an 8 x 10, acrylic on canvas board.
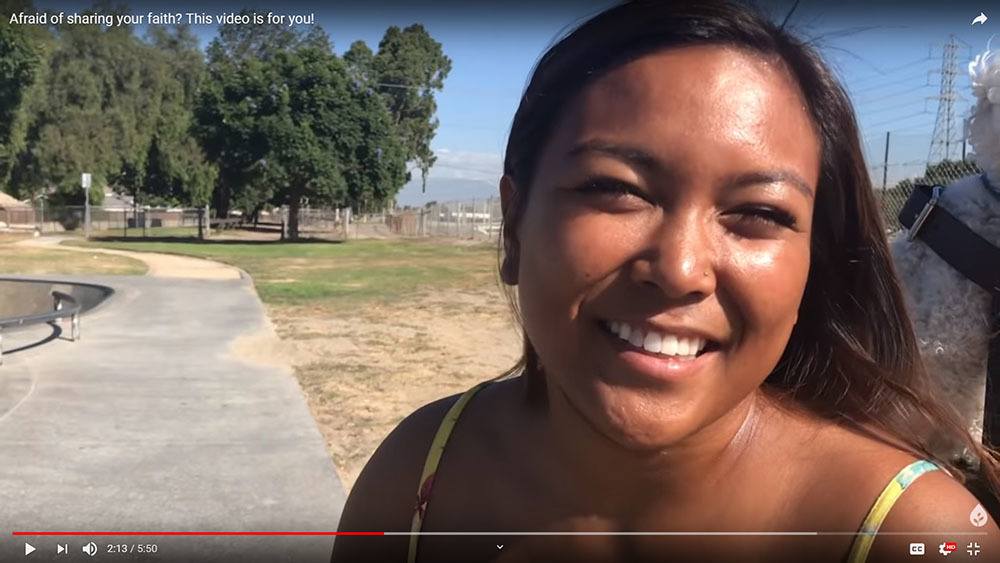
I’ll demonstrate how you can paint a quick portrait study with an aggressive opaque, alla prima technique. The idea is to see what you can accomplish within 30 minutes. It will force you to think quickly, and find out what the most important aspects are that will convey the subject’s likeness and just paint them without fuss.
At the same time, I encourage you to enjoy the process and don’t fret over whether the painting looks good or not. Of course it won’t look as good as a painting you’ve spent hours on! But it’s OK. Just enjoy the process.
Later on, you can always add more layers to the painting and give it a finished look.
Ready to dive in?
Season 1, Episode 3 of the 30-Minute Acrylic Portrait…
After watching it, leave me a comment here below. I really look forward to reading and answering your thoughts and questions. Let me know how I can help and have a blessed and productive day!
Yours for better portraits,

P.S. Did you find this post helpful or encouraging? If so, send it on ahead! Let others know with the share buttons below. I’d love to hear your comments. Thank you so much! Also, do you have a question on acrylic portrait painting you’d like answered? Let me know, and I’d be happy to help!
“How to Paint a Young Man in White” in 30 Minutes
Thank you to everyone who left encouraging comments and kind words on my first episode of the “30-Minute Acrylic Portrait.” Now, it’s on to Episode #2.
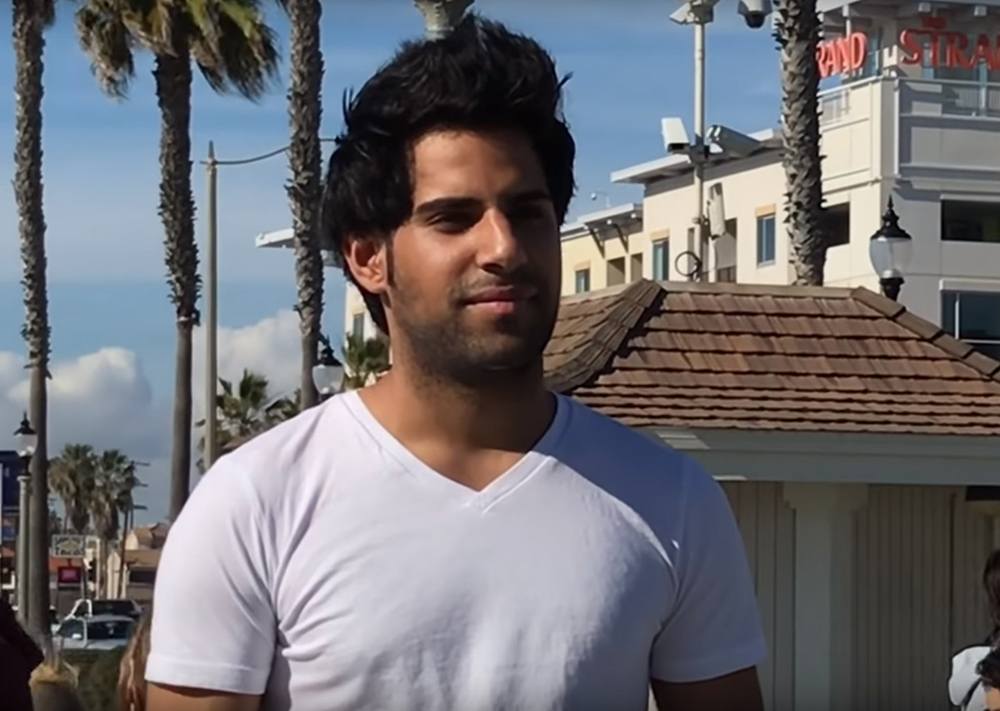
For today’s portrait, I’ll be painting a picture of a young man dressed in white, named Mohammed.
How did I come across this photo?
Well, I was looking for interesting reference images to paint from, scouring the internet and couldn’t find much. Even stock photo sites like Pexels and Pixabay came up short.
Then I recalled a YouTube channel that I frequently watch (or have playing in the background as I paint): Living Waters.
On this channel, there are literally hundreds of videos of people being interviewed by Ray Comfort, a Christian author, evangelist and short movie producer. Every person is different and unique. I noticed the lighting on several of these interesting characters was fantastic, and the video quality high enough that I could grab some screenshots of the footage and then paint from them.

Of course, I needed to get permission first.
So I contacted the ministry’s general email address, and got an expected automated response.
The next day, however, I got an unexpected call from Ray Comfort, granting me permission to paint portraits based on his videos. I was blown away by his generosity and thought this was also another confirmation from God to continue doing the series. I should have enough images to keep me busy for months, maybe even years. 🙂
So here we go.
Season 1, Episode 2 of the 30-Minute Acrylic Portrait…
As always, let me know what you think of this video. I encourage you to try this exercise for yourself. You don’t have to feel pressured to come up with a masterpiece. Just enjoy the process and see what you can do within half an hour.
Or you might just want to keep watching these videos for fun, sipping some coffee or tea. 🙂 Either way, thank you for watching, and I look forward to sharing more with you.
Yours for better portraits,
P.S. Did you find this post helpful or encouraging? If so, send it on ahead! Let others know with the share buttons below. I’d love to hear your comments. Thank you so much! Also, do you have a question on acrylic portrait painting you’d like answered? Let me know, and I’d be happy to help!

How to Paint Oval Vignette Acrylic Portrait Timelapse
Step-by-step techniques for an elegant oval vignette in acrylic portrait
Creating an acrylic portrait with an oval vignette style is an inspiring technique that allows your subject to stand out elegantly, adding focus and artistry. In this timelapse guide, I’ll walk you through how to achieve an oval vignette acrylic portrait using a unique glazing method. This technique helps you build depth, enhance color vibrancy, and create a finish that rivals the luminosity of oil paintings.
Understanding the Oval Vignette Technique
An oval vignette composition is a traditional approach that frames your subject in a subtle, softly blurred oval shape, gently drawing attention to the portrait’s focal point. This timeless style is ideal for achieving classic, professional results, whether you’re creating family portraits or a commissioned piece.
Step 1: Preparing Your Canvas with Initial Layers
To begin, prep the canvas with a light layer of matte medium and diluted paint. Use raw umber dark, ultramarine blue, and a dash of burnt sienna. This combination will set up foundational tones that help bring warmth and depth later on. Thin layers will be added progressively, each enhancing the portrait’s tonal structure.
Step 2: Blocking in Values and Colors
Blocking in your values provides a strong base for your portrait:
- Start Light: Use thin washes of paint to gradually build values, beginning with the mid-tones.
- Add Color with Glazing: Introduce alizarine crimson and phthalo green in thin layers for the skin, adding natural, warm undertones.
- Maintain Balance: Rather than finishing one section entirely, work across the canvas, applying each color to corresponding areas simultaneously. This approach keeps the portrait harmonious.
Step 3: Building Depth with Glazing Layers
The glazing technique is key to creating a portrait that radiates depth and realism:
- Multiple Layers: Up to 100 ultra-thin layers can be used to achieve a fully nuanced look.
- Lighting Effects: The translucent quality of these layers allows light to reflect off the canvas, creating a sense of depth and vibrancy.
- Oil-Like Finish: This glazing method adds a polish that can make acrylics resemble the look of oil paints, with soft transitions and a luminous finish.
Step 4: Enhancing Realism with Fine Details
As the portrait evolves, focus on adding detail:
- Nuances in Features: To make eyes, lips, and hair appear lifelike, add details like eyelash shadows, fine lines in the lips, and highlights in the irises.
- Gradual Shading: Build up shading in areas like the cheeks, nose, and forehead. A steady hand and attention to small value changes will achieve the realism you want.
- Background and Clothing: Layer in small color adjustments to enhance textures, like the folds of clothing or woodwork in the background.
Step 5: Adding Highlights and Final Touches
In the final stages, highlights and refined details bring the portrait to completion:
- Bright Highlights: Use titanium white mixed with matte medium to add precise highlights to areas like the nose, cheekbones, and chin.
- Softened Borders: To emphasize the oval vignette, blend the edges softly with a semi-dry brush, ensuring a smooth transition from the background to the portrait.
- Review Consistency: Check that all areas of the portrait have been equally developed. Avoid leaving any section overly detailed compared to others, maintaining a cohesive finish.
Tips and Techniques for Glazing Success
- Patience is Key: Building 50-100 layers takes time, but this patience will bring richness and realism.
- Use Matte Medium: It helps dilute the paint to the desired transparency, preserving color vibrancy without compromising texture.
- Rotate Colors: Alternate between colors like raw umber, burnt sienna, and ultramarine blue to create depth and dimension.
- Light Source Consideration: Adjust shading to reflect your portrait’s light source, helping facial features feel three-dimensional.
- Avoid Overworking: While glazing layers add depth, too much reworking can muddy colors. Stick to thin, controlled applications.
Why Glazing Works for Acrylic Portraits
Glazing layers allow light to pass through, reflecting back and adding dimension. Each transparent layer builds on the one before, creating complex color variations. This effect gives the portrait an oil-like appearance, a finish that’s often praised for acrylics. The difference in visual depth between these layers keeps the painting from looking flat and enhances the vignette effect around your subject.
Common Challenges and Solutions
- Colors Look Flat: This can happen if the layers are too thick. Thin out each layer with matte medium and add layers patiently to avoid oversaturation.
- Difficulty with Vignette Edges: Keep edges soft by blending them with a nearly dry brush, creating that gentle fade that defines a vignette style.
- Struggle with Skin Tones: Experiment with a mix of warm and cool shades like raw sienna, burnt sienna, and phthalo green, adjusting layers until the desired tone is achieved.
Final Thoughts
Creating an oval vignette acrylic portrait is a wonderful way to highlight your subject and create a stunning effect that draws the viewer’s eye. With glazing, you can achieve depth and richness that elevate your work and add a touch of timeless beauty. Try this technique on your next portrait to experience the difference it makes in achieving realism and sophistication.
For more tips on acrylic portrait painting, glazing methods, and tutorials on creating depth and realism, visit my site at realisticacrylic.com. This technique, along with many others, will enhance your skills and add a professional touch to your portraits.
Let me know how you enjoyed this video, and if you have any questions on acrylic portrait painting, I’ll be happy to help.
LEARN MORE
- How to Paint Foliage Using the Acrylic Glazing Technique
- How to Trace for an Accurate Portrait Sketch
- How to Paint Realistic Eyes in Your Acrylic Portrait
- How to Add Raw Umber Dark & Ultramarine Blue to Your Portrait
- How to Make Your Own Raw Umber Dark
- How to Paint Realistic Trees & Grass in Your Acrylic
- How to Block In Skin Tone Values Using Glazing Technique
- How to Paint Vibrant Reds in Your Acrylic Portrait
- How to Glaze Background Colors & More Acrylic Portrait
- How to Paint White Clothing in Your Acrylic Portrait
- How to Easily Transition from a Sketch to a Painting
- How to Block In Shading & Skin Tones in Your Acrylic
- How to Build Up Color on Acrylic Pet Portrait
- How to Build Up Form on Clothing with Acrylic
- How to Paint Dark Clothing Using Acrylic Glazing Technique
- How to Paint a 24 x 30 Acrylic With 30 People
- How to Do Smooth Shading with Acrylic
- How to Sketch an Acrylic Portrait with a Grid
Read more about how to paint a portrait that you can surely be proud of!
Let me know how you enjoyed this video and if you have any questions on acrylic portrait painting, I’ll be happy to help.
Yours for better portraits,
P.S. Did you find this post helpful or encouraging? If so, send it on ahead! Let others know with the share buttons below. I’d love to hear your comments. Thank you so much! Also, do you have a question on acrylic portrait painting you’d like answered? Let me know, and I’d be happy to help!
How to Paint an Acrylic Portrait in 30 Minutes
Discover the quick and simple method to capture portraits with speed and precision
As a child, I was amazed as I watched “The Joy of Painting” host Bob Ross paint a beautiful landscape in less than 30 minutes. I was captivated by his gentle touch, his fast wet-on-wet technique, and the way he could totally put you at ease.
I can’t say I wanted to be just like Bob when I grew up, but he did help inspire me to paint.
Later on, I learned the more methodical glazing technique from Norbert Kox, where you apply layer after layer of translucent paint. It’s very time consuming, but it creates fantastic realistic effects. This is the style I have become known for.
But sometimes I just want to knock out a quick painting, have fun with it, and yet push myself.
Can I paint a somewhat respectable looking painting in half an hour?
If I do it often, will I get faster?
Could it help me paint faster, and more confidently in my “typical” more detailed portraits?
Could an exercise like this help YOU to do the same?
There’s only one way to find out.
So, with that, I’m launching a new series of videos, or something like a show called, “The 30-Minute Acrylic Portrait” Season One, Episode 1…
Tips for Success in Fast-Paced Portrait Painting
- Set a Timer: Keep yourself on track by setting a timer. This helps maintain focus and prevents overworking areas.
- Keep Your Palette Organized: Lay out your colors clearly, so you can mix shades quickly without delay.
- Use a Limited Palette: Working with fewer colors will simplify the process and give the portrait a harmonious look.
- Practice Blocking and Simplifying: Learn to capture shapes and shadows quickly by focusing on big-picture composition.
Common Mistakes to Avoid
- Focusing Too Much on Detail: With only 30 minutes, try to avoid getting caught up in minute details.
- Using Too Many Colors: Stick with a few main colors for consistency and ease.
- Overthinking the Process: Embrace a relaxed approach, letting the process unfold naturally.
Conclusion
Creating a 30-minute acrylic portrait requires simplifying techniques, focusing on essential shapes, and mastering the art of blocking in shadows and highlights. This method allows for creative expression while enhancing your confidence and ability to capture a portrait quickly. Practice makes perfect, so keep experimenting with colors, tones, and brush techniques.
Read more about my additional resources, tutorials, to learn more and check out my free courses here. . Whether you’re a beginner or an experienced artist, there’s always something new to learn and apply to your paintings. Happy painting!
Let me know what you think of this video. Is it helpful? Interesting? Would you like to see more?
I’d love to hear back from you with your honest thoughts.
LEARN MORE
- How to Paint Foliage Using the Acrylic Glazing Technique
- How to Trace for an Accurate Portrait Sketch
- How to Paint Realistic Eyes in Your Acrylic Portrait
- How to Add Raw Umber Dark & Ultramarine Blue to Your Portrait
- How to Make Your Own Raw Umber Dark
- How to Paint Realistic Trees & Grass in Your Acrylic
- How to Block In Skin Tone Values Using Glazing Technique
- How to Paint Vibrant Reds in Your Acrylic Portrait
- How to Glaze Background Colors & More Acrylic Portrait
- How to Paint White Clothing in Your Acrylic Portrait
- How to Easily Transition from a Sketch to a Painting
- How to Block In Shading & Skin Tones in Your Acrylic
- How to Build Up Color on Acrylic Pet Portrait
- How to Build Up Form on Clothing with Acrylic
- How to Paint Dark Clothing Using Acrylic Glazing Technique
- How to Paint a 24 x 30 Acrylic With 30 People
- How to Do Smooth Shading with Acrylic
- How to Sketch an Acrylic Portrait with a Grid
Read more about how to paint a portrait that you can surely be proud of!
Yours for better portraits,
P.S. Did you find this post helpful or encouraging? If so, send it on ahead! Let others know with the share buttons below. I’d love to hear your comments. Thank you so much! Also, do you have a question on acrylic portrait painting you’d like answered? Let me know, and I’d be happy to help!

Almost as Good as a Trip to the Art Museum
Recently, I was browsing a couple of my favorite YouTube channels, and a fellow portrait painter that I look up to, Mark Carder, mentioned this amazing free resource for artists on his vlog.
I checked it out and was excited.
I’m not sure if you live near an art museum or gallery, but in my opinion, nothing fuels inspiration more for realistic portrait painting than studying the works of the masters–like Rembrandt, Caravaggio, or Sargent. Seeing how they composed their paintings, chose their colors, applied their brushstrokes can encourage you to go higher with your own realistic painting skills. But most of us, even if we do have access to the museum, don’t have time to take the trip.
However, you can virtually take a trip to the museum with this free collection of high-resolution art images online.
I’ll tell you about it (and show it to you) in this video…
Let me know if you find this helpful!
LEARN MORE
- How to Paint Foliage Using the Acrylic Glazing Technique
- How to Trace for an Accurate Portrait Sketch
- How to Paint Realistic Eyes in Your Acrylic Portrait
- How to Add Raw Umber Dark & Ultramarine Blue to Your Portrait
- How to Make Your Own Raw Umber Dark
- How to Paint Realistic Trees & Grass in Your Acrylic
- How to Block In Skin Tone Values Using Glazing Technique
- How to Paint Vibrant Reds in Your Acrylic Portrait
- How to Glaze Background Colors & More Acrylic Portrait
- How to Paint White Clothing in Your Acrylic Portrait
- How to Easily Transition from a Sketch to a Painting
- How to Block In Shading & Skin Tones in Your Acrylic
- How to Build Up Color on Acrylic Pet Portrait
- How to Build Up Form on Clothing with Acrylic
- How to Paint Dark Clothing Using Acrylic Glazing Technique
- How to Paint a 24 x 30 Acrylic With 30 People
- How to Do Smooth Shading with Acrylic
- How to Sketch an Acrylic Portrait with a Grid
Read more about how to paint a portrait that you can surely be proud of!
Yours for better portraits,
P.S. Did you find this post helpful or encouraging? If so, send it on ahead! Let others know with the share buttons below. I’d love to hear your comments. Thank you so much! Also, do you have a question on acrylic portrait painting you’d like answered? Let me know, and I’d be happy to help!

How to Paint Two Bubble Frame Oval Acrylic Portraits
Unlock the secrets to creating captivating two bubble frame oval acrylic portraits
Painting two bubble frame oval acrylic portraits offers a unique opportunity to explore creativity and technique while crafting eye-catching artwork. In this guide, you’ll discover the essential steps to create stunning portraits that showcase not only your artistic skills but also the charming oval frames that elevate your paintings. Whether you’re a beginner or an experienced artist, you’ll learn how to blend colors effectively, capture realistic features, and compose your portraits for maximum impact. Let’s dive into the world of acrylic painting and bring your two bubble frame oval acrylic portraits to life!
How is my portrait project coming along?
“Um, I haven’t even started it yet.”
“Oh. Could you do another one and get it done for me by Christmas?”
“Let me check. Sure.”
This is kind of how the conversation went when a client called me on a portrait project that I had scheduled out for a few months. I was backed up with commissions, and it was already well into December.
Do another portrait when I was already behind? Why not? I thrive on a little deadline pressure. I’ve got an extra reserve of midnight oil 🙂
So here are the portraits I created, two convex-oval 14″ x 20″ acrylic on canvas paintings. I decided to work on both at once. And I got them both done in time, too, by God’s grace!
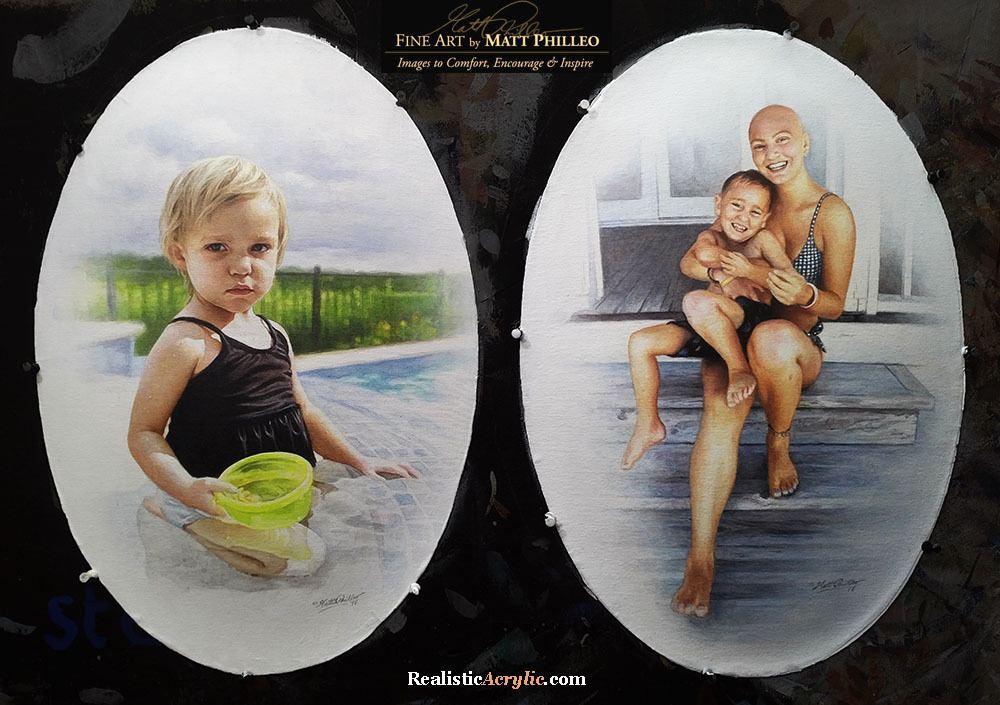
And now I want to show you how I painted them. I’ll take you through the process from the colors I select for the palette, the first few layers, all the way to the completed painting.
How I Painted These Oval Vintage Acrylic Portraits
This tutorial is a work in progress, so I’ll be adding more videos in the future!
Keep in touch and I’ll let you know when I post the next one!
Let me know how this tutorial helps!
Have you ever painted on an oval canvas or unusual surface before? If so, leave a comment and tell me about it. Have a blessed day!
LEARN MORE
- How to Paint Foliage Using the Acrylic Glazing Technique
- How to Trace for an Accurate Portrait Sketch
- How to Paint Realistic Eyes in Your Acrylic Portrait
- How to Add Raw Umber Dark & Ultramarine Blue to Your Portrait
- How to Make Your Own Raw Umber Dark
- How to Paint Realistic Trees & Grass in Your Acrylic
- How to Block In Skin Tone Values Using Glazing Technique
- How to Paint Vibrant Reds in Your Acrylic Portrait
- How to Glaze Background Colors & More Acrylic Portrait
- How to Paint White Clothing in Your Acrylic Portrait
- How to Easily Transition from a Sketch to a Painting
- How to Block In Shading & Skin Tones in Your Acrylic
- How to Build Up Color on Acrylic Pet Portrait
- How to Build Up Form on Clothing with Acrylic
- How to Paint Dark Clothing Using Acrylic Glazing Technique
- How to Paint a 24 x 30 Acrylic With 30 People
- How to Do Smooth Shading with Acrylic
- How to Sketch an Acrylic Portrait with a Grid
Read more about how to paint a portrait that you can surely be proud of!
Yours for better portraits,
P.S. Did you find this post helpful or encouraging? If so, send it on ahead! Let others know with the share buttons below. I’d love to hear your comments. Thank you so much! Also, do you have a question on acrylic portrait painting you’d like answered? Let me know, and I’d be happy to help!

Paint an Acrylic Portrait With Me in 2019!
Would you like to learn portrait painting from me in person?
I’d like to let you know that I’ll be teaching at the Chippewa Valley Cultural Association (Heyde Center for the Arts, Chippewa Falls, WI) on March 12-13, 10:30am-3:30pm, a two-day intensive acrylic portrait painting workshop. The class size is limited to 10 people to make sure I can give each student feedback and individual instruction.
Learn more/ register by clicking the image below…
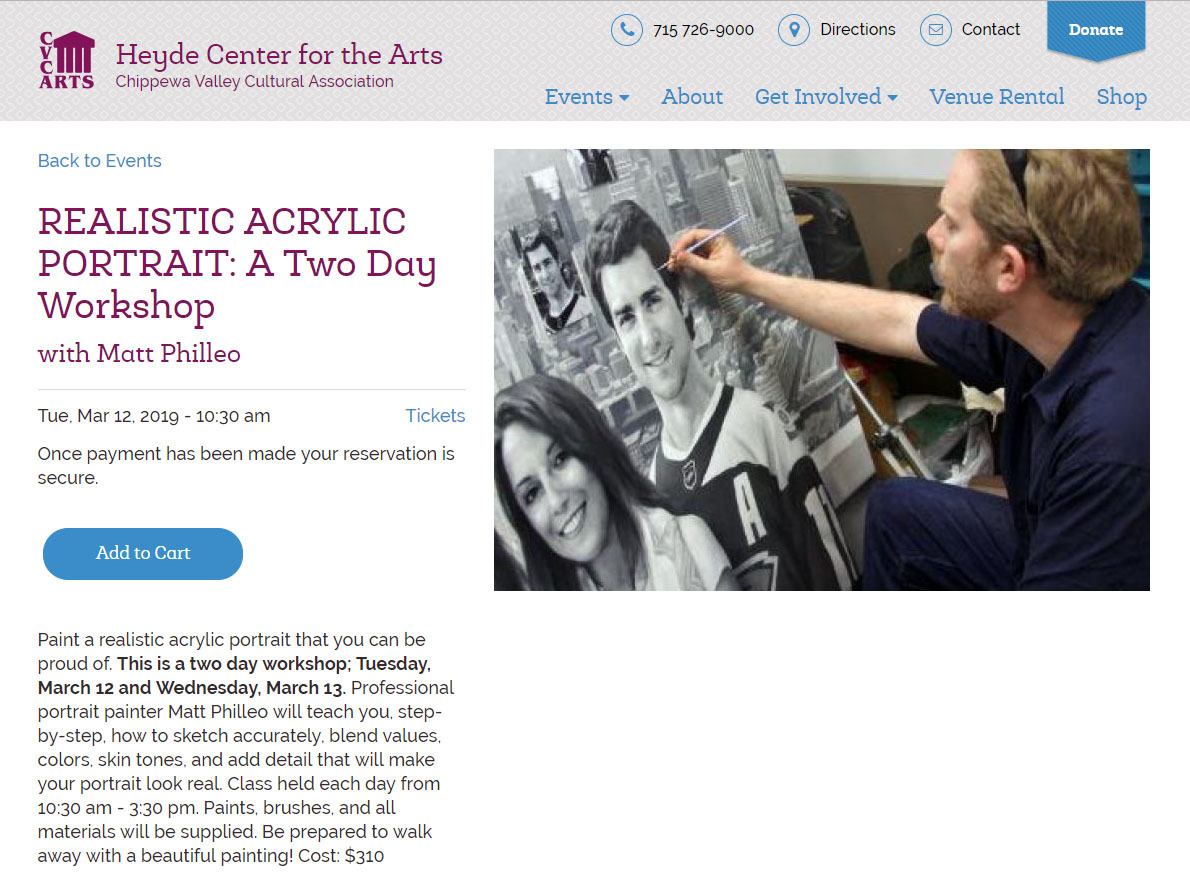
Learn how to paint realistic acrylic portraits with a two-day intensive , held at the Heyde Center in Chippewa Falls, WI workshop by artist Matt Philleo on March 12-13, 10:30-3:30pm
If you live or will be in the St. Paul/ Minneapolis-Eau Claire, WI area around that time and would like to learn how to paint with me, I would love to see you then!
Or maybe you know someone that may be interested. Could you please let them know about this? Thank you so much! Let me know if you have any questions.
Yours for better portraits,
P.S. Did you find this post helpful or encouraging? If so, send it on ahead! Let others know with the share buttons below. I’d love to hear your comments. Thank you so much! Also, do you have a question on acrylic portrait painting you’d like answered? Let me know, and I’d be happy to help!
Realistic Acrylic Portrait School, awarded 10 Top Acrylic Painting Blogs for 2019, by Feedspot.

Easy, Inexpensive Artist’s Palette for Acrylic Painting
One of the most important aspects of acrylic portrait painting is setting up your palette.
It’s often overlooked, but having a palette setup that works well for you can minimize frustration, increase productivity, reduce paint costs, and even enhance accuracy in your portrait.
Recently, an artist asked me how I set up my palette. Of course, there’s many ways to do it.
I’m not going to say the way I do it is the right way, but it works for me. And it may work for you as well.
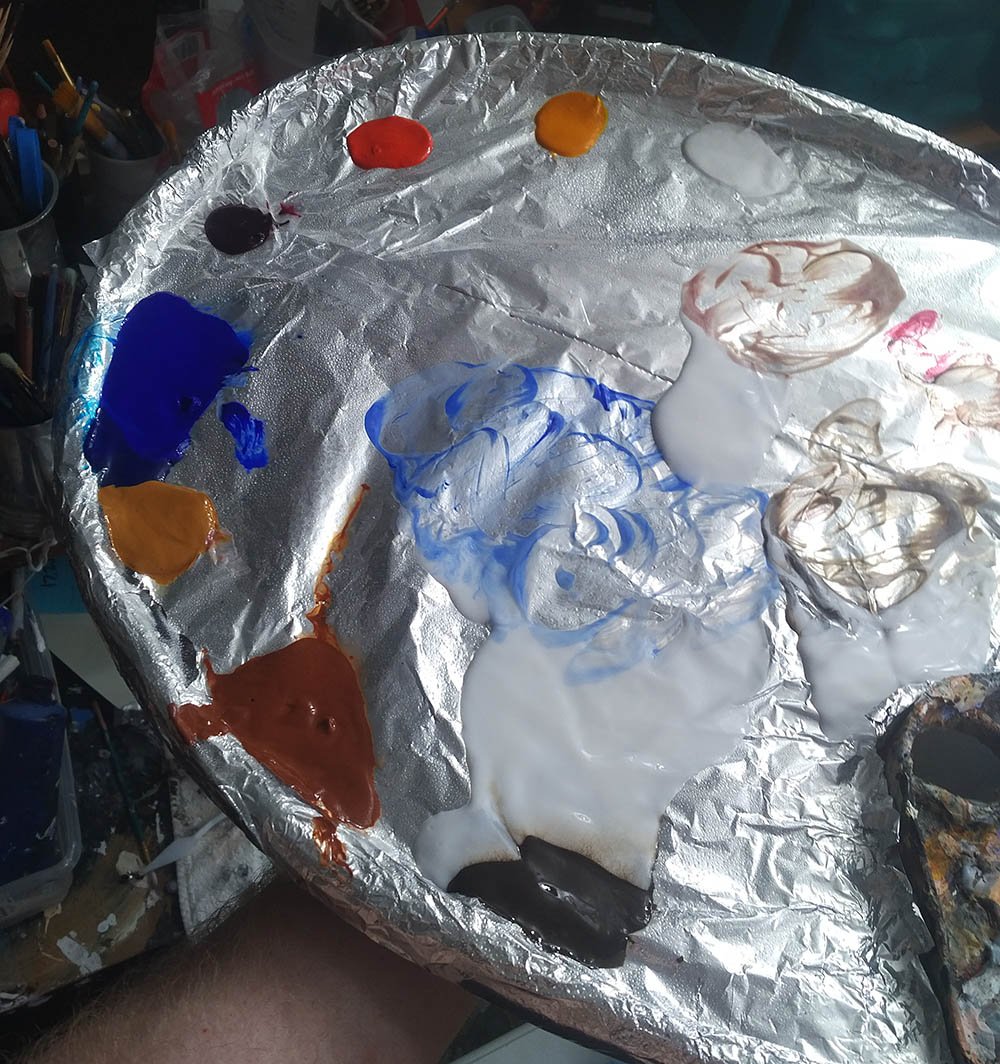
I use a traditional wood palette–about 14″ wide and 18″ long. I customized it a bit by adding a lip to the edge. That keeps my matte medium from dripping off the side. The lip is thick chipboard about 2″ in width that I bent and glued onto the wood. Then I sealed it with gloss medium to keep the moisture from warping it.
Let me help you get started on your new portrait today…
Learn How to Paint Acrylic Portraits With My Free Mini-Video Course!Before I start a new painting, I put aluminum foil over the entire surface, and attach it securely to back of the palette with clear packaging tape. It holds very well.
Then I lay out my paints.
I keep them wet as I can with a spray bottle of water while I work, spraying them about every 15 minutes or so.
When my mixing area gets too full of paint, I add a fresh piece of aluminum foil over the area, folding it over slightly to conform to the rounded shape of the palette. The previous layer of wet paint holds it down. This way I am not wasting paint. All my main colors on the palette remain until my painting is done or they dry up.
I throw the discarded, soiled pieces of aluminum foil away in a bag and then I get paid for them when I recycle them with my aluminum cans. And it doesn’t pollute the environment either!
Here is a video where I explain further how to set this palette up…
Question: What do you use for your palette…and why?
Enjoy your portrait painting and let me know if I can help you in any way.
All the best,
P.S. Did you find this post helpful or encouraging? If so, send it on ahead! Let others know with the share buttons below. I’d love to hear your comments. Thank you so much! Also, do you have a question on acrylic portrait painting you’d like answered? Let me know, and I’d be happy to help!

12 Steps on How to Paint Realistic Skin Tones in Your Acrylic Portrait
Learn the art of skin tones: A step-by-step guide for realistic acrylic portraits
What do you MOST want to learn?
This is a question I asked the artists in my Facebook group. The #1 answer was skin tones.
So I decided to put together a 5-week live video class, showing the whole process of painting an acrylic portrait, step-by-step, concentrating on flesh tones.
Most people know me as the guy that does slow, methodical glazes. But in this series, I wanted to meet artists where they’re at and do the portrait in more of an opaque technique. We had a great response to the class, with about eighty students on board right away during the first lesson!
I decided to create a printable guide that shows what we covered during the classes, although obviously not in as much depth as you’d get out of watching 5 hours of video! I think you’ll find this guide helpful. This online tutorial is an adaptation of the guide, showing a portrait from a photo I painted of my wife. If you take the video course (now open for enrollment) it will complement it well, and give you something to keep next to your easel as you paint. It can stand on its own, too. If you put the techniques to practice, you’ll see improvement in your portrait painting, for sure.
Either way, enjoy this tutorial, and I look forward to teaching you more!
Step 1: Create a Basic Sketch
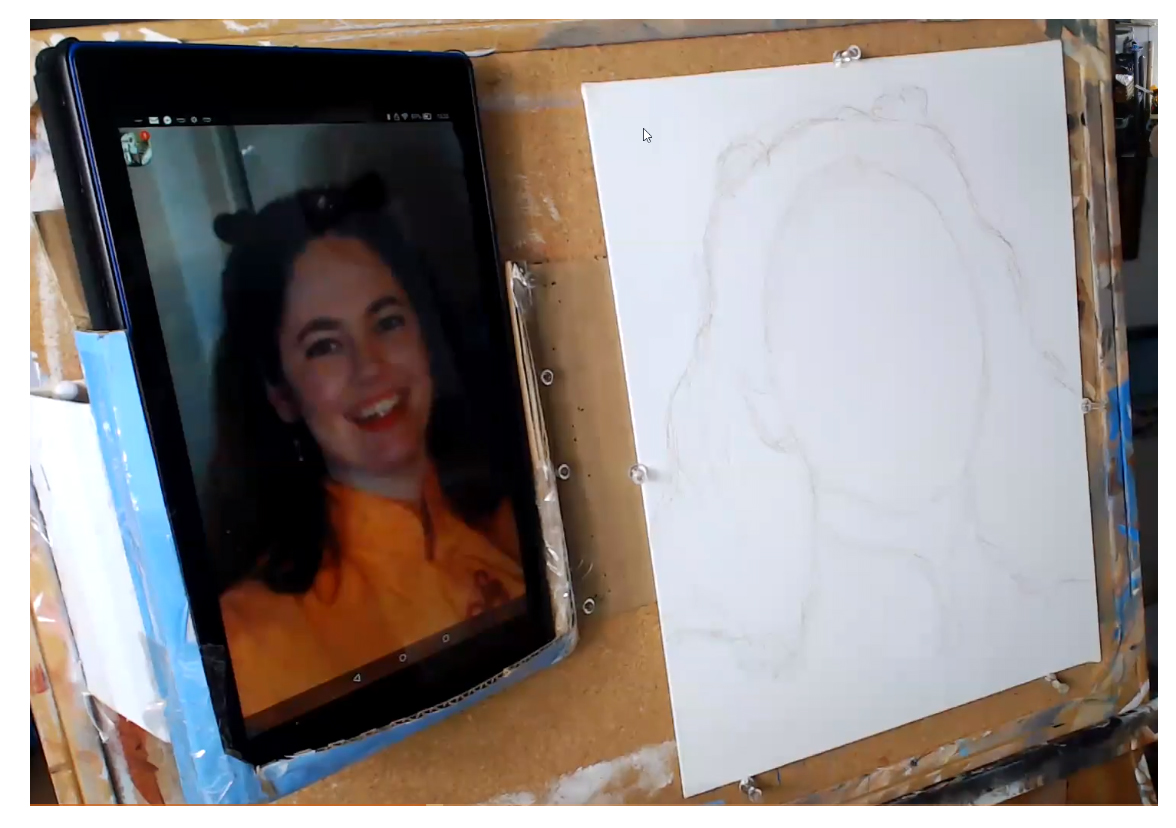
Step 2: Block in the Hair Color and Value
Although we are concentrating on skin tones, quickly blocking in the hair color and value frames the face. It will help us determine what colors to use for the skin tone, and make sure it is accurate. When you paint on top of plain white, you will think your skin tone is too dark, when in reality it’s not. We look for the predominant color in the hair. In this example, I’m using raw umber dark, and applying with a 3/4” -1” flat brush.
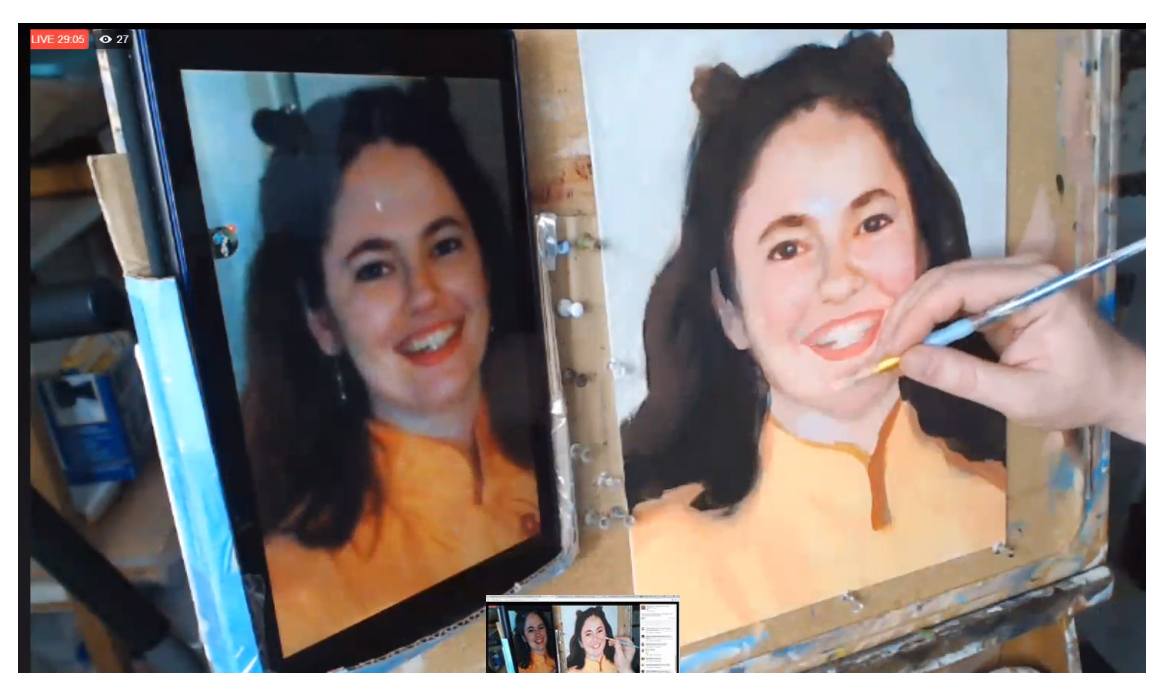
Step 3: Fill in the Skin Tone Base

In this step, I’m using a mixture of titanium white, burnt sienna, and organic red orange for the first, foundational skin tone layer. Make the paint as fluid as you can, by adding a little matte medium (10%) and brush quickly, just filling the whole area in.
Print off Your Own Guide to Paint Realistic Skin Tones in Acrylic
I created a handy reference guide that covers all the steps in this article in a 7 page PDF. You can download it right now, print it, and set it next to your easel, so you know exactly what colors, what techniques and what steps to take when you paint skin tones on your portrait. Download it below…
Download and Print the Skin Tones Guide
Step 4: Suggest the Features
Now it’s time to get the fun part: actually painting in the facial features–the eyes, nose and mouth. But we don’t want to paint them too dark right away. Lightly “suggest” them in using a mixture of the skin tone base from the previous layer and burnt sienna. Painting the features this way at first will allow you to adjust them if necessary.
Step 5: Darken and Refine the Features
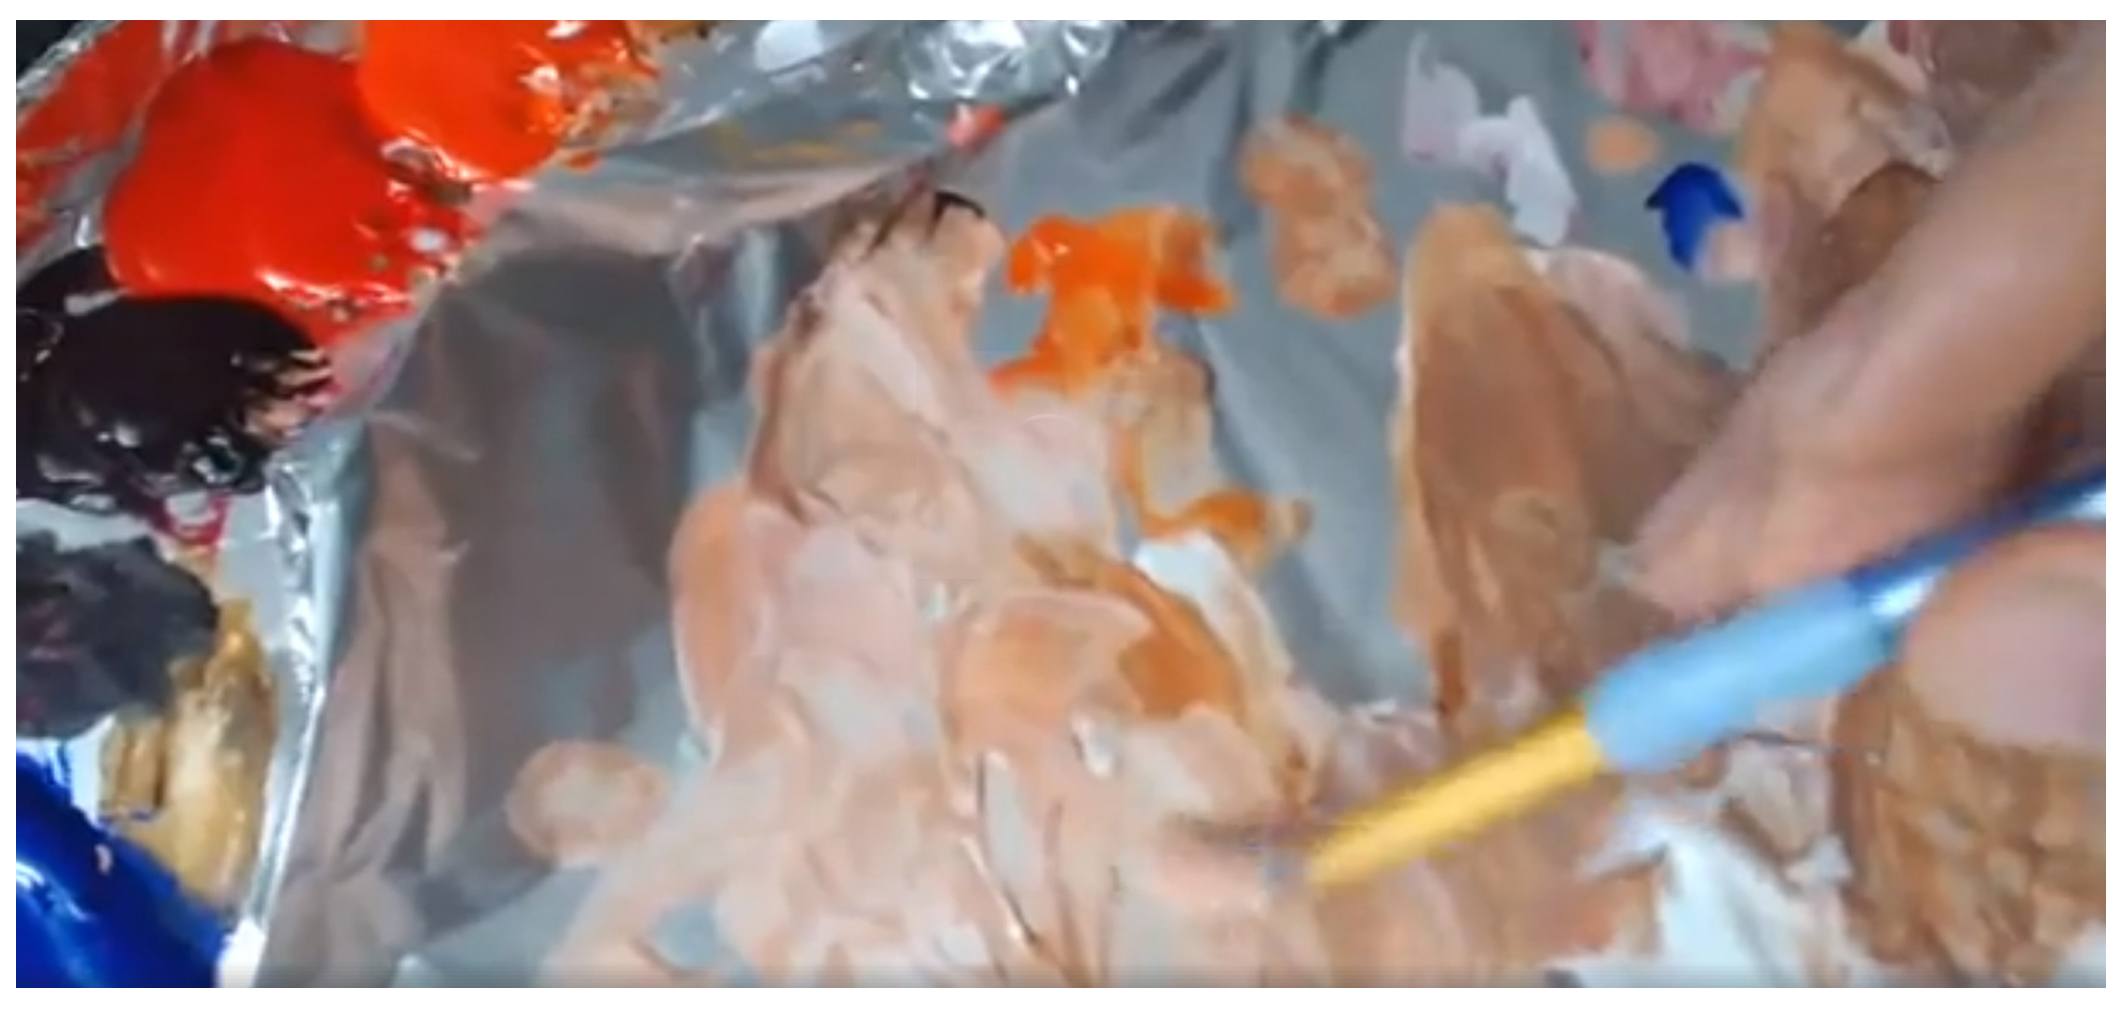
After the facial features dry, you can go over them with a darker color. Just add a little more burnt sienna for the eyebrows and nose. For the eyes, a bit of raw umber will cool down the color enough so that if the eyes are a different color than brown, you can easily adjust it. We’re not trying to dial in the exact eye color; rather, we’re just trying to ger the main shape and value established. For the lips, in this case, I’m using napthol red and burnt sienna, diluted a bit by the main flesh tone color.
Step 6: Block in the Mid-tone Shadows
Unless we add in shadows on the face, it will look flat. That is obvious. The trick is to use the right color and value. And then to place that tone in the right places to give the illusion of three dimensionality, In my example, I use a similar color to what I used for the previous step, and lightened it up just a bit with the main skin tone color, so it’s easy to control and doesn’t get too dark.
Step 7: Refine the Eyebrows
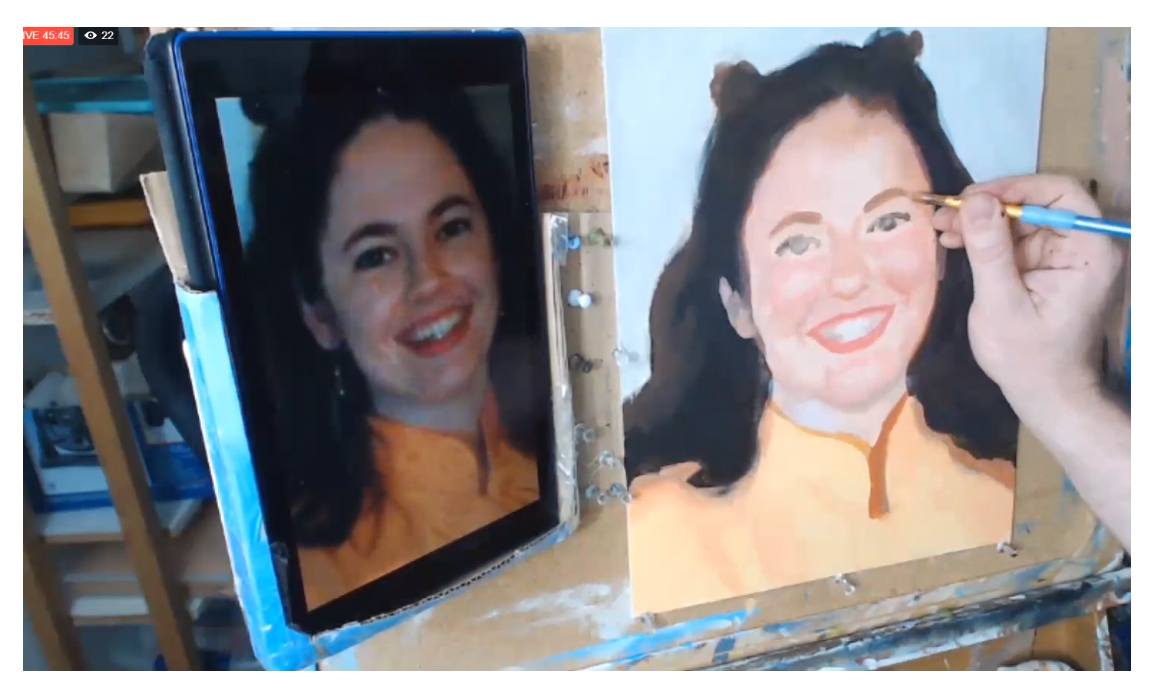
The eyebows up to this point look too thin. So what I’m doing here is creating a mixture of raw umber dark, alizarine crimson, raw sienna, and a touch of burnt sienna. Then, I carefully go over the eyebrow areas, and also thicken them up a bit too. You have to think of the eyebrows not just as hairs but also the shadow under the eye socket. What we’re doing is actually painting the base tone for the eyebrows. Then we go over with a darker color to suggest the hairs.
Tired of Muddy Colors?
Get my complete guide on painting skin tones, for free, and start mixing and blending realistic skin tones right away…
Download and Print the Skin Tones Guide
Step 8: Darken and Refine the Eyes

The eyes also need to get darker. So I take some raw umber dark, alizarine crimson and mix it into some of the skin tone base. Next, I paint that slowly with a small round brush, suggesting her eyelashes, eyeliner, and even the thickness of her eyelids.
Step 9: Turn the Form
“Turning the form” means we bring out the three-dimensionality of the facial structure by placing shading and gradation in just the right spots. In this step, I use a color just slightly darker than the main skin tone and add more depth to her chin. In addition, I deepen some of the shadows alongside her nose, and under her eyes, to make the cheeks appear as if they are projecting forward in space a little bit.
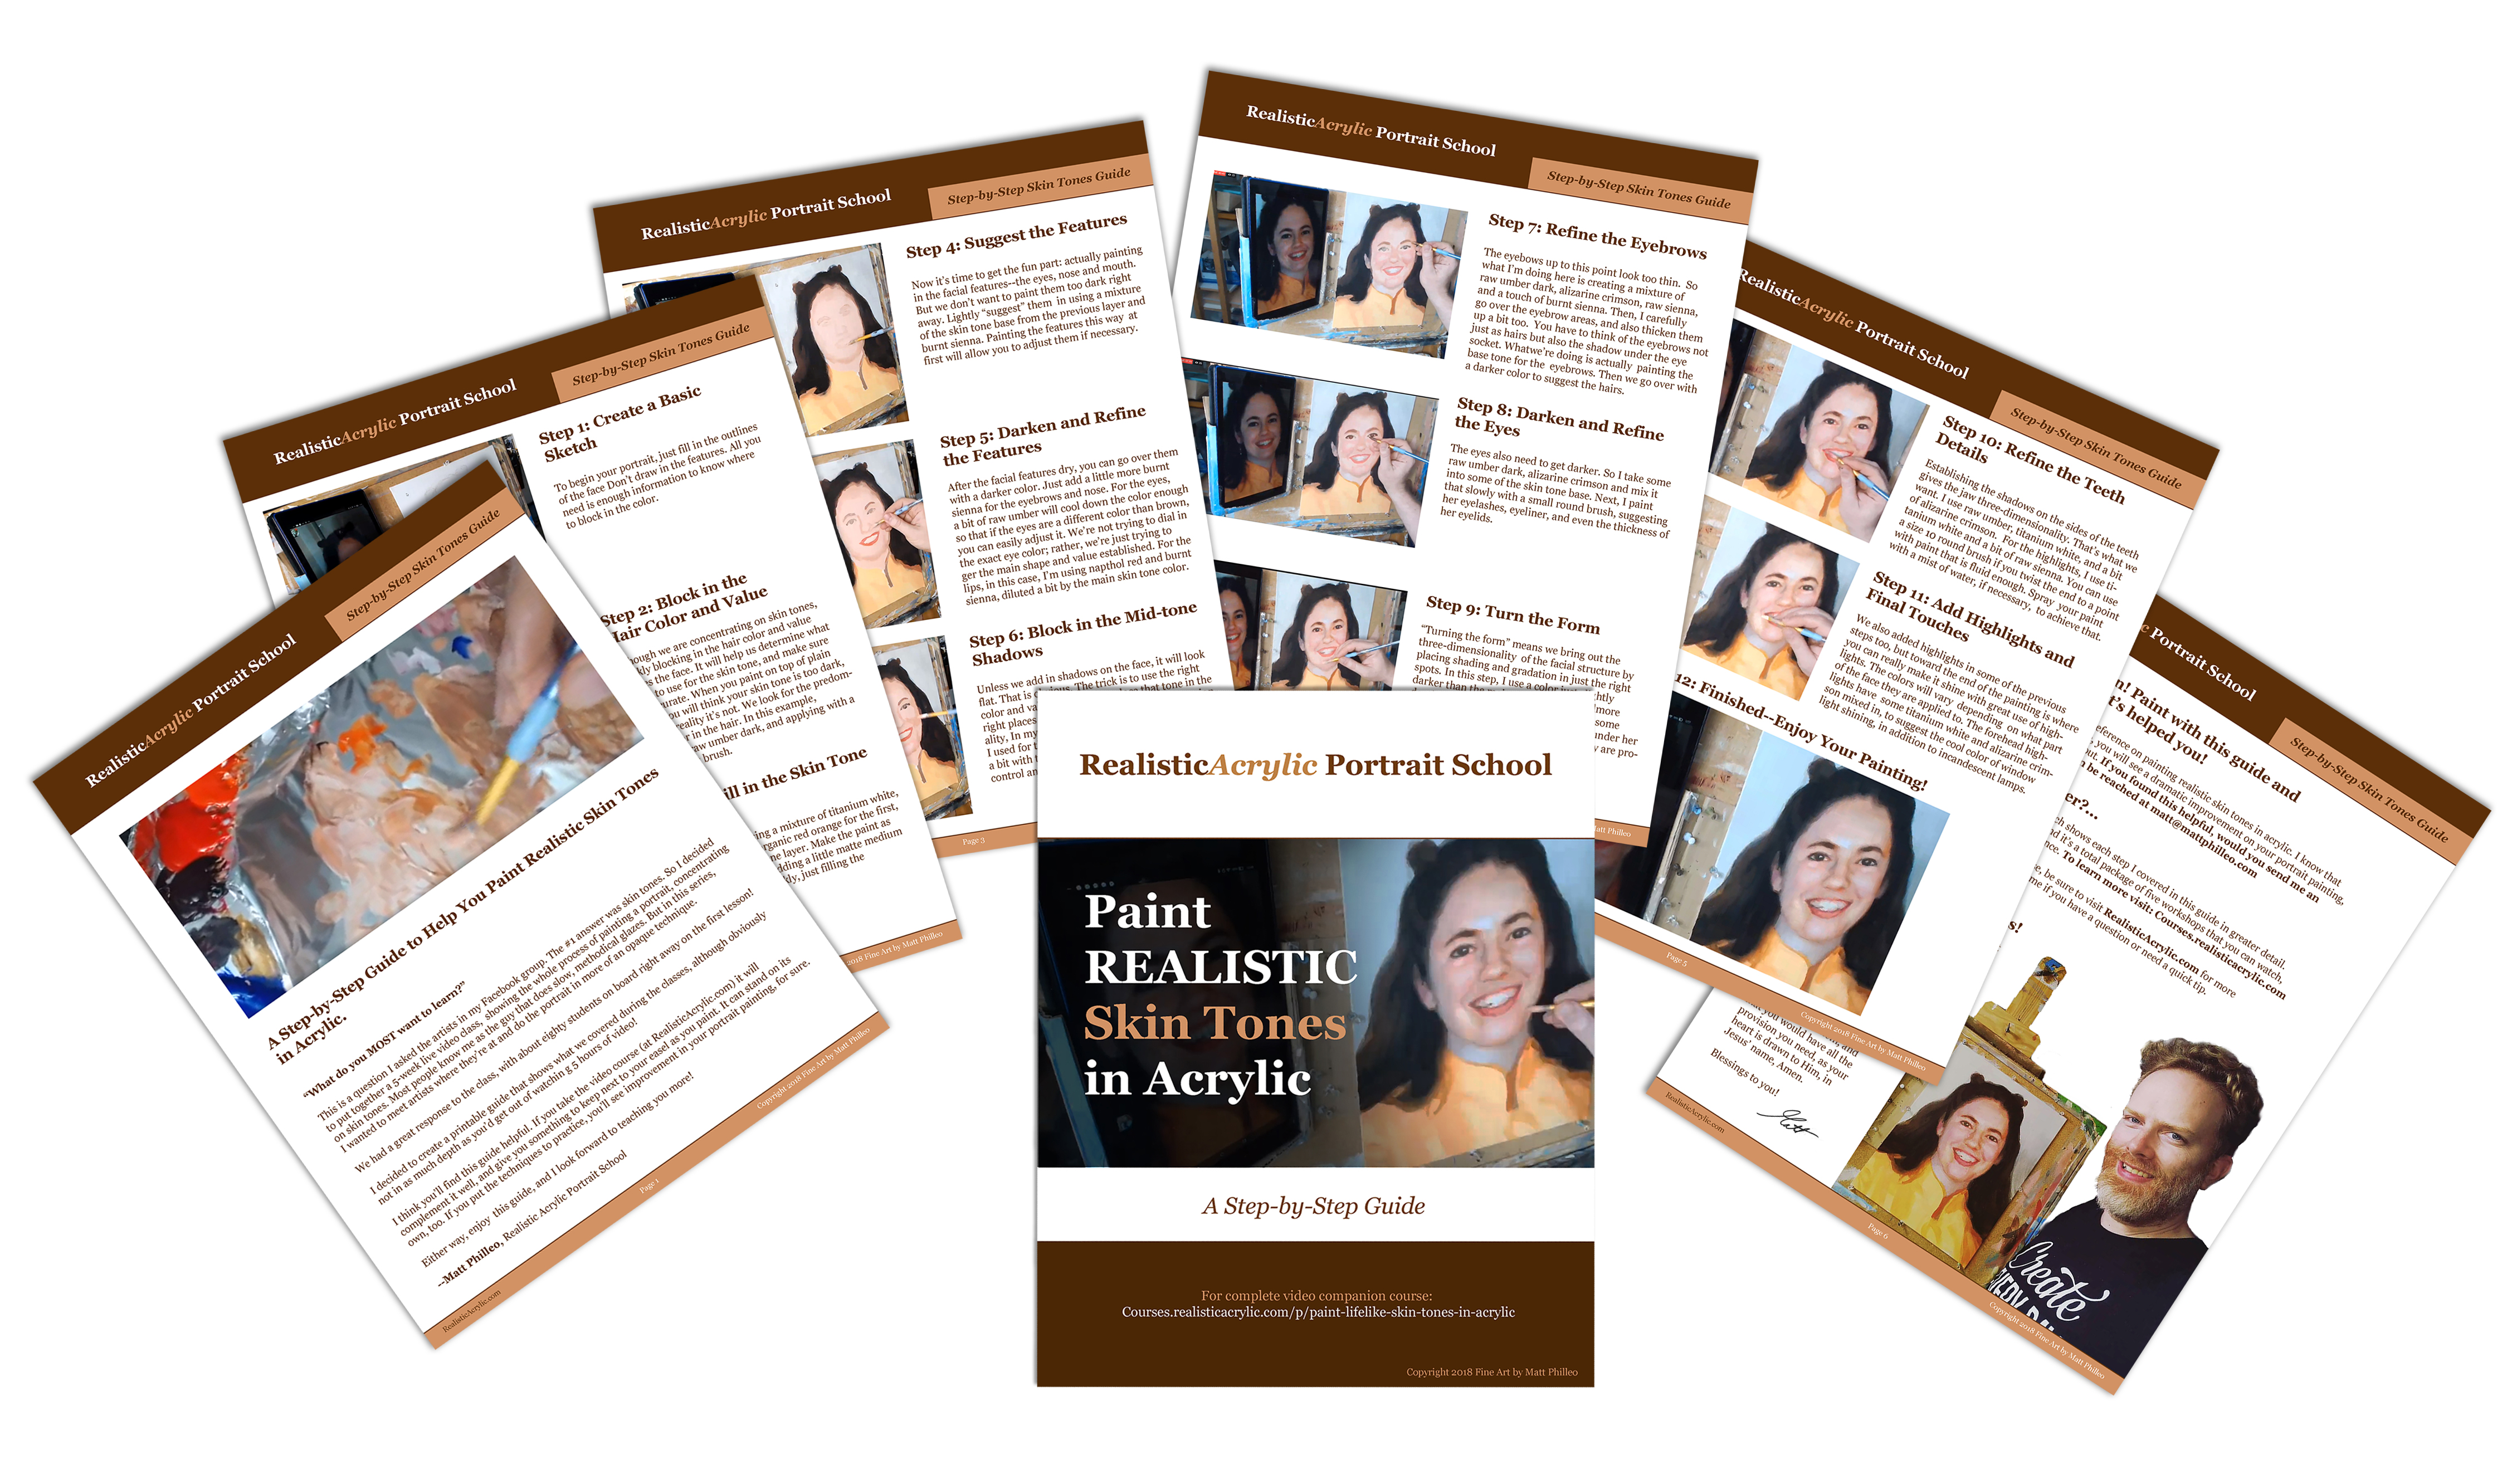
Step 10: Refine the Teeth Details
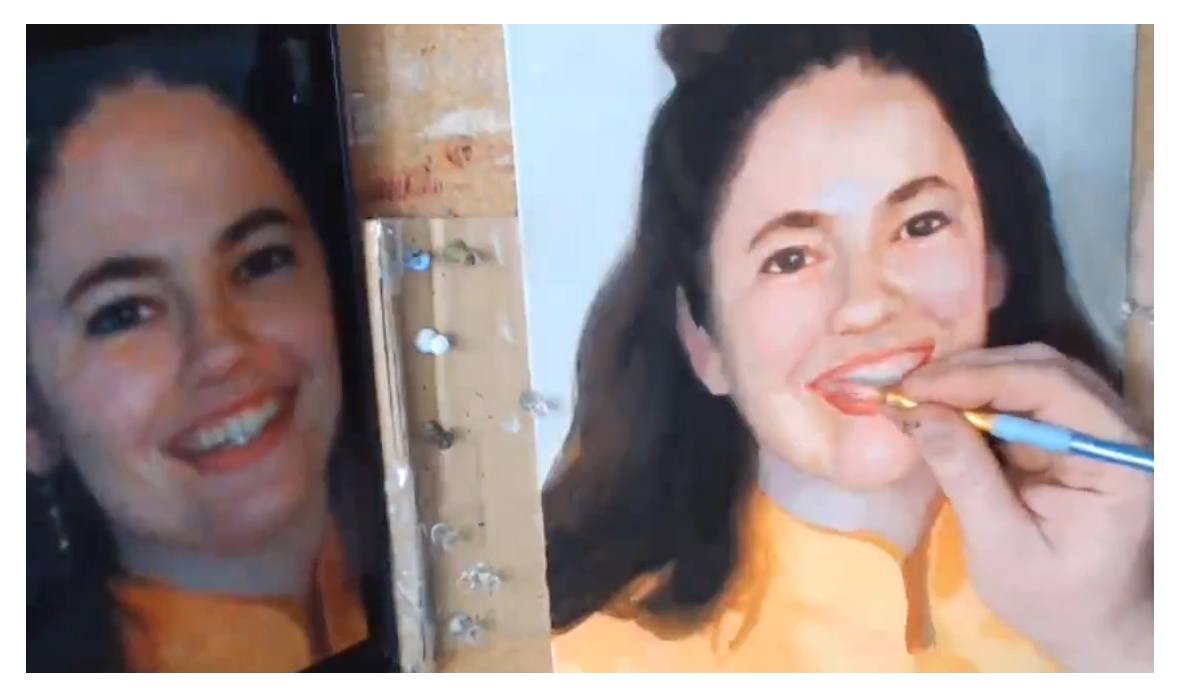
Establishing the shadows on the sides of the teeth gives the jaw three-dimensionality. That’s what we want. I use raw umber, titanium white, and a bit of alizarine crimson. For the highlights, I use titanium white and a bit of raw sienna. You can use a size 10 round brush if you twist the end to a point with paint that is fluid enough. Spray your paint with a mist of water, if necessary, to achieve that.
Step 11: Add Highlights and Final Touches
We also added highlights in some of the previous steps too, but toward the end of the painting is where you can really make it shine with great use of high- lights. The colors will vary depending on what part of the face they are applied to. The forehead high- lights have some titanium white and alizarine crimson mixed in, to suggest the cool color of window light shining, in addition to incandescent lamps.
Step 12: Finished–Enjoy Your Painting!

Now, it’s your turn! Paint with this guide and let me know how it’s helped you!
I enjoyed creating this helpful reference on painting realistic skin tones in acrylic. I know that if you put the steps into practice, you will see a dramatic improvement on your portrait painting, especially if you’re just starting out. If you found this helpful, would you send me an email and let me know? I can be reached at [email protected].
Make you print off the skin tones guide so you can paint a lifelike portrait you can be proud to show. Click the button below to download it.
Download and Print the Skin Tones Guide
Can I help you further?…
I have a video course available which shows each step I covered in this guide in greater detail. The course is about 5 hours long, and it’s a total package of five workshops that you can watch, step-by-step, at your own convenience. To learn more visit: Courses.realisticacrylic.com Even if you aren’t able take the course, be sure to get the free printable reference guide on painting skin tones in acrylic. Email me if you have a question or need a quick tip. I’ll be happy to help.
LEARN MORE
- How to Paint Foliage Using the Acrylic Glazing Technique
- How to Trace for an Accurate Portrait Sketch
- How to Paint Realistic Eyes in Your Acrylic Portrait
- How to Add Raw Umber Dark & Ultramarine Blue to Your Portrait
- How to Make Your Own Raw Umber Dark
- How to Paint Realistic Trees & Grass in Your Acrylic
- How to Block In Skin Tone Values Using Glazing Technique
- How to Paint Vibrant Reds in Your Acrylic Portrait
- How to Glaze Background Colors & More Acrylic Portrait
- How to Paint White Clothing in Your Acrylic Portrait
- How to Easily Transition from a Sketch to a Painting
- How to Block In Shading & Skin Tones in Your Acrylic
- How to Build Up Color on Acrylic Pet Portrait
- How to Build Up Form on Clothing with Acrylic
- How to Paint Dark Clothing Using Acrylic Glazing Technique
- How to Paint a 24 x 30 Acrylic With 30 People
- How to Do Smooth Shading with Acrylic
- How to Sketch an Acrylic Portrait with a Grid
Read more about how to paint a portrait that you can surely be proud of!
Share with your friends!
Let your fellow artists know about Realistic Acrylic Portrait School. My desire is to help artists learn how to paint an acrylic portrait they can be proud of. As I do for all my students, I pray that God would bless you with His peace in your painting process, direct your brush-strokes, that your paintings would encourage those who seem them, and that you would have all the provision you need, as your heart is drawn to Him, in Jesus’ name, Amen.
Blessings to you!
P.S. Did you find this post helpful or encouraging? If so, send it on ahead! Let others know with the share buttons below. I’d love to hear your comments. Thank you so much! Also, do you have a question on acrylic portrait painting you’d like answered? Let me know, and I’d be happy to help!

Step-by-Step Process of a Memoriam Portrait (Video Lesson)
Sometimes as portrait artists, we are called to capture the memory of a lost loved one. It’s a very special thing, a privilege that we given, to be able to do that for someone.
I don’t take it lightly.
Recently, I just finished up a commissioned portrait for a friend, whose pastor has recently passed away. This is an 11″ x 14″ acrylic on canvas. I want to show you the entire process, but I’m going to start in this post with just the sketch and first couple layers. Then, we’ll just add on with more steps to this same post.
Many of my blog readers prefer more video content rather than written, so that’s how I’m going to do it here.
Step 1: Blocking in the First Shadows and Tones
Step 2: Filling in the Initial Skin Tone Glaze
Step 3: Integrating the Background and Hair Color
Step 4: How to Paint the Hair
Step 5: How to Paint Nuances in the Skin Tones
LEARN MORE
- How to Paint Foliage Using the Acrylic Glazing Technique
- How to Trace for an Accurate Portrait Sketch
- How to Paint Realistic Eyes in Your Acrylic Portrait
- How to Add Raw Umber Dark & Ultramarine Blue to Your Portrait
- How to Make Your Own Raw Umber Dark
- How to Paint Realistic Trees & Grass in Your Acrylic
- How to Block In Skin Tone Values Using Glazing Technique
- How to Paint Vibrant Reds in Your Acrylic Portrait
- How to Glaze Background Colors & More Acrylic Portrait
- How to Paint White Clothing in Your Acrylic Portrait
- How to Easily Transition from a Sketch to a Painting
- How to Block In Shading & Skin Tones in Your Acrylic
- How to Build Up Color on Acrylic Pet Portrait
- How to Build Up Form on Clothing with Acrylic
- How to Paint Dark Clothing Using Acrylic Glazing Technique
- How to Paint a 24 x 30 Acrylic With 30 People
- How to Do Smooth Shading with Acrylic
- How to Sketch an Acrylic Portrait with a Grid
Read more about how to paint a portrait that you can surely be proud of!
Would you like to know when I post another video lesson on this portrait? Click the button below to get my art tips and keep learning!
Learn How to Paint Acrylic Portraits With My Free Mini-Video Course!
Hope you enjoyed this acrylic portrait painting tutorial. As always, let me know how I can help you with your portraits or if you have a question. Leave me a comment below!
Be blessed in your painting,
P.S. Did you find this post helpful or encouraging? If so, send it on ahead! Let others know with the share buttons below. I’d love to hear your comments. Thank you so much! Also, do you have a question on acrylic portrait painting you’d like answered? Let me know, and I’d be happy to help!