Tag Archives for " realistic acrylic portrait "

2025 Winter Acrylic Painting Challenge, Lesson 8 Bringing Your Portrait Home
Master the final touches: Bring your acrylic portrait to life with precision and confidence
Congratulations! You’ve made it to the final stage of your acrylic portrait. This is where all the hard work comes together, and your painting truly comes to life. In Lesson 8: Bringing Your Portrait Home, we will focus on refining details, sharpening edges, and adding those final highlights that make your portrait stand out.
It’s tempting to keep working indefinitely, but knowing when to stop is just as important as knowing how to start. By the end of this lesson, you’ll feel confident that your painting is complete, ready to be signed, and displayed with pride.
Step 1: Assess Your Progress
Before making any final touches, take a step back and evaluate your portrait. Ask yourself:
✔ Are the proportions and facial features balanced?
✔ Is the contrast strong enough to create depth?
✔ Do the highlights and shadows define the form effectively?
✔ Are there any unresolved areas that need attention?
If you notice anything that feels off, now is the time to make minor adjustments.
Step 2: Refining Edges and Enhancing Contrast
One of the most effective ways to bring realism to your portrait is by sharpening edges and boosting contrast.
Techniques for Crisp Edges:
- Use a small round brush with slightly thinned paint for clean, sharp lines.
- Define important areas like the jawline, nose bridge, and lips with subtle refinements.
- Blur unnecessary details in background elements to enhance depth and focus.
Boosting Contrast for Depth:
- Deepen shadows with a mix of raw umber and alizarine crimson for warmth.
- Brighten highlights using titanium white with a touch of yellow ochre for natural skin tones.
- Adjust mid-tones to create smooth transitions between light and shadow.
These small changes will make a significant difference in the overall impact of your portrait.
Step 3: Adding Final Highlights
To make your portrait pop, strategic highlights should be applied.
Where to Place Highlights:
✔ The tip of the nose and cheekbones
✔ The upper eyelids and brow ridge
✔ The edges of the lips and chin
✔ The light-catching areas of clothing or accessories
Using a dry brush technique with minimal paint can help you create soft, natural highlights without overpowering the painting.
Step 4: Knowing When to Stop
It’s easy to overwork a painting, but at some point, you must decide it’s finished. A few signs that your portrait is complete:
✔ The main subject stands out against the background.
✔ The details are refined but not overly complicated.
✔ The colors and contrast look balanced.
✔ You feel satisfied when viewing your work from a distance.
If you can check off these points, it’s time to bring your portrait home and move on to the final step—signing your artwork!
Step 5: Signing Your Painting
A signature is the finishing touch that makes your work official.
Tips for Signing Your Acrylic Painting:
✔ Use a fine brush or acrylic paint pen for precision.
✔ Place your signature in a subtle but visible area (bottom right or left corner).
✔ Keep it small and unobtrusive so it does not distract from the portrait.
✔ Use a color that complements but contrasts slightly with the background.
Once signed, your painting is officially complete!
Celebrate Your Progress!
Completing a portrait is a huge achievement! Whether you’re keeping it for yourself, gifting it, or selling it, take a moment to appreciate your hard work.
If you’ve participated in the 2025 Winter Acrylic Painting Challenge, share your final piece with the community and celebrate your growth as an artist. Remember each finished portrait is a stepping stone to even greater artistic success.
📢 Did you enjoy this challenge? Sign up for the next one and keep improving your portrait painting skills! 🎨✨
FAQs: Bringing Your Portrait Home
1. How do I know when my painting is finished?
If the details, contrast, and composition feel balanced, and you no longer see major issues, it’s time to stop. Overworking a painting can reduce its realism.
2. Should I varnish my painting after finishing?
Yes! A protective varnish will enhance colors and provide longevity. Use a gloss, satin, or matte finish, depending on your preference.
3. How can I fix mistakes in the final stages?
For minor errors, gently layer paint over the area with a dry brush. If needed, use a soft wet cloth to lift fresh paint before it dries.
4. What’s the best way to display my finished portrait?
Frame your painting with a simple, elegant border or display it on a stretched canvas for a professional look.
2025 Winter Acrylic Portrait Painting Challenge Series
2025 Winter Acrylic Portrait Painting Challenge: Steps to Get Started
2025 Winter Acrylic Portrait Challenge Pre-Lesson: Gathering Your Supplies
2025 Winter Acrylic Portrait Challenge, Lesson 1: Prepping Your Canvas for the Portrait
2025 Winter Acrylic Painting Challenge, Lesson 2: Sketching Your Portrait Accurately
2025 Winter Acrylic Painting Challenge, Lesson 3: Sealing in Your Sketch
2025 Winter Acrylic Painting Challenge, Lesson 4: Beginning Your Portrait with Glazes
2025 Winter Acrylic Painting Challenge, Lesson 5: Building Up Color and Contrast
2025 Winter Acrylic Painting Challenge,Bonus Video: Increasing Contrast
2025 Winter Acrylic Painting Challenge, Lesson 6 Shading and Color Nuances
2025 Winter Acrylic Painting Challenge, Lesson 7 Creating Realism in Your Portrait
2025 Winter Acrylic Painting Challenge, BONUS Video:Adjusting Colors and Details

How to Prime Your Own Canvas
Master the art of priming for a flawless painting surface
Priming a canvas is a crucial step in preparing your painting surface. Whether you are working on a custom-sized canvas or looking for better quality than store-bought options, learning how to prime your own canvas will give you full control over your art materials. Without proper priming, paint can absorb unevenly, leading to unwanted textures and reduced longevity. In this guide, you’ll learn the best techniques for stretching, tightening, and applying gesso to your canvas, ensuring a professional-quality surface for your acrylic or oil paintings.
Step 1: Preparing Your Canvas
Before applying gesso, the canvas must be properly stretched and tightened. A loose canvas can cause sagging, making it difficult to work on.
How to Tighten Your Canvas:
- Spray or Brush with Water: Lightly mist the front and back of the canvas with water. As it dries, the fibers will contract, tightening the surface.
- Use Canvas Keys (Optional): If extra tension is needed, insert canvas keys into the corners and tap them gently with a mallet. These should be used as a last resort.
Ensuring that the canvas is tight before priming will create a sturdy and reliable painting surface.
Step 2: Choosing the Right Gesso
Acrylic gesso is the most common primer used for both acrylic and oil painting. Brands like Liquitex and Nova Color offer high-quality options. Gesso comes in different thicknesses, and the type you choose will impact the final texture of your canvas.
Why Use Gesso?
- Prevents paint from soaking into the canvas.
- Provides a smoother and more even painting surface.
- Improves the durability of your artwork.
Shake the gesso well before using it. This ensures that any settled pigments and binders are mixed evenly for a consistent application.
Step 3: Applying the First Layer of Gesso
The first layer of gesso is essential for sealing the raw canvas and preventing excessive paint absorption.
Materials Needed:
✔ Acrylic gesso
✔ 3-inch paintbrush or drywall taping knife
✔ Container for pouring gesso
How to Apply:
- Pour the gesso into a container, such as an empty yogurt cup.
- Load your brush with a generous amount of gesso.
- Apply in smooth, even strokes, working in one direction (either vertical or horizontal).
- Cover the entire canvas, ensuring even distribution.
- Allow it to dry completely before adding additional coats.
The drying time will vary depending on the thickness of the application and the surrounding humidity.
Step 4: Sanding and Additional Layers
To achieve a smoother painting surface, multiple layers of gesso are recommended.
Adding More Layers:
- Apply a second coat in the opposite direction of the first (if the first coat was vertical, apply the second coat horizontally).
- Lightly sand the surface between coats using fine-grit sandpaper for a polished finish.
- Repeat for a third or fourth coat if a smoother surface is desired.
Each layer enhances the texture and longevity of the canvas, making it ideal for detailed brushwork and blending.
Step 5: Letting the Canvas Cure
After the final coat of gesso, the canvas should be left to cure for at least 24 hours. This allows the primer to fully bond with the canvas fibers, ensuring a stable painting surface.
Tips & Techniques for a Perfectly Primed Canvas
✔ Use quality gesso to avoid cracking or peeling over time.
✔ Apply in thin layers for a more even and refined surface.
✔ Sand between coats to remove any brush strokes or ridges.
✔ Ensure proper drying time to prevent tackiness before painting.
✔ Work in a well-ventilated area to speed up drying and avoid inhaling fumes.
Learning how to prime your own canvas gives you complete control over your painting surface. Whether you’re working with acrylics or oils, a properly primed canvas ensures better paint application and a more durable artwork. With these simple steps, you can create a professional-quality foundation for your creative projects.
Are you ready to start your next masterpiece? Try priming your own canvas and see the difference! 🎨
FAQs About Priming a Canvas
1. Why is priming a canvas necessary?
Priming seals the canvas, preventing excessive paint absorption and improving durability. Without gesso, paint can soak into the fibers, leading to uneven textures and fading over time.
2. Can I use regular white paint instead of gesso?
No. Gesso contains specific binders that create an absorbent surface, whereas regular paint does not provide the same adhesion benefits.
3. How many coats of gesso should I apply?
Two to three coats are typically recommended. Additional layers can be added for a smoother surface.
4. Can I use a roller instead of a brush?
Yes, a roller can be used for a more even application, but a brush allows for better control, especially on stretched canvases.
5. How long should I wait before painting on a primed canvas?
It is best to wait at least 24 hours after the final coat of gesso has dried to ensure optimal adhesion.
- Sketching Your Painting Accurately
- Beginning a Pet Portrait in Acrylic
- The Mystery of Realism in Painting
- Apply A Burnt Sienna Glaze to a Portrait
- Learn How to Sketch a Portrait Freehand in 45 Minutes
- Adding highlights to your acrylic painting
- 5 Excellent Reasons to Use Aluminum Foil
- Paint Realistic Wrinkles in Acrylic
- Painting Clothing in an Acrylic Portrait
- Paint a Cloudy Sky Acrylic
- How to add Semi-Opaque Highlights
- How to Enhance the Contrast in Your Acrylic
- How to Add Glaze to Your Acrylic Painting
- Paint Realistic Reflections on Eyeglasses in an Acrylic Portrait
- Build Up Depth on Your Acrylic Portrait Backgrounds
- How Do You Do Layers With the Glazing Technique?
- Learn How to Paint Wrinkles in Acrylic
Read more about how to paint a portrait that you can surely be proud of!
I’d love to hear your thoughts on this video. Please share it with your friends and family. Let me know if you have any further questions. I’ll greatly help you.
If you’d like to learn more, sign up for my free email tips and video class today.
Learn How to Paint Acrylic Portraits With My Free Mini-Video Course!Thank you so much for taking the time to read this tutorial and watch the video. That means a lot to me. I hope you find it very helpful in your portrait painting.
Yours for Better Portraits,

P.S. Did you find this post helpful or encouraging? If so, send it in ahead! Let others know with the share buttons below. I’d love to hear your comments. Thank you so much! Also, do you have a question on acrylic portrait painting you’d like answered? Let me know, and I’d be happy to help!

2025 Winter Acrylic Painting Challenge,Bonus Video: Increasing Contrast
Master the art of increasing contrast in your acrylic portraits with simple glazing techniques
In this bonus session of the 2025 Winter Acrylic Painting Challenge, we focus on an essential stepincreasing contrast to create more depth and realism. By building up layers and refining shadows, we can bring out key elements in the portrait before moving into the next lesson.
Why Contrast Matters in Acrylic Painting
Contrast is one of the fundamental principles that makes a painting stand out. It helps define the subject, create a sense of depth, and guide the viewer’s eye. Without proper contrast, an image may appear flat or lifeless.
In this lesson, the focus is on:
- Strengthening shadows and highlights
- Refining shapes with precise brushwork
- Using glazing techniques for smooth transitions
Materials Used
- Raw Umber Dark
- Ultramarine Blue
- Alizarine Crimson
- Titanium White
- Raw Sienna
- Matte Medium
- Round Detail Brush (Size 2)
- Flat Brush (1/4 inch)
Step-by-Step Process for Increasing Contrast
1. Adding Definition to Clothing and Accessories
The first area of focus is the clothing, particularly the buttons and fabric folds. To prevent losing the details, a light mixture of titanium white and raw sienna is applied to the buttons. This ensures they remain visible even after additional layers of paint are added.
- Mix titanium white with raw sienna for an opaque highlight.
- Apply it in thin, controlled strokes to emphasize the button edges.
- Allow the layer to dry before applying additional glazes.
2. Applying a Glaze for Deeper Shadows
To create a darker value for the clothing shadows, a glaze is prepared using raw umber dark, ultramarine blue, and a touch of alizarine crimson mixed with matte medium.
- This mixture is semi-translucent, allowing previous layers to remain visible.
- It is applied to the edges of the clothing and negative spaces between elements.
- A smooth gradient is achieved by feathering out the edges with a dry brush.
3. Refining Shadows in Facial Features
To make the face more three-dimensional, subtle shadows are introduced under the hat brim, around the eyes, and along the mustache and beard.
- A smaller detail brush is used for precision.
- A glaze mixture similar to the clothing shadows is applied in thin layers.
- The darkest areas are carefully deepened while still allowing for soft transitions.
4. Enhancing the Background and Rope Details
The negative space behind the subject is darkened to make the foreground stand out. Additionally, the ropes and scarf details are defined by using precise brush strokes.
- A darker glaze is applied to the background while maintaining soft edges.
- The spaces between the ropes are carefully shaded to enhance contrast.
- Layering shadows on the scarf creates a sense of texture and folds.
Tips for Mastering Contrast in Acrylic Painting
✔ Use a Limited Palette for Shadows: Mixing complementary colors rather than using straight black results in more natural-looking shadows.
✔ Work from General to Specific: Begin with broad shadow areas before refining small details.
✔ Layer Gradually: Instead of applying dark paint all at once, build it up in thin layers to control the intensity.
✔ Utilize Soft and Hard Edges: Hard edges emphasize details, while soft edges create depth and natural transitions.
✔ Check Your Painting in Black and White: Viewing your work in grayscale helps assess contrast levels effectively.
By following these steps and gradually increasing contrast, your painting will gain a greater sense of realism. Whether you are working on clothing, facial features, or background elements, strategic contrast adjustments can make all the difference.
Keep practicing, and don’t be afraid to layer and refine your shadows! What part of contrast enhancement do you find most challenging? Let’s discuss in the comments below.
🚀 Stay tuned for the next lesson in the 2025 Winter Acrylic Painting Challenge! Don’t forget to join my Facebook group, where I post update for the next lessons.
Frequently Asked Questions: Increasing Contrast in Acrylic Painting
Q: Why does my painting still look flat even after adding shadows?
A: The issue might be the lack of balance between shadows and highlights. Try increasing contrast in both areas by brightening highlights and deepening shadows gradually.
Q: How many layers should I use for proper contrast?
A: This depends on the opacity of your paint. Glazing techniques require multiple thin layers, while more opaque applications may need fewer.
Q: How can I blend shadows smoothly in acrylic painting?
A: Using matte medium or water can help create smoother transitions. Also, working while the paint is still wet allows for better blending.
2025 Winter Acrylic Portrait Painting Challenge Series
2025 Winter Acrylic Portrait Painting Challenge: Steps to Get Started
2025 Winter Acrylic Portrait Challenge Pre-Lesson: Gathering Your Supplies
2025 Winter Acrylic Portrait Challenge, Lesson 1: Prepping Your Canvas for the Portrait
2025 Winter Acrylic Painting Challenge, Lesson 2: Sketching Your Portrait Accurately
2025 Winter Acrylic Painting Challenge, Lesson 3: Sealing in Your Sketch
2025 Winter Acrylic Painting Challenge, Lesson 4: Beginning Your Portrait with Glazes
2025 Winter Acrylic Painting Challenge, Lesson 5: Building Up Color and Contrast

2025 Winter Acrylic Portrait Painting Challenge: Steps to Get Started
Learn to paint a winter scene with a rider and horse using acrylics: Free masterclass for all skill levels!
The new year brings a fresh opportunity to elevate your artistic journey with the 2025 Acrylic Portrait Painting Challenge. Running from January 6th to January 31st, this free challenge invites artists of all skill levels to explore the world of acrylic portraiture. Whether you’re a seasoned painter or just starting out, this masterclass series provides step-by-step guidance to help you craft a breathtaking winter scene featuring a rider on a horse in the snow.
The 2025 Acrylic Portrait Painting Challenge is here to help you grow as an artist while connecting with a community of like-minded creators. This free challenge offers everything you need to create a stunning acrylic portrait . And also you will discover how to sign up, receive your free welcome kit, and begin your artistic journey with me. Let’s dive into the details!
What Is the 2025 Acrylic Portrait Painting Challenge?
The challenge is a free opportunity for artists to learn acrylic portrait painting through structured lessons and community support. Participants will gain access to a detailed welcome kit and exclusive tutorials that guide them step by step.
By signing up, you will paint along with other artists worldwide and improve your skills in creating realistic portraits.
What’s Included in the Welcome Kit?
When you sign up, you’ll receive a comprehensive welcome kit that contains:
- Overview Guide: A document outlining the challenge’s structure and objectives.
- Supplies List: A detailed list of materials, including brushes, paints, and canvas sizes.
- Palette Layout Guide: Instructions for arranging your paints to ensure optimal color mixing.
- Reference Photo: An 8×10 reference image, along with a gridded version for precise sketching.
- Master Class Schedule: A lesson schedule detailing the topics covered throughout the challenge.
This kit ensures that you are fully prepared to paint alongside the lessons.
How to Sign Up for the Challenge
Signing up for the 2025 Acrylic Portrait Painting Challenge is simple and completely free. Follow these steps:
- Visit the official sign-up page: realisticacrylic.com/acrylic-portrait-painting-challenge.
- Fill out your first and last name, as well as your email address.
- Click the “Send Me the Welcome Kit” button.
- Check your email for the registration confirmation and further instructions.
Once registered, you will receive a downloadable PDF welcome kit. It is recommended to save or print it for easy access during the challenge.
Benefits of Joining the Challenge
- Learn at Your Own Pace: Access seven to eight lessons, covering every step of creating a realistic acrylic portrait.
- Community Support: Join a private Facebook group to connect with other participants, share progress, and seek feedback.
- Step-by-Step Guidance: Follow structured tutorials that simplify complex techniques.
Frequently Asked Questions
Q: Is the challenge free to join?
A: Yes, the challenge is completely free, and you can sign up at any time.
Q: Do I need prior painting experience?
A: No prior experience is required. The lessons cater to artists of all skill levels.
Q: What supplies will I need?
A: A supplies list is included in the welcome kit, detailing brushes, paints, and canvas sizes.
Q: Can I download the welcome kit to my phone?
A: Yes, the PDF file can be downloaded to your phone, tablet, or computer.
Q: Can I access the lessons later if I miss the live session?
A: Yes, the lessons will be available to view on demand.
Q: How can I connect with the artist community?
A: You’ll gain access to an exclusive online group where you can share progress, ask questions, and receive feedback. Join my Facebook Group now: Realistic Acrylic Portraits
Tips for a Successful Challenge Experience
- Save the welcome kit to your device for easy access.
- Print the materials to keep them organized and within reach.
- Participate in the Facebook group for support and motivation.
- Star or mark challenge-related emails as important to avoid missing updates.
- Share the challenge with artist friends to enjoy the experience together.
The 2025 Acrylic Portrait Painting Challenge is your chance to develop your portrait painting skills while enjoying the camaraderie of a supportive artistic community. Signing up is easy, and the welcome kit ensures you are fully prepared to participate.
Join us today and take the first step toward creating a masterpiece. Don’t wait, sign up now and grab the opportunity to transform a blank canvas into a masterpiece. Whether you’re painting to create a heartfelt gift, sharpen your skills, or express yourself. This Free Portrait Painting Challenge is the perfect place to start with.

How to Paint Realistic Trees: Acrylic Glazing Technique
Master the art of adding depth, vibrance, and fine details to your tree paintings with this step-by-step acrylic glazing technique.
Painting trees can be a rewarding but challenging endeavor for artists. Have you ever felt stuck with your landscape painting, unsure how to enhance the realism or depth of your trees? With the acrylic glazing technique, you can bring life to your tree paintings by layering subtle, translucent hues for stunning visual effects. In this guide, we’ll show you how to paint realistic trees step-by-step, using tips and techniques that can elevate your acrylic art.
Why Use the Acrylic Glazing Technique?
Acrylic glazing involves layering transparent paint to build depth, luminosity, and subtle tonal shifts. This technique allows you to control the vibrancy and realism of your work. It’s especially effective for creating the intricate textures and colors found in trees and foliage.
Step-by-Step Guide to Painting Realistic Trees
1. Prepare Your Materials
Before you start, gather the following materials:
- Acrylic Paints: Titanium white, Indian yellow, phthalo blue, raw sienna
- Matte Medium: To create fluid, transparent layers
- Brushes: Small round brush for details, flat brush for broader strokes
- Palette: For mixing colors
- Canvas or Paper: Prepped with a neutral base layer
2. Create the Base Layers
Start by painting a base layer with mid-tone colors to establish the overall structure of the trees. Use a mix of Indian yellow, phthalo blue, and raw sienna to create a natural, earthy palette. Allow the base layer to dry completely before moving on.
3. Mix Your Glaze
Combine a small amount of acrylic paint with matte medium to create a transparent glaze. For the first layer, use a mix of Indian yellow and titanium white. This will help add subtle warmth and highlight areas where light hits the foliage.
4. Add Details and Highlights
Use your small round brush to add highlights to the edges of leaves and branches. Adjust the intensity of your colors by mixing in more titanium white for lighter tones or phthalo blue for cooler shadows. Work methodically from left to right to avoid smudging.
5. Incorporate Chromatic Nuances
To achieve realistic depth, vary your glaze colors. For example:
- Add more Indian yellow to enhance vibrancy in sunlit areas.
- Use a cooler mix of phthalo blue and titanium white for shaded areas.
Blend these variations smoothly to mimic the natural interplay of light and shadow.
6. Refine the Texture
Focus on the intricate details of tree bark and leaves. Use your round brush to create fine lines and textures, layering darker glazes for shadows. Be patient and build the texture gradually, allowing each glaze to dry before adding more.
Mastering the acrylic glazing technique opens up a world of possibilities for creating realistic trees in your paintings. By layering colors with precision and patience, you can achieve breathtaking depth and vibrancy. Don’t let frustration hold you back embrace these techniques and watch your landscapes come to life.
For further resources and guides, visit realisticacrylic.com and check out my free courses to enhance your acrylic painting journey.
Tips for Success
- Use Matte Medium: It ensures smooth, transparent layers without compromising the paint’s consistency.
- Test Your Colors: Check the intensity of your glaze by painting a small swatch on a white card. Adjust as needed.
- Work with Light Layers: Avoid applying thick glazes; subtlety is key for realistic results.
- Keep a Reference: Use a photo or observe real trees to capture accurate colors and details.
Frequently Asked Questions
Q: What is the best brush for painting tree details?
A small round brush is ideal for fine details like leaves and branches, while a flat brush works well for broader areas.
Q: How do I prevent my painting from looking muddy?
Use transparent glazes and let each layer dry completely before adding another. Avoid overmixing colors directly on the canvas.
Q: Can I use glazing techniques for other elements in landscapes?
Absolutely! Glazing is versatile and can enhance skies, water reflections, and even distant mountains.
Conclusion
Mastering the acrylic glazing technique opens up a world of possibilities for creating realistic trees in your paintings. By layering colors with precision and patience, you can achieve breathtaking depth and vibrancy. Don’t let frustration hold you back—embrace these techniques and watch your landscapes come to life.
LEARN MORE
- Sketching Your Painting Accurately
- Beginning a Pet Portrait in Acrylic
- The Mystery of Realism in Painting
- Apply A Burnt Sienna Glaze to a Portrait
- Learn How to Sketch a Portrait Freehand in 45 Minutes
- Adding highlights to your acrylic painting
- 5 Excellent Reasons to Use Aluminum Foil
- Paint Realistic Wrinkles in Acrylic
- Painting Clothing in an Acrylic Portrait
- Paint a Cloudy Sky Acrylic
- How to add Semi-Opaque Highlights
- How to Enhance the Contrast in Your Acrylic
- How to Add Glaze to Your Acrylic Painting
- Paint Realistic Reflections on Eyeglasses in an Acrylic Portrait
- Build Up Depth on Your Acrylic Portrait Backgrounds
- How Do You Do Layers With the Glazing Technique?
- Learn How to Paint Wrinkles in Acrylic
Read more about how to paint a portrait that you can surely be proud of!
I’d love to hear your thoughts on this video. Please share it with your friends and family. Let me know if you have any further questions. I’ll greatly help you.
If you’d like to learn more, sign up for my free email tips and video class today.
Learn How to Paint Acrylic Portraits With My Free Mini-Video Course!Thank you so much for taking the time to read this tutorial and watch the video. That means a lot to me. I hope you find it very helpful in your portrait painting.
Yours for Better Portraits,
P.S. Did you find this post helpful or encouraging? If so, send it in ahead! Let others know with the share buttons below. I’d love to hear your comments. Thank you so much! Also, do you have a question on acrylic portrait painting you’d like answered? Let me know, and I’d be happy to help!

How to Paint Titanium White Highlights on Acrylic Grisaille
Unlocking depth and dimension with the power of highlights
Acrylic grisaille painting, where the initial layer focuses on monochromatic shades, builds a solid foundation for adding light and shadow. By incorporating titanium white, you’ll create highlights that bring vibrancy and realism to the piece. This tutorial focuses on how to add titanium white highlights on an acrylic grisaille painting, with an emphasis on using layering and glazing techniques.
1. Understanding Titanium White in Acrylic Grisaille
Titanium white is a high-opacity pigment ideal for creating highlights that stand out against darker backgrounds. It’s often used as the top layer in grisaille to add illumination. Mixed with a matte medium, titanium white becomes more translucent, making it perfect for glazing subtle highlights.
2. Setting Up Your Materials
Before you start painting, make sure to gather these essential materials:
- Titanium white acrylic paint
- Matte medium for glaze consistency
- Raw sienna for warm undertones
- Soft, synthetic brushes for precision
- Reference photo, if available for guidance
Setting up your materials in advance helps ensure a smooth painting process and allows for better color blending.
3. Mixing Titanium White with Matte Medium
To achieve a translucent effect, mix titanium white with a matte medium.
- Combine Equal Parts of titanium white and matte medium.
- Adjust Opacity by adding more medium if needed.
- Add a touch of raw sienna to warm the highlights.
Mixing with matte medium softens the intensity of titanium white, which avoids chalky finishes and integrates with existing shades.
4. Building Up Highlights with Layers
The key to lifelike highlights is building them in layers. Start with lighter layers and intensify as needed:
- Apply in Thin Layers: Use translucent white for softer highlights.
- Use a Dabbing Technique: Apply paint gently with your fingers or a soft brush to blend naturally.
- Focus on Key Areas: Areas like the forehead, cheeks, and hands usually capture light.
Building highlights gradually gives you control over how much brightness is added and helps blend with the underlying grisaille.
5. Creating Soft, Blended Edges
Blending is crucial to achieving a realistic finish. Soft edges allow highlights to transition smoothly:
- Feather the Edges by gently moving your brush outwards.
- Dab with a Clean Brush to soften transitions between highlighted and shaded areas.
- Layer Highlights: Adding subsequent layers after each has dried creates depth.
6. Incorporating Warm Undertones with Raw Sienna
Adding a touch of raw sienna to titanium white enhances the warmth, making highlights appear more natural.
- Mix with Titanium White: A small amount of raw sienna warms up highlights for a more lifelike effect.
- Apply Over Darker Areas: Use raw sienna highlights where the form turns, such as along the scroll in the painting.
- Layer Gradually: Continue layering with raw sienna-infused highlights to achieve depth.
Warm undertones help the highlights feel more integrated with the skin tones and surroundings.
7. Emphasizing Key Highlights for Depth
With grisaille, the highest highlights create the most contrast and depth:
- Focus on High Points: Areas like the cheekbones, forehead, and hands should be brighter.
- Use a Slightly Thicker Application: In these areas, reduce the amount of matte medium to make highlights more opaque.
- Add Fine Details: Tiny highlights on features such as eyes or the edge of a scroll add realism.
Tips and Techniques
- Practice Patience with Layers: Allow each layer to dry fully before adding more white to avoid muddying colors.
- Experiment with Blending Tools: Fingers can be a great blending tool, allowing for soft, natural transitions.
- Keep Highlights Soft: Avoid hard edges by lightly feathering the brush or dabbing with a clean brush.
Conclusion
Painting titanium white highlights on an acrylic grisaille foundation elevates your artwork by adding brilliance and realism. Through layering and blending techniques, each highlight contributes to the depth and life of the portrait. Start by mixing titanium white with matte medium and raw sienna, and then carefully apply highlights in key areas. The result will be a stunning, light-infused painting that truly stands out.
FAQs
What is the Purpose of Using Titanium White in Acrylic Grisaille?
Titanium white is highly opaque and ideal for creating crisp highlights that stand out against darker monochromatic underpainting. It helps to enhance light and depth.
How Do I Avoid Chalky Highlights?
Mixing titanium white with matte medium and a touch of raw sienna creates a warmer, less chalky effect, blending smoothly with darker tones.
Why Use Raw Sienna in White Highlights?
Adding raw sienna brings warmth and helps integrate the highlights with the rest of the painting. It adds a subtle vibrancy, avoiding the starkness that pure white can sometimes create.
How Should I Place Highlights on a Portrait?
Focus on areas where light naturally falls, such as the forehead, nose, cheeks, and hands. Adding highlights here enhances depth and realism.
How Do I Layer Highlights for Realism?
Start with thin, translucent layers, gradually adding more opacity to the final highlights. This layering builds a natural depth that closely resembles real light and shadow.
LEARN MORE
- Sketching Your Painting Accurately
- Beginning a Pet Portrait in Acrylic
- The Mystery of Realism in Painting
- Apply A Burnt Sienna Glaze to a Portrait
- Learn How to Sketch a Portrait Freehand in 45 Minutes
- Adding highlights to your acrylic painting
- 5 Excellent Reasons to Use Aluminum Foil
- Paint Realistic Wrinkles in Acrylic
- Painting Clothing in an Acrylic Portrait
- Paint a Cloudy Sky Acrylic
- How to add Semi-Opaque Highlights
- How to Enhance the Contrast in Your Acrylic
- How to Add Glaze to Your Acrylic Painting
- Paint Realistic Reflections on Eyeglasses in an Acrylic Portrait
- Build Up Depth on Your Acrylic Portrait Backgrounds
- How Do You Do Layers With the Glazing Technique?
- Learn How to Paint Wrinkles in Acrylic
Read more about how to paint a portrait that you can surely be proud of!
I’d love to hear your thoughts on this video. Please share it with your friends and family. Let me know if you have any further questions. I’ll greatly help you.
If you’d like to learn more, sign up for my free email tips and video class today.
Learn How to Paint Acrylic Portraits With My Free Mini-Video Course!Thank you so much for taking the time to read this tutorial and watch the video. That means a lot to me. I hope you find it very helpful in your portrait painting.
Yours for Better Portraits,

P.S. Did you find this post helpful or encouraging? If so, send it in ahead! Let others know with the share buttons below. I’d love to hear your comments. Thank you so much! Also, do you have a question on acrylic portrait painting you’d like answered? Let me know, and I’d be happy to help!

How to Transform Your Acrylic Paintings with Vibrant Colors
Learn to create stunning acrylic paintings using advanced glazing techniques
Transform Your Acrylic Paintings with the Glazing Technique: Step-by-Step Guide
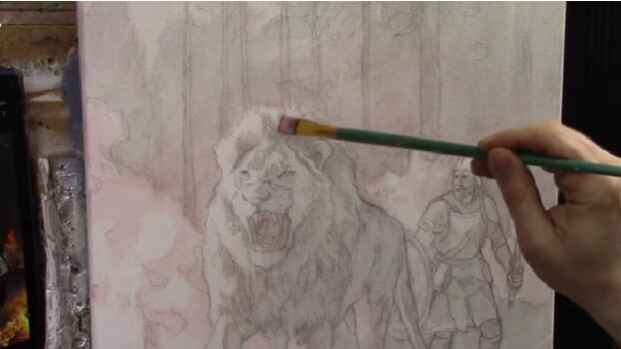
Achieving depth and vibrancy in acrylic paintings can be challenging, but with the right techniques, it becomes an exciting and rewarding process. In my recent tutorial, we continued working on an allegorical painting titled “He Goes Ahead of Us,” depicting a lion and a soldier. This painting symbolizes Jesus fighting our battles, with the lion representing Jesus leading the way.
Understanding the Glazing Technique
The glazing technique involves applying thin layers of paint mixed with a large amount of matte medium. This method builds up depth and luminosity, allowing the underlying layers to show through and creating vibrant, rich colors.
Setting Up the Value Structure
We applied a monochromatic glaze to establish the value structure. A mix of matte medium, raw umber dark, and ultramarine blue was used to create a gray glaze, which was then applied to block in the tonal values throughout the painting.
Adding Organic Orange to My Lion and Soldier Painting
We focused on adding color to our painting using the glazing technique. The key color introduced was organic orange, which adds a warm, vibrant touch to the fiery areas of the painting. This color, mixed with matte medium, creates a translucent glaze that enhances the painting’s luminosity and depth.
Preparing the Glaze
- Select Your Brush:
- Use a flat 5/8 brush for even application.
- Mix the Glaze:
- Combine a small amount of organic orange pigment with a generous amount of matte medium to create a translucent, milky glaze that dries clear.
Applying the Glaze
- Begin with the Fiery Areas:
- Apply the organic orange glaze to the edges and openings of the flames to create dynamic, vibrant effects.
- Build up layers gradually to enhance the luminosity.
- Expand to Other Areas:
- Extend the glaze to other parts of the painting, such as the lion and the soldier, to ensure color harmony and depth.
Tips and Techniques for Effective Glazing
- Use a Reference Photo: Carefully observe your reference photo to accurately place tonal values and colors.
- Apply Thin Layers: Start with light applications of glaze and build up gradually to avoid overpowering the painting.
- Dry Brushing for Shading: Exhaust the paint on the brush to create subtle shading effects.
- Incorporate Color Harmony: Spread the glaze throughout the painting to maintain color unity.
Enhancing the Painting
To create realistic flames, the glaze was applied around the edges and in the openings of the flames. This method enhances luminosity and ensures the fire looks dynamic and vibrant. By layering different colors, such as yellow, on top of the orange glaze, the flames will become even more striking.
Expanding the Glaze to the Background
The warm colors from the fire were extended into the background to capture the effect of the flames lighting up the forest. This creates a cohesive and immersive scene. The glaze was also added to the soldier and the lion, ensuring color harmony throughout the painting.
Detailed Steps in Glazing
- Establish the Darks:
- Apply the glaze in the dark areas first to set the stage for luminosity.
- This step is crucial for achieving a balanced value structure.
- Build the Midtones:
- Gradually apply the glaze to midtone areas, ensuring smooth transitions.
- Use a light touch to avoid overpowering the initial layers.
- Highlight with Light Colors:
- After establishing the darks and midtones, add lighter colors to create highlights.
- Use yellow or other bright colors to enhance the vibrancy of the flames.
Tips for Successful Glazing
- Use Matte Medium Generously: Mix a large amount of matte medium with a small amount of pigment to create a smooth and translucent glaze.
- Build Up in Layers: Gradually build up the glaze in multiple layers to achieve the desired depth and vibrancy.
- Observe and Adjust: Continuously observe your reference photo and adjust the placement of the glaze accordingly.
- Practice Patience: Glazing requires patience and practice, but the results are well worth the effort.
How Do You Make Acrylic Paintings More Vibrant?
To make acrylic paintings more vibrant, mastering the glazing technique is essential. This involves applying thin, translucent layers of paint over a dry layer to create depth and luminosity. Start by mixing a small amount of pigment with a generous amount of matte medium to form a smooth glaze. Apply this in thin layers, building up the color gradually.
Additionally, using high-quality, artist-grade acrylic paints ensures richer, more vibrant colors. Incorporating contrast between light and dark areas, adding bright highlights, and using a limited palette for color harmony are also key strategies. These methods, combined with careful observation of a reference photo and meticulous layering, can transform your acrylic paintings, making them pop with vibrancy and life.
Final Thoughts
The glazing technique is a powerful tool for artists looking to enhance their acrylic paintings. By applying thin, translucent layers of color, you can create depth, vibrancy, and a sense of realism. This method allows for continuous adjustments and refinements, ensuring your painting evolves beautifully.
Watch the video below on how I use the glazing technique to create amazing luminosity in your paintings
By incorporating these techniques and tips into your painting process, you can achieve stunning results that capture the essence and vibrancy of your subject. Keep practicing and experimenting with the glazing technique to unlock your full artistic potential.
LEARN MORE
- Sketching Your Painting Accurately
- Beginning a Pet Portrait in Acrylic
- The Mystery of Realism in Painting
- Apply A Burnt Sienna Glaze to a Portrait
- Learn How to Sketch a Portrait Freehand in 45 Minutes
- Adding highlights to your acrylic painting
- 5 Excellent Reasons to Use Aluminum Foil
- Paint Realistic Wrinkles in Acrylic
- Painting Clothing in an Acrylic Portrait
- Paint a Cloudy Sky Acrylic
- How to add Semi-Opaque Highlights
- How to Enhance the Contrast in Your Acrylic
- How to Add Glaze to Your Acrylic Painting
- Paint Realistic Reflections on Eyeglasses in an Acrylic Portrait
- Build Up Depth on Your Acrylic Portrait Backgrounds
- How Do You Do Layers With the Glazing Technique?
- Learn How to Paint Wrinkles in Acrylic
Read more about how to paint a portrait that you can surely be proud of!
I’d love to hear your thoughts on this video. Please share it with your friends and family. Let me know if you have any further questions. I’ll greatly help you.
If you’d like to learn more, sign up for my free email tips and video class today.
Learn How to Paint Acrylic Portraits With My Free Mini-Video Course!Thank you so much for taking the time to read this tutorial and watch the video. That means a lot to me. I hope you find it very helpful in your portrait painting.
Yours for Better Portraits,
P.S. Did you find this post helpful or encouraging? If so, send it in ahead! Let others know with the share buttons below. I’d love to hear your comments. Thank you so much! Also, do you have a question on acrylic portrait painting you’d like answered? Let me know, and I’d be happy to help!

How to Paint Lion and Soldier: Glazing Technique & Tips
Learn the acrylic glazing technique to create depth and luminosity in your portraits.
In the realm of acrylic painting, capturing depth and luminosity can elevate your artwork to a new level. Today, we delve into a symbolic and inspirational piece: a 16×20 acrylic on canvas depicting a lion and a soldier. This painting, inspired by the concept of divine guidance and protection, uses the glazing technique to achieve its captivating effect.
The acrylic glazing technique is a powerful technique that has revolutionized the way artists approach acrylic portrait painting. By layering translucent washes of color over a base layer, artists can achieve a depth and luminosity that bring their subjects to life. This method is particularly effective in creating inspiring works such as a Lion and a Soldier, where the interplay of light and shadow can evoke powerful emotions.
Understanding Acrylic Glazing
Acrylic glazing involves applying thin, transparent layers of paint to a dried layer of acrylic. Each layer modifies the color and tone of the underlying layers, allowing artists to build complex, rich hues without the muddiness that can result from mixing colors directly on the palette. The technique requires patience and precision, as each layer must dry completely before the next is applied.
The Concept Behind the Painting
The painting titled “He Goes Ahead of Us” is based on a verse from Deuteronomy, illustrating how divine guidance leads and protects through life’s battles. The lion symbolizes strength and leadership, while the soldier represents our active role in facing life’s challenges. This powerful imagery is brought to life using acrylic paints and the glazing technique.
Materials Needed
Before diving into the process, gather the following materials:
- Canvas (16×20)
- Acrylic paints (raw umber, burnt sienna, raw sienna, phthalo blue, ultramarine blue, alizarine crimson, naphthol red, organic orange, Indian yellow, titanium white)
- Matte medium
- Brushes (various sizes)
- Palette
- Reference photo
Steps to Achieve Acrylic Glazing
- Prepare Your Canvas: Start with a clean, primed canvas. Apply an underpainting if desired, using opaque colors to establish the basic composition and values.
- Mix the Glaze: Combine your chosen acrylic color with a glazing medium to achieve the desired transparency. The ratio of paint to medium can be adjusted based on the effect you want to achieve.
- Apply the Glaze: Using a soft brush, apply the glaze in thin, even layers. Allow each layer to dry completely before adding the next. The drying time will vary depending on the thickness of the glaze and environmental conditions.
- Build Up Layers: Continue adding layers of glaze, gradually building up the color intensity and depth. Pay attention to the interplay of light and shadow, which enhances the three-dimensionality of your subject.
- Final Touches: Once you have achieved the desired effect, add any final details or highlights. Use opaque paints sparingly to avoid disrupting the transparency of the glazes.
Mastering Acrylic Portrait Painting
Acrylic portrait painting benefits immensely from the glazing technique. Portraits require a nuanced approach to capture the subtleties of skin tones, facial features, and expressions. Glazing allows artists to create realistic and lifelike portraits with a sense of depth and dimension.
Key Techniques for Acrylic Portraits
- Underpainting: Start with a monochromatic underpainting to establish the basic values and shapes. This serves as a foundation for the subsequent layers.
- Layering: Use glazing to build up the skin tones gradually. Begin with lighter, more transparent layers, and gradually increase the opacity in the darker areas.
- Blending: Acrylics dry quickly, which can make blending challenging. Use glazing to create smooth transitions between colors and tones.
- Details: Add fine details such as hair, eyes, and textures using a combination of glazing and opaque painting techniques. Use a fine brush for precision.
- Highlights and Shadows: Emphasize the highlights and shadows to enhance the three-dimensionality of the portrait. Glazing allows for subtle adjustments and refinements.
Inspirational Acrylic Painting of a Lion and Soldier
Combining the majestic presence of a lion with the strength and bravery of a soldier creates a powerful and inspirational image. The acrylic glazing technique is particularly suited for capturing the contrasting textures and emotions of such a subject.
Composition and Planning
- Conceptualize: Begin by conceptualizing the composition. Decide on the pose, background, and overall mood of the painting. Sketch out your ideas on paper.
- Reference Materials: Gather reference photos of lions and soldiers. Pay attention to the details of their features, textures, and expressions.
- Composition: Plan the composition on your canvas. Consider the placement of the lion and the soldier, ensuring a balanced and harmonious arrangement.
Painting Process
- Underpainting: Start with a detailed underpainting. Use earthy tones for the lion and neutral tones for the soldier. Establish the basic shapes and values.
- Layering and Glazing: Begin applying glazes to build up the colors and textures. For the lion, use a combination of warm browns, oranges, and yellows to capture the fur. For the soldier, use cooler tones such as blues, greens, and grays.
- Textures: Pay attention to the textures of the lion’s mane and the soldier’s uniform. Use glazing to create a sense of depth and realism.
- Details: Add fine details such as the lion’s whiskers, the soldier’s facial features, and any other intricate elements. Use a combination of glazing and opaque painting for precision.
- Background: Create a background that complements the subjects. Use glazing to create a sense of depth and atmosphere.
- Final Touches: Add any final highlights and shadows to enhance the overall impact of the painting. Ensure that the glazes are smooth and evenly applied.
Watch the full video below
The acrylic glazing technique is a versatile and powerful method that can elevate acrylic portrait paintings to new levels of realism and depth. By mastering this technique, artists can create inspiring and impactful works, such as a painting of a lion and a soldier, that resonate with viewers on an emotional level. Whether you are a beginner or an experienced artist, incorporating glazing into your acrylic painting practice can open up new possibilities and enhance your artistic expression.
LEARN MORE
- Sketching Your Painting Accurately
- Beginning a Pet Portrait in Acrylic
- The Mystery of Realism in Painting
- Apply A Burnt Sienna Glaze to a Portrait
- Learn How to Sketch a Portrait Freehand in 45 Minutes
- Adding highlights to your acrylic painting
- 5 Excellent Reasons to Use Aluminum Foil
- Paint Realistic Wrinkles in Acrylic
- Painting Clothing in an Acrylic Portrait
- Paint a Cloudy Sky Acrylic
- How to add Semi-Opaque Highlights
- How to Enhance the Contrast in Your Acrylic
- How to Add Glaze to Your Acrylic Painting
- Paint Realistic Reflections on Eyeglasses in an Acrylic Portrait
- Build Up Depth on Your Acrylic Portrait Backgrounds
- How Do You Do Layers With the Glazing Technique?
- Learn How to Paint Wrinkles in Acrylic
Read more about how to paint a portrait that you can surely be proud of!
I’d love to hear your thoughts on this video. Please share it with your friends and family. Let me know if you have any further questions. I’ll greatly help you.
If you’d like to learn more, sign up for my free email tips and video class today.
Learn How to Paint Acrylic Portraits With My Free Mini-Video Course!Thank you so much for taking the time to read this tutorial and watch the video. That means a lot to me. I hope you find it very helpful in your portrait painting.
Yours for Better Portraits,
P.S. Did you find this post helpful or encouraging? If so, send it in ahead! Let others know with the share buttons below. I’d love to hear your comments. Thank you so much! Also, do you have a question on acrylic portrait painting you’d like answered? Let me know, and I’d be happy to help!

How To Adjust Eyes, Mouth, And More In Your Portrait
Enhance your portraits with detailed adjustments using the glazing technique
Portrait painting is a journey that involves continuous learning and refinement. One of the key skills to master is the ability to make adjustments to the eyes, mouth, and other facial features. These fine-tuning techniques can significantly enhance the likeness and realism of your portraits. In this blog post, we will explore the glazing technique, a method that allows for precise adjustments and seamless blending. By following this step-by-step guide, you will be able to elevate your acrylic painting skills and achieve a more lifelike finish.
Preparing Your Workspace and Materials
Before diving into the painting process, it is crucial to prepare your workspace and materials. A well-lit area is essential, and all necessary supplies should be within reach. For this session, you will need:
- Acrylic paints (including raw umber, ultramarine blue, and alizarine crimson)
- Matte medium
- A variety of brushes (including a Princeton Velvet Touch size 4)
- A reference photo (preferably a lighter version to see details clearly)
By ensuring that your materials are ready, you will be able to focus entirely on the painting process without interruptions.
Assessing and Adjusting the Reference Image
The first step involves assessing your reference image. If the original photo is too dark, it is recommended to create a lighter version to help identify finer details. This step is essential for making accurate adjustments to the eyes, mouth, and other facial features. In the example discussed, the artist used a 20×24 commission portrait and identified areas that needed slight adjustments for better likeness.
Mixing the Right Colors
Next, it is important to mix your paints to create a rich, almost black color. Combine raw umber, ultramarine blue, and alizarine crimson. Adjust the color temperature as needed to achieve the desired shade. This custom mix will help in fine-tuning the details and nuances of the portrait.
Applying the Glaze
The glazing technique involves applying a thin, translucent layer of paint over the existing layers. The brush should be dipped into clear matte medium and mixed with the custom color to create a translucent glaze. This diluted glaze allows for smoother blending and more precise adjustments. For instance, when adjusting the width of the subject’s mouth, the artist added a bit of darkness to the nasal labial fold and then blended it out using the diluted glaze.
Blending Techniques
Blending is a critical aspect of the glazing technique. To achieve seamless transitions, the following method should be used:
- Apply the glaze to the desired area.
- Dab the surface with a finger or a clean brush to soften the edges.
- Repeat the process as needed to build up the desired opacity and smoothness.
This technique ensures that the adjustments blend naturally with the existing layers, creating a lifelike finish.
Enhancing Facial Features
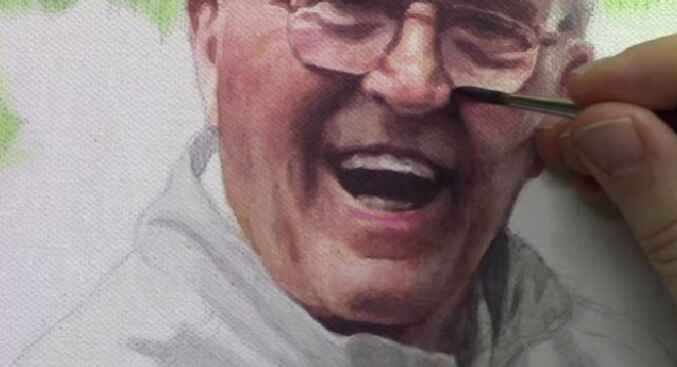
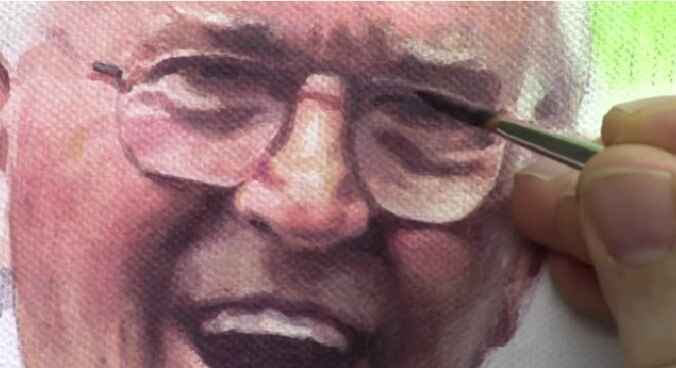
Pay close attention to key facial features, such as the eyes, nose, and mouth. Small adjustments can significantly impact the overall likeness of the portrait. For example, in the video tutorial below, the artist shifted the eyes slightly to the left and added shading to the tear ducts to enhance realism. Similarly, refining the angles and shading of the mouth can make the smile appear more natural and expressive.
Adjusting the Eyes
The eyes are often referred to as the windows to the soul, making their accuracy crucial in portrait painting. To adjust the eyes:
- Study the reference photo closely to determine the necessary adjustments.
- Apply a translucent glaze to the areas that need modification.
- Blend the glaze smoothly to ensure a natural transition.
- Pay attention to the placement of the iris and the overall shape of the eyes.
These steps will help create a more lifelike and expressive look in the eyes of your portrait.
Refining the Mouth
The mouth is another critical feature that can greatly affect the overall expression of the portrait. To refine the mouth:
- Adjust the shape and angles to match the reference photo.
- Use the glazing technique to add depth and definition to the lips.
- Blend the edges carefully to avoid harsh lines.
- Consider the relationship between the mouth and other facial features, such as the nasal labial fold.
These refinements will help in capturing the true character and emotion of the subject.
Final Touches and Refinements
After making the primary adjustments, it is important to take a step back and assess the portrait as a whole. Look for any areas that need additional refinement. The same glazing and blending techniques should be used to enhance these areas. For instance, adding warmth to the nasal labial fold with a bit of alizarin crimson can help the features blend more harmoniously.
Additional Tips for Realistic Portraits
While the glazing technique is powerful, several other tips can enhance your portraits further. Here are some additional suggestions:
- Use high-quality brushes: Investing in good quality brushes can make a significant difference in the application and blending of paint.
- Work in layers: Building up layers gradually can help achieve depth and realism in your portraits.
- Take breaks: Stepping back from your work periodically allows you to see it with fresh eyes and identify areas that need improvement.
- Study anatomy: A solid understanding of facial anatomy can aid in making more accurate adjustments and creating more lifelike portraits.
By incorporating these tips into your process, you can continue to improve your portrait painting skills and create works of art that truly capture the essence of your subjects.
Additional Resources
By following these steps, precise adjustments can be made to the eyes, mouth, and other facial features in your acrylic portrait. The glazing technique is a powerful tool that allows for subtle yet impactful refinements, enhancing the overall likeness and realism of your artwork.
For more tips and techniques, I recommend you download my free gift for you, a free guide, “Fix Muddy Skin Tones in Your Acrylic Portrait.” This comprehensive resource provides additional insights into correcting common issues and achieving a professional finish. Visit the Realistic Acrylic Portrait School for more tutorials, videos, and free downloadable guides to help you paint a portrait you can be proud of.
For a video tutorial, watch the full video below.
LEARN MORE
- Sketching Your Painting Accurately
- Beginning a Pet Portrait in Acrylic
- The Mystery of Realism in Painting
- Apply A Burnt Sienna Glaze to a Portrait
- Learn How to Sketch a Portrait Freehand in 45 Minutes
- Adding highlights to your acrylic painting
- 5 Excellent Reasons to Use Aluminum Foil
- Paint Realistic Wrinkles in Acrylic
- Painting Clothing in an Acrylic Portrait
- Paint a Cloudy Sky Acrylic
- How to add Semi-Opaque Highlights
- How to Enhance the Contrast in Your Acrylic
- How to Add Glaze to Your Acrylic Painting
- Paint Realistic Reflections on Eyeglasses in an Acrylic Portrait
- Build Up Depth on Your Acrylic Portrait Backgrounds
- How Do You Do Layers With the Glazing Technique?
- Learn How to Paint Wrinkles in Acrylic
Read more about how to paint a portrait that you can surely be proud of!
I’d love to hear your thoughts on this video. Please share it with your friends and family. Let me know if you have any further questions. I’ll greatly help you.
If you’d like to learn more, sign up for my free email tips and video class today.
Learn How to Paint Acrylic Portraits With My Free Mini-Video Course!Thank you so much for taking the time to read this tutorial and watch the video. That means a lot to me. I hope you find it very helpful in your portrait painting.
Yours for Better Portraits,
P.S. Did you find this post helpful or encouraging? If so, send it in ahead! Let others know with the share buttons below. I’d love to hear your comments. Thank you so much! Also, do you have a question on acrylic portrait painting you’d like answered? Let me know, and I’d be happy to help

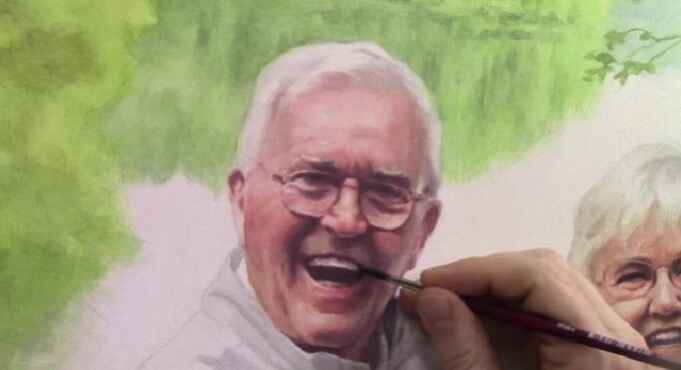
How to Paint a Smiling Man with Dark Hair
A step-by-step guide on painting a captivating portrait in just 30 minutes
Discover the secrets of creating a stunning 30-minute acrylic portrait of a smiling man with dark hair. Perfect for both beginners and experienced artists, this guide will walk you through each step of the process with expert tips and techniques.
Creating a portrait in just 30 minutes may seem like a daunting task, but with the right techniques and materials, it can be an exhilarating and rewarding experience. In this guide, we’ll explore the step-by-step process of painting a smiling man with dark hair using acrylics. Whether you’re a seasoned artist or a beginner looking to improve your skills, this tutorial will provide you with the tools and confidence needed to create a stunning piece of art in just half an hour.
Materials You’ll Need
Before diving into the painting process, ensure you have all the necessary materials at hand:
- Acrylic paints: A basic set including primary colors, white, and black.
- Brushes: A variety of sizes, including a flat brush, a round brush, and a detail brush.
- Canvas or painting surface: Preferably pre-primed for acrylics.
- Palette: For mixing your paints.
- Water and a container: For cleaning brushes.
- Paper towels or rags: For wiping brushes.
Step by- step on how to paint smiling man with dark hair in 30 minute acrylic portrait
Step 1: Prepare Your Workspace
Set up your workspace with all your materials within easy reach. Ensure you have good lighting to accurately see your colors and details. Place your reference photo in a visible spot for easy access.
Step 2: Sketch the Outline
Using a light pencil, sketch the basic outline of the man’s face on the canvas. Focus on the placement of key features such as the eyes, nose, mouth, and hairline. Keep the sketch light to avoid visible lines through the paint.
Step 3: Blocking in the Base Colors
Start by blocking in the base colors of the face. Mix a skin tone using a combination of white, red, yellow, and a touch of blue. Apply the skin tone using a flat brush, covering the entire face area. Don’t worry about details at this stage; focus on creating a smooth and even base layer.
For the hair, mix a dark brown or black shade and block in the hair area. Use broad, sweeping strokes to cover the entire hair section. This will serve as the foundation for adding texture and highlights later.
Step 4: Adding Shadows and Highlights
Once the base layer is dry, begin adding shadows and highlights to create depth and dimension. Mix a slightly darker shade of the skin tone for the shadows and a lighter shade for the highlights.
- Shadows: Apply the darker shade to areas such as under the cheekbones, around the eyes, and along the jawline. Use a soft, round brush to blend the edges, creating a smooth transition between the shadow and the base color.
- Highlights: Apply the lighter shade to areas where light naturally hits the face, such as the forehead, the bridge of the nose, and the tops of the cheeks. Blend the edges to create a seamless transition.
For the hair, add highlights by mixing a lighter shade of the base color and applying it to areas where light would naturally reflect, such as the top of the head and along the strands. Use a smaller brush for finer details.
Step 5: Detailing the Features
Now that the basic tones and shades are in place, focus on adding details to the facial features. This step brings the portrait to life and captures the subject’s expression.
- Eyes: Use a small detail brush to paint the whites of the eyes, leaving the pupils for later. Add shadows around the eye sockets and highlights to the upper eyelids to create depth. Paint the irises using a color that matches the reference photo, and add small highlights to give the eyes a lifelike sparkle.
- Nose: Refine the shape of the nose by adding subtle shadows along the sides and under the tip. Highlight the bridge and the tip to give the nose dimension.
- Mouth: Paint the lips using a mix of red and skin tone. Add shadows to the corners and under the lower lip to create volume. Highlight the center of the lower lip for a fuller appearance.
- Hair: Add fine strands and texture using a small brush and lighter shades of the base color. Pay attention to the direction of the hair growth and the natural flow of the strands.
Step 6: Final Touches
In this final step, refine any areas that need additional work and add the finishing touches. Check for consistency in lighting and shadows across the entire portrait. Add any necessary details, such as subtle wrinkles, moles, or other distinguishing features.
Step 7: Let It Dry
Allow the painting to dry completely before making any further adjustments or displaying it. Acrylic paints dry quickly, but it’s important to ensure all layers are thoroughly dry to prevent smudging or damage.
Tips for Success
- Work quickly: The 30-minute technique relies on swift application and blending. Keep your brush strokes fluid and confident.
- Practice blending: Smooth transitions between shadows, midtones, and highlights are key to creating a realistic portrait. Practice blending techniques on a separate sheet before applying them to your painting.
- Use a limited palette: Working with a limited color palette can help maintain color harmony and simplify the painting process.
By following these steps, you can create a stunning and expressive portrait of a smiling man with dark hair using the 30-minute acrylic portrait painting technique. This method allows you to achieve impressive results in a short amount of time, making it perfect for artists of all skill levels. With practice and patience, you’ll be able to capture the essence of your subjects and bring them to life on canvas.
Remember, the key to learn this technique is practice and experimentation. Don’t be afraid to try different approaches and make adjustments as needed. Happy painting!
Watch the video below for more details.
LEARN MORE
- Sketching Your Painting Accurately
- Beginning a Pet Portrait in Acrylic
- The Mystery of Realism in Painting
- Apply A Burnt Sienna Glaze to a Portrait
- Learn How to Sketch a Portrait Freehand in 45 Minutes
- Adding highlights to your acrylic painting
- 5 Excellent Reasons to Use Aluminum Foil
- Paint Realistic Wrinkles in Acrylic
- Painting Clothing in an Acrylic Portrait
- Paint a Cloudy Sky Acrylic
- How to add Semi-Opaque Highlights
- How to Enhance the Contrast in Your Acrylic
- How to Add Glaze to Your Acrylic Painting
- Paint Realistic Reflections on Eyeglasses in an Acrylic Portrait
- Build Up Depth on Your Acrylic Portrait Backgrounds
- How Do You Do Layers With the Glazing Technique?
- Learn How to Paint Wrinkles in Acrylic
Read more about how to paint a portrait that you can surely be proud of!
I’d love to hear your thoughts on this video. Please share it with your friends and family. Let me know if you have any further questions. I’ll greatly help you.
If you’d like to learn more, sign up for my free email tips and video class today.
Learn How to Paint Acrylic Portraits With My Free Mini-Video Course!Thank you so much for taking the time to read this tutorial and watch the video. That means a lot to me. I hope you find it very helpful in your portrait painting.
Yours for Better Portraits,
P.S. Did you find this post helpful or encouraging? If so, send it in ahead! Let others know with the share buttons below. I’d love to hear your comments. Thank you so much! Also, do you have a question on acrylic portrait painting you’d like answered? Let me know, and I’d be happy to help!