Tag Archives for " acrylic painting "

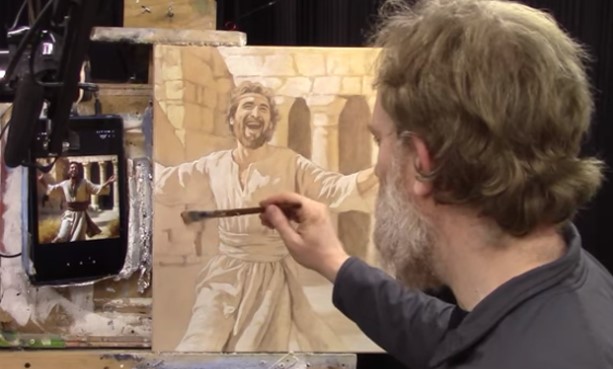
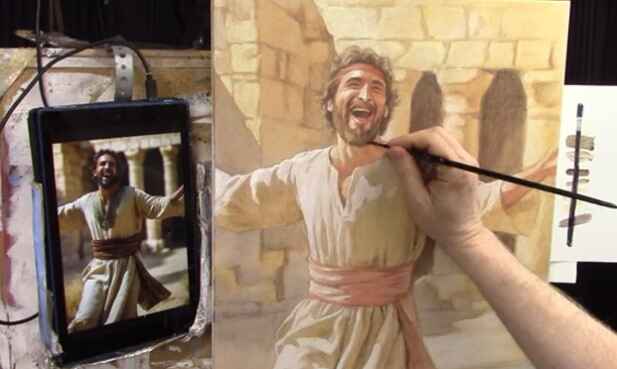
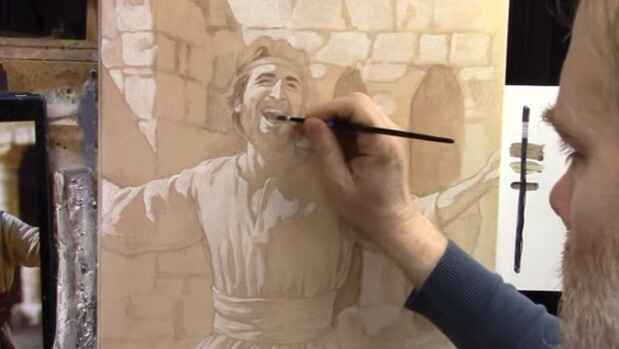
How to Add Color Glazes in Acrylic to Your Grisaille
Learn how to enhance your grisaille with color glazes for a vibrant finish
Introduction
Adding color glazes to a grisaille painting is a transformative technique that can infuse your artwork with vibrant hues and rich textures. This process, rooted in historical painting methods, allows artists to achieve a remarkable depth of color and detail. In this guide, we’ll explore the step-by-step method for applying color glazes over a grisaille base, helping you bring your acrylic paintings to life with stunning results.
Understanding Grisaille
Grisaille is a monochromatic painting technique using shades of gray to create a value study. Historically, Old Masters employed this method to establish the tonal structure of their paintings before applying color. This monochromatic layer acts as a foundation, providing a strong value structure that guides the application of subsequent color layers.
Why Use Grisaille?
Using grisaille as a foundation that allows artists to focus on value and composition without being distracted by color. It’s an effective way to ensure that your painting has a strong structure before introducing color glazes.
Materials Needed
- Acrylic Paints: Titanium White, Raw Umber, Burnt Sienna, Indian Yellow, Ultramarine Blue, Phthalo Blue, Napthol Red
- Matte Medium: To mix with the paint for glazing
- Brushes: Flat and round brushes for different applications
- Palette: For mixing paints and mediums
- White Card: For testing glaze colors
Step-by-Step Guide to Adding Color Glazes
- Prepare Your Grisaille Base
Ensure your grisaille painting is fully dried before beginning the glazing process. The grisaille layer should have clear contrasts between light and dark areas, establishing a solid value foundation. - Mix Your Glaze
Glazing involves mixing a small amount of acrylic paint with a larger quantity of matte medium. The matte medium dilutes the paint, creating a translucent layer that allows the underlying grisaille to show through. For skin tones, mix Burnt Sienna with a touch of Organic Orange and Raw Sienna to create a warm, earthy color. For background elements, combine Raw Sienna and Indian Yellow for a warm, golden hue. - Apply the First Glaze Layer
Start by applying a thin glaze of the mixed color over specific areas, such as skin tones or clothing. Use a light brush with minimal pressure to ensure the glaze is even and translucent. For example, apply a faint Burnt Sienna glaze to the skin areas to introduce warmth and create subtle tonal variations. - Layering and Building Up Color
Allow each glaze layer to dry completely before applying subsequent layers. Build up color gradually, adjusting the intensity as needed. For example, apply additional layers of Raw Sienna to the background to deepen the color and create a more unified look. Incorporate cooler tones like Ultramarine Blue and Phthalo Blue for areas affected by the sky, adding a sense of atmosphere and depth. - Refining Details
Use a smaller brush to apply color glazes to specific details, such as shadows and highlights. For instance, use a mix of Napthol Red and Burnt Sienna for the sash, ensuring a warmer tone in the shadowed areas and a more vibrant color in the highlights. This approach helps to differentiate between various elements and adds richness to the painting. - Blending and Adjusting Colors
As you apply the glazes, step back frequently to assess the overall effect. Adjust colors as needed to ensure harmony and balance. For example, if the background appears too warm, tone it down with a cooler glaze. Conversely, enhance warm areas with additional glazes to achieve the desired effect. - Final Touches
After completing the glazing process, evaluate your painting for any final adjustments. Add finishing touches to enhance specific areas or correct any imbalances. Ensure that the color glazes blend seamlessly with the underlying grisaille, creating a cohesive and vibrant final piece.
Tips for Successful Glazing
- Test Glazes First: Use a white card to test glaze mixtures and ensure the desired color and transparency.
- Work in Thin Layers: Apply glazes in thin, translucent layers to maintain the depth and value of the grisaille layer.
- Allow Drying Time: Ensure each glaze layer is completely dry before applying the next to avoid muddying the colors.
- Use Appropriate Brushes: Choose brushes suitable for glazing to achieve smooth, even applications.
Incorporating color glazes into your grisaille paintings is a powerful technique that adds complexity and vibrancy to your artwork. By following these steps and employing careful color mixing and layering, you can achieve stunning results that bring your acrylic paintings to life. Experiment with different colors and glazes to discover unique effects and enhance your artistic skills.
LEARN MORE
- Sketching Your Painting Accurately
- Beginning a Pet Portrait in Acrylic
- The Mystery of Realism in Painting
- Apply A Burnt Sienna Glaze to a Portrait
- Learn How to Sketch a Portrait Freehand in 45 Minutes
- Adding highlights to your acrylic painting
- 5 Excellent Reasons to Use Aluminum Foil
- Paint Realistic Wrinkles in Acrylic
- Painting Clothing in an Acrylic Portrait
- Paint a Cloudy Sky Acrylic
- How to add Semi-Opaque Highlights
- How to Enhance the Contrast in Your Acrylic
- How to Add Glaze to Your Acrylic Painting
- Paint Realistic Reflections on Eyeglasses in an Acrylic Portrait
- Build Up Depth on Your Acrylic Portrait Backgrounds
- How Do You Do Layers With the Glazing Technique?
- Learn How to Paint Wrinkles in Acrylic
Read more about how to paint a portrait that you can surely be proud of!
I’d love to hear your thoughts on this video. Please share it with your friends and family. Let me know if you have any further questions. I’ll greatly help you.
If you’d like to learn more, sign up for my free email tips and video class today.
Learn How to Paint Acrylic Portraits With My Free Mini-Video Course!Thank you so much for taking the time to read this tutorial and watch the video. That means a lot to me. I hope you find it very helpful in your portrait painting.
Yours for Better Portraits,

P.S. Did you find this post helpful or encouraging? If so, send it in ahead! Let others know with the share buttons below. I’d love to hear your comments. Thank you so much! Also, do you have a question on acrylic portrait painting you’d like answered? Let me know, and I’d be happy to help!

How To Add Dark Contrast: Acrylic Grisaille Painting
Learn the grisaille that enhances depth and dimension with dark contrast in acrylic painting
Adding dark contrast to your painting is essential for creating depth and dimension, especially in grisaille painting. Grisaille is a monochromatic painting technique that uses shades of gray to create a detailed underpainting, which can then be glazed with color.
This method, reminiscent of the techniques used by the old masters like Caravaggio, allows artists to achieve a high level of realism and tonal complexity. In this tutorial, we will explore how to effectively add dark tonal values to your acrylic grisaille painting, enhancing your portrait with rich contrast.
Understanding Grisaille Painting
Grisaille painting involves creating a detailed monochromatic underpainting that serves as a foundation for further color glazes. The technique is particularly useful for developing a strong value structure in your painting. When working with shades of gray, you can focus on the tonal values without the distraction of color, ensuring a solid foundation for your final piece.
Materials Needed
- Acrylic paints: raw umber, ultramarine blue, alizarine crimson, and titanium white
- Matte medium
- Brushes: Flat brushes (size 4), Round brushes (size 0 and 4)
- Palette
- Canvas or painting surface
Step-by-Step Guide on How to Add Darks to Your Acrylic Grisaille Painting
Step 1: Preparing the Underpainting
- Initial Sketch: Begin with a detailed sketch of your subject on your painting surface. This will serve as your guide for the underpainting.
- Ground Layer: Apply a thin, even layer of an earth-tone color (such as raw umber) to your canvas. This serves as the ground layer and helps unify the painting.
- Highlight Layer: Using titanium white, add highlights to your sketch. This step helps establish the lightest areas in your painting, creating a clear distinction between different tonal values.
Step 2: Mixing the Dark Glaze
- Palette Setup: On your palette, mix raw umber, ultramarine blue, and alizarine crimson. Use a larger amount of raw umber compared to the other two pigments.
- Adding Medium: Incorporate matte medium into your mixture. The matte medium helps create a transparent glaze that you can layer over your painting without losing the underlying details.
Step 3: Applying the Dark Glaze
- Glazing Technique: Start applying the dark glaze to the areas of your painting that you have designated as shadows. Use a flat brush for larger areas and a round brush for smaller, more detailed sections.
- Creating Contrast: Focus on building three main tonal values: highlights, midtones, and shadows. This triad simplifies the process and ensures a balanced composition.
- Detailing: Use a smaller round brush (size 0) for intricate details such as facial features, nostrils, and eyelids. This precision helps maintain the realism in your painting.
Step 4: Enhancing Shadows
- Depth in Shadows: Darken the eyes, mouth, and other deep shadow areas to add more depth. These elements create a focal point and enhance the three-dimensionality of your subject.
- Shading and Blending: Smoothly blend the dark glaze into the midtones to avoid harsh transitions. This creates a natural gradient and enhances the realism of your painting.
Step 5: Refining Details
- Facial Features: Continue to refine the details on the face, focusing on the beard, mustache, and hair. Treat these elements as shapes with specific tonal values rather than individual features.
- Clothing and Accessories: Add dark tonal values to the clothing and other accessories. This helps create a cohesive look and ensures that every part of your painting is harmonized in terms of contrast and depth.
Tips and Techniques
- Consistency in Glaze: Ensure that your glaze mixture is consistent throughout the painting process. This prevents unwanted streaks and uneven application.
- Layering: Apply multiple layers of glaze if necessary. Allow each layer to dry completely before adding another to achieve the desired depth.
- Value Shapes: Start on recognizing and painting value shapes rather than specific details. This approach helps maintain the overall structure and coherence of the painting.
- Patience and Precision: Take your time with the detailing process. Patience and precision are key to achieving a realistic and impactful final piece.
By learning this technique of adding dark contrast to acrylic grisaille paintings, you can significantly enhance the depth and dimension of your artwork. This method not only simplifies the painting process but also provides a solid foundation for further color glazes. With practice and attention to detail, you can create stunning, realistic paintings that capture the essence of your subject.
Read more about my additional resources, tutorials, to learn more and check my free courses designed to help you improve your portrait painting skills.
Happy painting, and God bless!.
LEARN MORE
- Sketching Your Painting Accurately
- Beginning a Pet Portrait in Acrylic
- The Mystery of Realism in Painting
- Apply A Burnt Sienna Glaze to a Portrait
- Learn How to Sketch a Portrait Freehand in 45 Minutes
- Adding highlights to your acrylic painting
- 5 Excellent Reasons to Use Aluminum Foil
- Paint Realistic Wrinkles in Acrylic
- Painting Clothing in an Acrylic Portrait
- Paint a Cloudy Sky Acrylic
- How to add Semi-Opaque Highlights
- How to Enhance the Contrast in Your Acrylic
- How to Add Glaze to Your Acrylic Painting
- Paint Realistic Reflections on Eyeglasses in an Acrylic Portrait
- Build Up Depth on Your Acrylic Portrait Backgrounds
- How Do You Do Layers With the Glazing Technique?
- Learn How to Paint Wrinkles in Acrylic
Read more about how to paint a portrait that you can surely be proud of!
I’d love to hear your thoughts on this video. Please share it with your friends and family. Let me know if you have any further questions. I’ll greatly help you.
If you’d like to learn more, sign up for my free email tips and video class today.
Learn How to Paint Acrylic Portraits With My Free Mini-Video Course!Thank you so much for taking the time to read this tutorial and watch the video. That means a lot to me. I hope you find it very helpful in your portrait painting.
Yours for Better Portraits,

P.S. Did you find this post helpful or encouraging? If so, send it in ahead! Let others know with the share buttons below. I’d love to hear your comments. Thank you so much! Also, do you have a question on acrylic portrait painting you’d like answered? Let me know, and I’d be happy to help!

How to Begin Acrylic Portrait Painting Grisaille—Titanium White
Learn the grisaille technique using titanium white for stunning acrylic portraits
Creating a compelling acrylic portrait often involves mastering various techniques. One such technique is grisaille, a method of painting in shades of gray, that helps to establish depth and dimension in your artwork. In this tutorial, we’ll explore how to start an acrylic portrait painting using titanium white, focusing on a depiction of King David rejoicing as the Ark of the Covenant returns to Jerusalem. This step-by-step guide will help you understand the process and give you practical tips to apply to your paintings.
Introduction to Grisaille Technique
Grisaille is a classic painting technique that involves creating a monochromatic underpainting. This technique was traditionally used to simulate sculpture and can serve as a strong foundation for adding color later. Using titanium white in the grisaille method helps in building up highlights and ensuring that the final painting has a vibrant and dynamic range of tones.

Setting Up Your Painting
- Sketching the Subject: Begin by sketching your subject. In this case, we’re focusing on King David with a joyful expression, arms outstretched, and dancing as the Ark of the Covenant returns to Jerusalem. Ensure your sketch captures the essential features and emotions of the subject.
- Applying the Ground Layer: Before starting the actual painting, apply a toning layer or ground. This is usually done with a mixture of colors such as raw umber or burnt sienna to create an earthy background that sets the stage for the painting.
Starting with Titanium White
Materials Needed:
- Titanium white acrylic paint
- Matte medium
- Small round brush
- Flat brush (optional)
- Spray bottle with water
- Palette
Step-by-Step Process:
- Mixing Titanium White: Mix titanium white with matte medium to create a slightly translucent paint. This mixture should have a consistency similar to warm honey, making it easy to apply and blend.
- Initial Application: Start applying the titanium white over the ground layer. Focus on the areas that will have the strongest highlights. For King David, this includes parts of his face, arms, and background elements such as the temple.
- Working from Left to Right: Since most people are right-handed, it’s beneficial to work from left to right to avoid smudging your work. Begin with the background, applying the titanium white to highlight the bricks and stones.
- Detailing the Subject: Move to the main subject, King David. Apply the titanium white to the illuminated areas of his face and body. Pay attention to the reference photo, ensuring you capture the highlights accurately.
- Blending and Precision: Use brush pressure to control the application. Light pressure will give you thinner, more precise lines, while heavier pressure will result in thicker, more opaque coverage. Blend the edges to create smooth transitions between light and shadow.
Tips and Techniques
- Glazing in Reverse: This technique involves painting light on dark instead of the traditional dark on light. It helps in building up the highlights gradually and achieving a smooth finish.
- Using Brush Pressure: Adjusting brush pressure is crucial for creating varying tonal values. Use less pressure for lighter applications and more pressure for thicker, more opaque strokes.
- Reloading the Brush: Reload your brush strategically to maintain a consistent application of paint. This ensures that the highlights remain strong and the transitions smooth.
- Avoid Reworking Dry Areas: Once an area has begun to dry, avoid going over it again. Reworking dry paint can lead to a blotchy and uneven finish.
- Reference Photo: Continuously refer to your reference photo. Painting what you see rather than what you think you see ensures accuracy in capturing the subject’s features and light effects.
Adding Finishing Touches
After establishing the highlights with titanium white, the next steps involve adding shadows and further refining the details. Once the grisaille underpainting is complete, you can start introducing color to bring the portrait to life. This method not only helps in achieving a realistic and three-dimensional look but also makes the subsequent layers of color more vibrant.
Using titanium white in the grisaille technique is an effective way to start an acrylic portrait painting. It allows you to focus on the tonal values and build a strong foundation for your artwork. By following the steps and tips outlined in this guide, you’ll be able to create a compelling underpainting that sets the stage for a vibrant and detailed final piece.
Read more about my additional resources, tutorials, to learn more and check my free courses. Whether you’re a beginner or an experienced artist, there’s always something new to learn and apply to your paintings. Happy painting!
LEARN MORE
- Sketching Your Painting Accurately
- Beginning a Pet Portrait in Acrylic
- The Mystery of Realism in Painting
- Apply A Burnt Sienna Glaze to a Portrait
- Learn How to Sketch a Portrait Freehand in 45 Minutes
- Adding highlights to your acrylic painting
- 5 Excellent Reasons to Use Aluminum Foil
- Paint Realistic Wrinkles in Acrylic
- Painting Clothing in an Acrylic Portrait
- Paint a Cloudy Sky Acrylic
- How to add Semi-Opaque Highlights
- How to Enhance the Contrast in Your Acrylic
- How to Add Glaze to Your Acrylic Painting
- Paint Realistic Reflections on Eyeglasses in an Acrylic Portrait
- Build Up Depth on Your Acrylic Portrait Backgrounds
- How Do You Do Layers With the Glazing Technique?
- Learn How to Paint Wrinkles in Acrylic
Read more about how to paint a portrait that you can surely be proud of!
I’d love to hear your thoughts on this video. Please share it with your friends and family. Let me know if you have any further questions. I’ll greatly help you.
If you’d like to learn more, sign up for my free email tips and video class today.
Learn How to Paint Acrylic Portraits With My Free Mini-Video Course!Thank you so much for taking the time to read this tutorial and watch the video. That means a lot to me. I hope you find it very helpful in your portrait painting.
Yours for Better Portraits,

P.S. Did you find this post helpful or encouraging? If so, send it in ahead! Let others know with the share buttons below. I’d love to hear your comments. Thank you so much! Also, do you have a question on acrylic portrait painting you’d like answered? Let me know, and I’d be happy to help!

How to paint Solar Eclipse: 30-Minute Acrylic Landscape Painting
Learn how to capture the solar eclipse in just 30 minutes using acrylic landscapes.
In this tutorial, we’ll guide you through creating a captivating 30-minute acrylic painting of a solar eclipse. Inspired by the recent Great American Eclipse, this lesson will teach you how to capture the dramatic lighting and unique atmosphere of the event in a fast-paced, yet comprehensive, painting session.
Materials Needed
- Acrylic Paints: Raw umber, burnt sienna, raw sienna, phthalo blue, ultramarine blue, alizarine crimson, napthol red, organic orange, Indian yellow, and titanium white.
- Brushes: Flat and round brushes (variety pack).
- Canvas: 8×10 canvas board.
- Additional Tools: Matte medium, water spray bottle.
Step-by-Step Painting Guide of 30-Minute Acrylic Landscape Painting
1. Setting the Scene
Start by setting up your canvas and palette. Begin by mixing a base color for the sky using raw umber, ultramarine blue, and titanium white. Aim for a periwinkle blue shade that will form the foundation of your sky. Apply this color across the top half of your canvas, blending it downward.
Tip: Use smooth, even strokes to cover the canvas, pushing hard to ensure the paint fills the weave of the canvas.
2. Creating Depth in the Sky
Once the base layer is applied, mix a lighter color using more titanium white and a touch of phthalo blue. Apply this lighter shade to the lower half of the sky to create a gradient effect. Add hints of indian yellow and organic orange to introduce a warm glow that reflects the twilight atmosphere of the eclipse.
Tip: Blend these colors gently where they meet to avoid harsh lines, and incorporate a few wispy clouds to enhance realism.
3. Painting the Horizon and Tree Line
For the horizon, mix a darker color with raw umber, ultramarine blue, and a bit of raw sienna. Use a flat-edged brush to block in the silhouette of the tree line. Keep the texture rough to suggest the trees and their branches without too much detail.
Tip: To create depth, use darker colors for thicker branches and lighter shades for thinner branches. This technique adds a sense of realism to your painting.
4. Adding the Solar Eclipse
As the painting progresses, focus on the solar eclipse. Mix titanium white with a small amount of napthol red and organic orange to create a base color for the eclipse. Use a small detail brush to paint the eclipse as a ring in the sky, placing it slightly off-center for a better compositional balance.
Tip: Add darker shades around the outer edge of the eclipse to emphasize its glow and create a sense of depth.
5. Enhancing Details and Final Touches
Once the eclipse is painted, add finer details such as solar prominences using a slightly lighter mixture of Titanium White and other colors. This step will bring a realistic fiery edge to the eclipse.
Tip: Use a dry brushing technique with matte medium to glaze over the painting, adding a final layer of depth and blending. Adjust the colors as needed to achieve the desired intensity and atmospheric effect.
6. Finishing Up
In the final minutes, make any necessary adjustments to the branches, add a bit more glow around the eclipse if needed, and ensure the overall balance of the painting is visually appealing.
Tip: Don’t rush the final touches; even with a 30-minute time constraint, small adjustments can make a significant difference in the overall appearance of your painting.
With this step-by-step guide, you should now have a vibrant and dramatic painting of a solar eclipse. Remember, practice makes perfect, so don’t be discouraged if your first attempt isn’t flawless. Enjoy the process and continue experimenting with different techniques to enhance your acrylic painting skills.
Read more about my additional resources, tutorials, to learn more and check my free courses. Whether you’re a beginner or an experienced artist, there’s always something new to learn and apply to your paintings. Happy painting!
LEARN MORE
- Sketching Your Painting Accurately
- Beginning a Pet Portrait in Acrylic
- The Mystery of Realism in Painting
- Apply A Burnt Sienna Glaze to a Portrait
- Learn How to Sketch a Portrait Freehand in 45 Minutes
- Adding highlights to your acrylic painting
- 5 Excellent Reasons to Use Aluminum Foil
- Paint Realistic Wrinkles in Acrylic
- Painting Clothing in an Acrylic Portrait
- Paint a Cloudy Sky Acrylic
- How to add Semi-Opaque Highlights
- How to Enhance the Contrast in Your Acrylic
- How to Add Glaze to Your Acrylic Painting
- Paint Realistic Reflections on Eyeglasses in an Acrylic Portrait
- Build Up Depth on Your Acrylic Portrait Backgrounds
- How Do You Do Layers With the Glazing Technique?
- Learn How to Paint Wrinkles in Acrylic
Read more about how to paint a portrait that you can surely be proud of!
I’d love to hear your thoughts on this video. Please share it with your friends and family. Let me know if you have any further questions. I’ll greatly help you.
If you’d like to learn more, sign up for my free email tips and video class today.
Learn How to Paint Acrylic Portraits With My Free Mini-Video Course!Thank you so much for taking the time to read this tutorial and watch the video. That means a lot to me. I hope you find it very helpful in your portrait painting.
Yours for Better Portraits,

P.S. Did you find this post helpful or encouraging? If so, send it in ahead! Let others know with the share buttons below. I’d love to hear your comments. Thank you so much! Also, do you have a question on acrylic portrait painting you’d like answered? Let me know, and I’d be happy to help!

3 Ways How to Keep your Acrylic Paint Wet
Learn the techniques to manage the fast drying time of acrylic paints
Acrylic paint is known for its quick drying time, which can be a double-edged sword for artists. On one hand, it allows for faster layering and quicker completion of artworks. On the other hand, it can be challenging to keep the paint wet long enough to blend colors and create smooth transitions. In this tutorial, we’ll explore three effective ways to manage the fast drying time of acrylic paints, helping you achieve better results in your artwork.
1. Master Blending and Brush Work
One of the most effective ways to work with acrylics is to improve your blending and brush techniques. Instead of trying to slow down the drying process, focus on mastering the following skills:
Fast Brush Strokes: Apply paint quickly and smoothly to keep a wet edge. This prevents harsh lines and ensures seamless blending. Fast brush strokes are crucial in getting the paint down before it starts to dry.
Smooth It Out: After applying the paint, use gentle brush strokes to smooth out the surface. This technique is especially useful for creating soft textures, such as fur in pet portraits.
Practice Different Techniques: Spend time practicing various brush techniques to become more comfortable with the fast drying time of acrylics. Experiment with different brush types and sizes to see which ones work best for your style.
2. Use Layers for Depth and Realism
Layering is a fundamental aspect of the acrylic glazing technique. By building up layers of translucent paint, you can create a rich, three-dimensional effect. Here’s how to do it:
Mixing the Glaze: Combine a small amount of acrylic paint with a larger amount of matte medium. This creates a translucent mixture that allows light to pass through, adding depth to your painting.
Applying Layers: Apply the glaze in thin, even coats. Allow each layer to dry completely before adding the next one. Over time, these layers will build up to create a smooth, blended look similar to the techniques used by old masters like Leonardo da Vinci.
Light and Depth: The light shines through the different layers, bounces off the white primer of the canvas beneath, and then back to your eye. This gives the painting a great sense of vibrancy and depth.
3. Maintain a Moist Painting Environment
Creating the right environment for painting can significantly impact the drying time of acrylics. Here are some tips to maintain a moist environment:
Use a Spray Mist: Keep a spray bottle filled with water nearby. Lightly mist your palette and painting surface occasionally to keep the paint wet longer. Be careful not to oversaturate the paint, as this can dilute the colors.
Humidifier: If you live in a dry climate or paint in a dry environment, consider using a humidifier in your studio. This adds moisture to the air and can help slow down the drying time of acrylic paint.
Avoid Direct Heat: Avoid painting in direct sunlight or near heaters, as heat can speed up the drying process. If you use a wood heater, like Matt does in his Wisconsin studio, make sure to balance it with a humidifier to maintain an ideal painting environment.
Tips and Techniques for Working with Acrylics
- Keep a Wet Palette: Invest in a wet palette, which helps keep your paint moist and workable for longer periods. Wet palettes are especially useful for blending colors.
- Plan Your Painting: Plan your painting in stages, working on different sections while others dry. This allows you to make the most of acrylics’ quick drying time without feeling rushed.
- Use Retarders Sparingly: While retarder mediums can slow down the drying time, they can also introduce other challenges. Use them sparingly and focus on the techniques mentioned above for better control.
By mastering blending and brush work, using layers effectively, and maintaining a moist painting environment, you can overcome the challenges of acrylics’ fast drying time. These ways not only help keep your acrylic paint wet but also enhance the overall quality of your artwork. Embrace the unique properties of acrylics and let them work for you, not against you.
Read more about my additional resources, tutorials, to learn more and check out my free courses. Whether you’re a beginner or an experienced artist, there’s always something new to learn and apply to your paintings. Happy painting!
LEARN MORE
- Sketching Your Painting Accurately
- Beginning a Pet Portrait in Acrylic
- The Mystery of Realism in Painting
- Apply A Burnt Sienna Glaze to a Portrait
- Learn How to Sketch a Portrait Freehand in 45 Minutes
- Adding highlights to your acrylic painting
- 5 Excellent Reasons to Use Aluminum Foil
- Paint Realistic Wrinkles in Acrylic
- Painting Clothing in an Acrylic Portrait
- Paint a Cloudy Sky Acrylic
- How to add Semi-Opaque Highlights
- How to Enhance the Contrast in Your Acrylic
- How to Add Glaze to Your Acrylic Painting
- Paint Realistic Reflections on Eyeglasses in an Acrylic Portrait
- Build Up Depth on Your Acrylic Portrait Backgrounds
- How Do You Do Layers With the Glazing Technique?
- Learn How to Paint Wrinkles in Acrylic
Read more about how to paint a portrait that you can surely be proud of!
I’d love to hear your thoughts on this video. Please share it with your friends and family. Let me know if you have any further questions. I’ll greatly help you.
If you’d like to learn more, sign up for my free email tips and video class today.
Learn How to Paint Acrylic Portraits With My Free Mini-Video Course!Thank you so much for taking the time to read this tutorial and watch the video. That means a lot to me. I hope you find it very helpful in your portrait painting.
Yours for Better Portraits,

P.S. Did you find this post helpful or encouraging? If so, send it in ahead! Let others know with the share buttons below. I’d love to hear your comments. Thank you so much! Also, do you have a question on acrylic portrait painting you’d like answered? Let me know, and I’d be happy to help!

5 Acrylic Blending Techniques: How to Achieve Stunning Portraits
Unlock the secrets of acrylic blending to achieve stunning portraits
Creating a lifelike and realistic portrait with acrylic paints can be challenging, but mastering the right blending techniques can make a significant difference. In this guide, we’ll explore five essential acrylic blending techniques that can elevate your portraits to a new level of realism and depth. Follow along with your canvas and brush as we dive into each technique.
Technique 1: Segmented Blending
Segmented blending is akin to the fluted facades of ancient temples, where dark and light shades create a dynamic and visually appealing contrast. This method involves overlapping layers of glazes to build up a rich sense of shading and depth.
Steps:
- Prepare Your Glaze: Mix a small amount of burnt umber dark with matte medium to create a semi-transparent glaze (about 90% opaque).
- Apply the First Layer: Use a half-inch flat brush to apply an even layer of the glaze onto the canvas. Brush in multiple directions to ensure smooth application.
- Let it Dry: Allow the layer to dry completely before applying the next one.
- Add Additional Layers: Apply the next layer, slightly overlapping the first one. This overlapping will create a darker shade where the layers meet, mimicking the effect of stained glass.
Segmented blending is excellent for achieving a controlled gradient from one color to another, making it perfect for backgrounds and large areas of shading.
Technique 2: Dilution Blending
Dilution blending involves using a highly diluted glaze to achieve smooth transitions and subtle shading. This technique is beneficial for creating soft gradients and gentle transitions between colors.
Steps:
- Mix Your Glaze: Combine burnt umber dark with matte medium (about 90% matte medium and 10% paint).
- Apply the Glaze: Brush the glaze onto the canvas in a diagonal square pattern.
- Blend with Matte Medium: Wipe off excess paint from your brush, dip it in pure matte medium, and blend into the glaze. Use varying brush pressure to achieve a smooth transition.
- Smooth the Edges: Gradually ease up the brush pressure to blur and soften the edges.
This technique works best on canvases with multiple layers of paint, enhancing the cumulative effect of underlying colors.
Technique 3: Dab Blending
Dab blending is a versatile technique ideal for softening edges and correcting overly dark areas in small, detailed sections of your painting.
Steps:
- Apply the Glaze: Load your brush with a similar glaze mixture and apply it to the canvas.
- Dab with Your Finger: Use your finger to gently dab and lift off excess paint, softening the edges and lightening the area.
Dab blending is particularly useful for fine details, such as facial features, where precision and subtlety are crucial.
Technique 4: Dry Brushing
Dry brushing allows for the creation of delicate, cloudy effects and subtle textures. This technique involves using minimal paint on a dry brush to achieve a light, airy application.
Steps:
- Load Your Brush: Apply a layer of burnt umber dark glaze to the canvas.
- Dry Your Brush: Use up most of the paint on your brush until it’s nearly dry.
- Apply with Light Pressure: With a nearly dry brush, lightly brush the canvas. Use perpendicular strokes to create a soft, blended effect.
Dry brushing is perfect for creating atmospheric backgrounds and adding texture to your portraits.
Technique 5: Wet-on-Wet Blending
Wet-on-wet blending is a traditional method that involves blending wet paint directly on the canvas to achieve smooth transitions and rich color depth.
Steps:
- Mix Your Paint: Combine burnt umber dark with titanium white to create a semi-opaque mix.
- Apply the Base Layer: Paint a diagonal pattern with the mixed color.
- Blend with White: Add titanium white to the right side of the painted area and blend it into the base layer using diagonal brush strokes.
This technique is versatile and can be used for both large areas and small details, making it a staple in any artist’s toolkit.
Tips and Techniques for Mastery
- Practice on a Separate Canvas: Before applying these techniques to your main portrait, practice on a separate canvas to get a feel for the brushwork and blending.
- Use a Hair Dryer: Speed up the drying process between layers with a hair dryer to maintain momentum and avoid smudging.
- Experiment with Brush Pressure: Varying the pressure of your brush can significantly impact the blending effect, so experiment to find what works best for different sections of your painting.
- Combine Techniques: Don’t hesitate to mix and match these techniques to achieve the desired effect. Each method can complement the others, adding complexity and richness to your portraits.
Mastering these five acrylic blending techniques will open up new possibilities in your portrait painting, allowing you to create stunning, lifelike images with depth and realism. Whether you’re a beginner or an experienced artist, incorporating these methods into your practice will enhance your skills and take your artwork to the next level. So grab your brushes, prepare your canvas, and start experimenting with these fantastic blending techniques today!
This video is part of a complete portrait painting course called. “Paint an Amazing Acrylic Portrait“
Read more about my additional resources, tutorials, to learn more and check my free courses. Whether you’re a beginner or an experienced artist, there’s always something new to learn and apply to your paintings. Happy painting!
LEARN MORE
- Sketching Your Painting Accurately
- Beginning a Pet Portrait in Acrylic
- The Mystery of Realism in Painting
- Apply A Burnt Sienna Glaze to a Portrait
- Learn How to Sketch a Portrait Freehand in 45 Minutes
- Adding highlights to your acrylic painting
- 5 Excellent Reasons to Use Aluminum Foil
- Paint Realistic Wrinkles in Acrylic
- Painting Clothing in an Acrylic Portrait
- Paint a Cloudy Sky Acrylic
- How to add Semi-Opaque Highlights
- How to Enhance the Contrast in Your Acrylic
- How to Add Glaze to Your Acrylic Painting
- Paint Realistic Reflections on Eyeglasses in an Acrylic Portrait
- Build Up Depth on Your Acrylic Portrait Backgrounds
- How Do You Do Layers With the Glazing Technique?
- Learn How to Paint Wrinkles in Acrylic
Read more about how to paint a portrait that you can surely be proud of!
I’d love to hear your thoughts on this video. Please share it with your friends and family. Let me know if you have any further questions. I’ll greatly help you.
If you’d like to learn more, sign up for my free email tips and video class today.
Learn How to Paint Acrylic Portraits With My Free Mini-Video Course!Thank you so much for taking the time to read this tutorial and watch the video. That means a lot to me. I hope you find it very helpful in your portrait painting.
Yours for Better Portraits,

P.S. Did you find this post helpful or encouraging? If so, send it in ahead! Let others know with the share buttons below. I’d love to hear your comments. Thank you so much! Also, do you have a question on acrylic portrait painting you’d like answered? Let me know, and I’d be happy to help!

How to Paint a Serious Self-Portrait in 30 Minutes
Learn to paint expressive self-portraits in acrylic
Welcome to my 30-minute acrylic portrait challenge! In this tutorial, you’ll learn how to paint a serious self-portrait in 30 minutes. This exercise is designed to help you become more efficient with your painting process, allowing you to capture the essence of your subject quickly and effectively.
Whether you’re a beginner or an experienced artist, this tutorial offers valuable insights and techniques to enhance your painting skills.
Step-by-Step Guide to Painting a Serious Self-Portrait
Materials You’ll Need:
- Acrylic paints: Raw Umber Dark, Burnt Sienna, Raw Sienna, Ultramarine Blue, Alizarine crimson, Naphthol Red, Pyrrole Orange, Indian Yellow, and and Titanium White
- Brushes: Flat brush, round brush
- Matte medium
- Palette
- Timer set for 30 minutes
- A strong light source (e.g., a lantern)
Preparation:
- Set Up Your Reference Photo:
- Take a selfie with strong lighting using a lantern. Ensure the lighting creates high contrast with strong shadows.
- Position the light source to create dramatic shadows that highlight your facial features.
- Set Up Your Palette:
- Arrange your acrylic paints and mix some matte medium for translucency.
- Prepare your brushes and have a water spray bottle handy to keep your palette moist.
Step 1: Blocking In the Composition
- Outline the Head and Features:
- Start with raw umber dark and matte medium. Dilute the paint to sketch the basic shapes.
- Block in the head, noting the tilt and angles. Keep the shapes simple and avoid detailing at this stage.
- Sketch the placement of the eyes, nose, and mouth. Ensure the proportions are correct.
- Establish Shadows and Dark Areas:
- Mix ultramarine blue, alizarin crimson, and burnt sienna to create a dark shadow color.
- Apply the shadow color to the areas with the most dramatic lighting contrasts, like the nose, eyebrows, and cheekbones.
- Continue to block in the shapes of the shadows, focusing on the larger areas first.
Step 2: Adding Mid-tones and Highlights
- Paint the Skin Tones:
- Mix titanium white with raw sienna and a bit of raw umber dark for the base skin tone.
- Apply this color to the forehead, cheeks, and nose, building the midtones.
- Avoid bringing the highlight color all the way to the edges; leave space for shading.
- Blend the Midtones and Highlights:
- Add more Titanium White to the skin tone mix for highlights.
- Focus on areas like the forehead, cheekbones, and the bridge of the nose.
- Use a round brush to blend the midtones into the highlights, creating a smooth transition.
Step 3: Detailing the Features
- Eyes and Eyebrows:
- Mix raw umber dark, ultramarine blue, and alizarine crimson for a dark eye color.
- Outline the eyes, paying attention to the shadows and light reflections.
- Add details to the eyebrows with raw sienna and burnt sienna, highlighting their shape and texture.
- Nose and Mouth:
- Use the same dark mixture for the shadows around the nose and mouth.
- Highlight the bridge of the nose with a lighter skin tone.
- For the lips, mix naphthol red with titanium white and apply it to the mouth, adding shadows underneath for depth.
Step 4: Painting the Hair and Beard
- Base Color for Hair:
- Mix raw umber dark and indian yellow for the hair color.
- Apply the base color to the hair, following the natural flow and direction.
- Adding Texture and Highlights:
- Blend lighter tones into the hair to create highlights, adding depth and volume.
- For the beard, mix burnt sienna and raw sienna for a slightly reddish hue. Apply this to the beard and mustache areas.
Step 5: Final Touches
- Refine the Details:
- Adjust the shadows and highlights to ensure a cohesive look.
- Add any final details to the eyes, nose, and mouth to enhance the likeness and expression.
- Background and Clothing:
- Use a mix of ultramarine blue and titanium white for the shirt.
- For the background, blend a grayish color to add contrast and make the portrait stand out.
Congratulations! You’ve completed a serious self-portrait in just 30 minutes. This exercise not only helps you improve your painting speed but also enhances your ability to capture the essence of your subject quickly.
Remember, practice makes perfect, so continue to challenge yourself with more 30-minute portraits to refine your skills further.
Tips and Techniques:
- Use Strong Lighting: High contrast lighting helps define shadows and highlights, making the painting process more efficient.
- Simplify Shapes: Focus on blocking in basic shapes and shadows before adding details.
- Keep the Palette Moist: Regularly spray your palette with water to keep the acrylic paints workable.
- Practice Regularly: The more you practice, the better you’ll get at capturing the essence of your subject quickly.
- Experiment with Colors: Don’t be afraid to play with different color combinations to achieve the desired effect.
By following these steps and techniques, you’ll be able to create stunning self-portraits in no time. Happy painting!
Read more about my additional resources, tutorials, to learn more and check out my free courses. Whether you’re a beginner or an experienced artist, there’s always something new to learn and apply to your paintings.
LEARN MORE
- Sketching Your Painting Accurately
- Beginning a Pet Portrait in Acrylic
- The Mystery of Realism in Painting
- Apply A Burnt Sienna Glaze to a Portrait
- Learn How to Sketch a Portrait Freehand in 45 Minutes
- Adding highlights to your acrylic painting
- 5 Excellent Reasons to Use Aluminum Foil
- Paint Realistic Wrinkles in Acrylic
- Painting Clothing in an Acrylic Portrait
- Paint a Cloudy Sky Acrylic
- How to add Semi-Opaque Highlights
- How to Enhance the Contrast in Your Acrylic
- How to Add Glaze to Your Acrylic Painting
- Paint Realistic Reflections on Eyeglasses in an Acrylic Portrait
- Build Up Depth on Your Acrylic Portrait Backgrounds
- How Do You Do Layers With the Glazing Technique?
- Learn How to Paint Wrinkles in Acrylic
Read more about how to paint a portrait that you can surely be proud of!
I’d love to hear your thoughts on this video. Please share it with your friends and family. Let me know if you have any further questions. I’ll greatly help you.
If you’d like to learn more, sign up for my free email tips and video class today.
Learn How to Paint Acrylic Portraits With My Free Mini-Video Course!Thank you so much for taking the time to read this tutorial and watch the video. That means a lot to me. I hope you find it very helpful in your portrait painting.
Yours for Better Portraits,

P.S. Did you find this post helpful or encouraging? If so, send it in ahead! Let others know with the share buttons below. I’d love to hear your comments. Thank you so much! Also, do you have a question on acrylic portrait painting you’d like answered? Let me know, and I’d be happy to help!

How To Paint Black Hair And Clothing In 30 Minutes
Learn how to paint black hair and clothing with these proven techniques
Learn how to paint black hair and clothing in just 30 minutes with this step-by-step acrylic portrait tutorial. Perfect for improving your skills and speeding up your painting process.
Introduction
Painting black hair and clothing can present unique challenges, but with the right techniques and practice, you can achieve stunning results even in a limited time frame. In this blog post, we will guide you through a step-by-step process to paint black hair and clothing in just 30 minutes. Whether you’re a seasoned artist or a beginner, these tips will help you refine your skills and produce high-quality acrylic portraits quickly.
Getting Started: Preparation and Setup
Before diving into the painting process, ensure you have all your materials ready. For this 30-minute acrylic portrait session, you’ll need:
- Acrylic paints: Raw umber dark, burnt sienna, ultramarine blue, alizarine crimson, titanium white, organic orange, and Indian yellow
- Brushes: Round brush, Filbert brush, Flat brush
- Canvas or painting surface, pre-toned
Tip: A pre-toned canvas can save time and set a warm base for your painting, helping colors blend more seamlessly.
Step 1: Establish the Basic Form
Start by blocking in the basic form of your subject. Use a mixture of raw umber dark and matte medium to create a translucent base layer. This will help you sketch out the general shapes without committing to dark colors too soon.
Technique:
- Plot the Composition: Lightly sketch the outline of the head, neck, and shoulders. Pay attention to proportions and positioning based on your reference photo.
- Adjust as Needed: Keep the lines light and adjustable to make any necessary changes easily.
Step 2: Block in Major Shapes and Shadows
With the basic form established, begin blocking in major shapes and shadows. For black hair and clothing, it’s essential to use rich, dark tones while keeping the paint opaque.
Technique:
- Mix Dark Colors: Combine raw umber dark, ultramarine blue, and a touch of titanium white to create a deep, dark shade for the hair.
- Apply to Hair and Clothing: Use a larger brush to block in the hair and clothing areas, focusing on the overall shape and major shadow areas.
Tip: Use a mix of different dark colors to add depth and variation to the hair and clothing.
Step 3: Add Mid-tones and Highlights
Once the base layers are dry, start adding midtones and highlights to bring your painting to life. This step is crucial for creating realistic textures and depth.
Technique:
- Mix Mid-tones: Combine burnt sienna with raw umber dark and a bit of titanium white to achieve a mid-tone color for the skin and other non-black areas.
- Add Highlights: Use a lighter color mix (titanium white with a touch of indian yellow) for highlights on the hair and clothing.
Tip: To create realistic highlights, observe how light falls on your reference photo and apply lighter shades accordingly.
Step 4: Refine Details and Adjustments
In the final stages, refine the details of your painting. Focus on small adjustments to enhance the realism and finish the piece.
Technique:
- Detail Work: Use a fine round brush to add details such as individual strands of hair, folds in the clothing, and fine highlights.
- Blending: Blend colors smoothly to avoid harsh lines and create a natural transition between shadows, midtones, and highlights.
Tip: Regularly step back from your painting to assess the overall balance and make adjustments as needed.
Painting black hair and clothing in 30 minutes is a challenging yet rewarding exercise that can significantly improve your acrylic portrait skills. By following these steps—establishing the basic form, blocking in major shapes and shadows, adding midtones and highlights, and refining details—you can achieve impressive results in a short time.
Remember, practice is key to mastering these techniques. The more you paint, the more proficient you’ll become. Keep experimenting with different colors, brush techniques, and compositions to continue improving your skills.
Additional Resource: Download our free guide on fixing muddy skin tones in acrylic portraits to further enhance your painting techniques.
Read more about my additional resources, tutorials, to learn more and check out my free courses. Whether you’re a beginner or an experienced artist, there’s always something new to learn and apply to your paintings. Happy painting!
LEARN MORE
- Sketching Your Painting Accurately
- Beginning a Pet Portrait in Acrylic
- The Mystery of Realism in Painting
- Apply A Burnt Sienna Glaze to a Portrait
- Learn How to Sketch a Portrait Freehand in 45 Minutes
- Adding highlights to your acrylic painting
- 5 Excellent Reasons to Use Aluminum Foil
- Paint Realistic Wrinkles in Acrylic
- Painting Clothing in an Acrylic Portrait
- Paint a Cloudy Sky Acrylic
- How to add Semi-Opaque Highlights
- How to Enhance the Contrast in Your Acrylic
- How to Add Glaze to Your Acrylic Painting
- Paint Realistic Reflections on Eyeglasses in an Acrylic Portrait
- Build Up Depth on Your Acrylic Portrait Backgrounds
- How Do You Do Layers With the Glazing Technique?
- Learn How to Paint Wrinkles in Acrylic
Read more about how to paint a portrait that you can surely be proud of!
I’d love to hear your thoughts on this video. Please share it with your friends and family. Let me know if you have any further questions. I’ll greatly help you.
If you’d like to learn more, sign up for my free email tips and video class today.
Learn How to Paint Acrylic Portraits With My Free Mini-Video Course!Thank you so much for taking the time to read this tutorial and watch the video. That means a lot to me. I hope you find it very helpful in your portrait painting.
Yours for Better Portraits,

P.S. Did you find this post helpful or encouraging? If so, send it in ahead! Let others know with the share buttons below. I’d love to hear your comments. Thank you so much! Also, do you have a question on acrylic portrait painting you’d like answered? Let me know, and I’d be happy to help!

Unlock Your Potential: The Truth Behind Portrait Painting Myths
Transform your portrait painting with these myth-busting insights
Portrait painting is an art form admired by many but often shrouded in misconceptions that can discourage aspiring artists. These myths can create unnecessary barriers, leading you to believe that portrait painting is an unattainable skill reserved for the gifted few. In this article, we’ll debunk three of the most common myths about portrait painting, empowering you to embrace your artistic journey with confidence and clarity.
Myth 1: “You need special talent to paint portraits”
One of the most pervasive myths is the belief that portrait painting requires a special, innate talent that only a select few possess. This notion can be incredibly discouraging, especially for beginners who may feel that they lack the “gift” needed to succeed.
The Truth: desire over talent
The reality is that desire and persistence are far more important than any inherent talent. While some may have a natural inclination toward art, anyone with the passion and commitment to learn can master portrait painting. Think of it like basketball—while players like Michael Jordan may have had a natural predisposition, others, like Spud Webb, defied the odds through sheer determination.
Tips and techniques:
- Cultivate Your Passion: Your desire to create art will drive you to practice and improve continuously.
- Seek Out a Mentor: Just as Luke Skywalker found guidance from Obi-Wan Kenobi, your desire will lead you to the right teacher. Look for instructors who resonate with your artistic goals.
- Practice Regularly: Talent develops through practice. The more you paint, the more skilled you’ll become.
Myth 2: “You must attend art school to be a portrait painter”
Another common myth is that formal education is necessary to become a skilled portrait painter. Many believe that years of art school are required to develop the techniques and knowledge needed to create realistic portraits.
The Truth: Focused learning trumps formal education
While art school can provide valuable training, it is by no means a requirement. In today’s digital age, you can access high-quality instruction from the comfort of your home. Many successful artists, including myself, have learned more from focused, short-term courses than from years of traditional education.
Tips and techniques:
- Find Targeted Instruction: Look for courses that focus specifically on portrait painting techniques, such as acrylic glazing, rather than broad art programs.
- Learn by Doing: Start with one portrait and focus on mastering it before moving on to more complex projects.
- Rinse and Repeat: Use the techniques you learn to create multiple portraits, gradually refining your skills with each attempt.
Myth 3: “Inspiration is necessary to start painting”
The final myth we’ll debunk is the idea that inspiration is a prerequisite for painting. Many artists believe they must wait for a burst of creativity before they can begin a new project.
The Truth: Consistency breeds creativity
Waiting for inspiration can lead to procrastination and missed opportunities. The most successful artists understand that creativity is often the result of consistent effort. By making painting a regular part of your routine, you’ll find that inspiration comes more easily.
Tips and techniques:
- Establish a Routine: Set aside time each day or week to work on your art, even if it’s just for a few minutes.
- Embrace the Process: Understand that not every session will be groundbreaking. The act of painting regularly will eventually lead to creative breakthroughs.
- Replenish Your Inspiration: While consistency is key, it’s also important to nourish your creativity. Spend time in nature, visit art galleries, or engage in activities that inspire you.
By debunking these myths, we hope to remove the barriers that may have been holding you back from pursuing portrait painting. Remember, talent is nurtured through desire, formal education can be replaced with focused learning, and inspiration is often the result of consistent practice. With these truths in mind, you’re well on your way to unlocking your full potential as a portrait artist.
As you continue your artistic journey, keep these insights close. Portrait painting is not reserved for the elite; it’s a skill that can be learned and mastered by anyone willing to put in the time and effort. So pick up your brush, challenge these myths, and start creating portraits you can be proud of!
Read more about my additional resources, tutorials, to learn more and check my free courses. Happy painting!
- Sketching Your Painting Accurately
- Beginning a Pet Portrait in Acrylic
- The Mystery of Realism in Painting
- Apply A Burnt Sienna Glaze to a Portrait
- Learn How to Sketch a Portrait Freehand in 45 Minutes
- Adding highlights to your acrylic painting
- 5 Excellent Reasons to Use Aluminum Foil
- Paint Realistic Wrinkles in Acrylic
- Painting Clothing in an Acrylic Portrait
- Paint a Cloudy Sky Acrylic
- How to add Semi-Opaque Highlights
- How to Enhance the Contrast in Your Acrylic
- How to Add Glaze to Your Acrylic Painting
- Paint Realistic Reflections on Eyeglasses in an Acrylic Portrait
- Build Up Depth on Your Acrylic Portrait Backgrounds
- How Do You Do Layers With the Glazing Technique?
- Learn How to Paint Wrinkles in Acrylic
Read more about how to paint a portrait that you can surely be proud of!
I’d love to hear your thoughts on this video. Please share it with your friends and family. Let me know if you have any further questions. I’ll greatly help you.
If you’d like to learn more, sign up for my free email tips and video class today.
Learn How to Paint Acrylic Portraits With My Free Mini-Video Course!
Thank you so much for taking the time to read this tutorial and watch the video. That means a lot to me. I hope you find it very helpful in your portrait painting.
Yours for Better Portraits,

P.S. Did you find this post helpful or encouraging? If so, send it in ahead! Let others know with the share buttons below. I’d love to hear your comments. Thank you so much! Also, do you have a question on acrylic portrait painting you’d like answered? Let me know, and I’d be happy to help!

How to Paint Landscapes with Acrylic Glazing in 3 Easy Parts
Learn how to create luminous, layered landscapes with depth and vibrancy
Introduction
Unlock the secrets to how to paint landscapes with acrylic glazing in 3 easy parts. If you’ve ever admired the vibrant, ethereal quality of painted landscapes and wondered how to achieve similar effects, this guide is for you. Acrylic glazing is a technique that involves layering transparent colors to build depth and luminosity, offering an unparalleled way to bring your landscapes to life.
In this blog post, we’ll demystify the acrylic glazing process by breaking it down into three easy-to-follow parts. Whether you’re an experienced artist or just starting, you’ll find clear, actionable steps to enhance your landscape paintings. We’ll cover everything from preparing your canvas to applying and blending layers, providing you with the tools to create landscapes that are not only visually stunning but also rich in detail and emotion. Dive in and discover how you can elevate your landscape paintings with the transformative power of acrylic glazing.
Part 1: Preparing Your Canvas and Initial Layers
1.1 Choosing the Right Materials
Before diving into acrylic glazing, it’s crucial to gather the right materials. You’ll need:
- A primed canvas or acrylic paper
- High-quality acrylic paints
- Glazing medium
- Brushes (various sizes)
- Palette knife
- Spray bottle for water
The glazing medium is essential as it allows you to create transparent layers of paint without compromising the intensity of the colors.
1.2 Creating the Underpainting
The underpainting is the foundation of your landscape. Start by blocking in the basic shapes and colors using a more opaque application of paint. This stage is about setting the mood and composition of your piece. Don’t worry about details yet; focus on the general placement of elements like the sky, mountains, trees, and water.
Tip: Use cooler tones for distant objects to create a sense of depth and warmer tones for objects in the foreground.
1.3 Letting the Underpainting Dry
Once your underpainting is complete, allow it to dry completely. This is crucial before moving on to the glazing process, as any wet paint can muddy the glazes and ruin the transparency of the layers.
Part 2: Building Depth with Glazes
2.1 Mixing Your Glazes
To mix a glaze, combine a small amount of acrylic paint with a generous amount of glazing medium. The goal is to create a translucent wash of color. You can adjust the ratio depending on the desired transparency.
Tip: Start with lighter glazes and gradually build up to darker tones. This layering technique will give your landscape a sense of depth and dimension.
2.2 Applying the First Glaze
Begin by applying a light glaze over the sky or background elements. Use a soft brush to apply the glaze in thin, even layers. Work quickly and smoothly, as acrylics dry fast. If the glaze appears too intense, you can soften it by misting it with water and blending it with a clean brush.
Technique: Apply glazes in a crisscross pattern to avoid streaks and create a more natural look.
2.3 Building Up the Layers
Continue applying glazes, allowing each layer to dry before adding the next. This process can be repeated multiple times to achieve the desired level of depth and richness in your landscape. For instance, you might apply several glazes of blue and purple to create a deep, atmospheric sky or multiple layers of green and brown to add richness to a forested area.
Tip: Vary the colors in your glazes to create subtle shifts in tone and temperature, enhancing the realism of your landscape.
Part 3: Refining Details and Final Touches
3.1 Adding Highlights and Shadows
Once the glazing layers are complete, it’s time to refine the details. Use more opaque paint to add highlights to areas that catch the most light, such as the tops of mountains or the edges of trees. For shadows, apply darker glazes or use more saturated paint to enhance the contrast.
Technique: Use a dry brush technique to softly blend the edges of your highlights and shadows, creating a more cohesive and realistic effect.
3.2 Enhancing Texture
To add texture to your landscape, consider using a palette knife to apply thicker layers of paint in certain areas, such as rocky surfaces or tree bark. You can also create texture by spattering paint with an old toothbrush or flicking it with your fingers.
Tip: Keep the texture subtle, so it doesn’t overpower the soft, glazed layers underneath.
3.3 Final Adjustments
Take a step back and assess your painting. Look for areas that need more depth or highlights, and make any final adjustments. You can add a final glaze to unify the colors and create a cohesive look. Ensure that the painting is balanced in terms of composition, color, and contrast.
Technique: Use a soft brush to gently blend any harsh edges or transitions between colors.
Acrylic glazing is an excellent technique for creating stunning, realistic landscapes. By breaking down the process into three easy parts—preparing your canvas and initial layers, building depth with glazes, and refining details—you can achieve professional results that capture the beauty of nature. Practice these techniques, experiment with different colors and glazes, and watch your landscapes come to life with depth and vibrancy.
Ready to take your landscape painting skills to the next level? Try out these glazing techniques in your next project, and share your results with us in the comments below! Read more about my additional resources, tutorials, to learn more and check my free courses guide here.
LEARN MORE
- Sketching Your Painting Accurately
- Beginning a Pet Portrait in Acrylic
- The Mystery of Realism in Painting
- Apply A Burnt Sienna Glaze to a Portrait
- Learn How to Sketch a Portrait Freehand in 45 Minutes
- Adding highlights to your acrylic painting
- 5 Excellent Reasons to Use Aluminum Foil
- Paint Realistic Wrinkles in Acrylic
- Painting Clothing in an Acrylic Portrait
- Paint a Cloudy Sky Acrylic
- How to add Semi-Opaque Highlights
- How to Enhance the Contrast in Your Acrylic
- How to Add Glaze to Your Acrylic Painting
- Paint Realistic Reflections on Eyeglasses in an Acrylic Portrait
- Build Up Depth on Your Acrylic Portrait Backgrounds
- How Do You Do Layers With the Glazing Technique?
- Learn How to Paint Wrinkles in Acrylic
Read more about how to paint a portrait that you can surely be proud of!
I’d love to hear your thoughts on this video. Please share it with your friends and family. Let me know if you have any further questions. I’ll greatly help you.
If you’d like to learn more, sign up for my free email tips and video class today.
Learn How to Paint Acrylic Portraits With My Free Mini-Video Course!
Thank you so much for taking the time to read this tutorial and watch the video. That means a lot to me. I hope you find it very helpful in your portrait painting.
Yours for Better Portraits,
P.S. Did you find this post helpful or encouraging? If so, send it in ahead! Let others know with the share buttons below. I’d love to hear your comments. Thank you so much! Also, do you have a question on acrylic portrait painting you’d like answered? Let me know, and I’d be happy to help!