- You are here:
- Home »
- Blog »
- Video Tutorial »
- How to Begin Acrylic Portrait Painting Grisaille—Titanium White

How to Begin Acrylic Portrait Painting Grisaille—Titanium White
Learn the grisaille technique using titanium white for stunning acrylic portraits
Creating a compelling acrylic portrait often involves mastering various techniques. One such technique is grisaille, a method of painting in shades of gray, that helps to establish depth and dimension in your artwork. In this tutorial, we’ll explore how to start an acrylic portrait painting using titanium white, focusing on a depiction of King David rejoicing as the Ark of the Covenant returns to Jerusalem. This step-by-step guide will help you understand the process and give you practical tips to apply to your paintings.
Introduction to Grisaille Technique
Grisaille is a classic painting technique that involves creating a monochromatic underpainting. This technique was traditionally used to simulate sculpture and can serve as a strong foundation for adding color later. Using titanium white in the grisaille method helps in building up highlights and ensuring that the final painting has a vibrant and dynamic range of tones.

Setting Up Your Painting
- Sketching the Subject: Begin by sketching your subject. In this case, we’re focusing on King David with a joyful expression, arms outstretched, and dancing as the Ark of the Covenant returns to Jerusalem. Ensure your sketch captures the essential features and emotions of the subject.
- Applying the Ground Layer: Before starting the actual painting, apply a toning layer or ground. This is usually done with a mixture of colors such as raw umber or burnt sienna to create an earthy background that sets the stage for the painting.
Starting with Titanium White
Materials Needed:
- Titanium white acrylic paint
- Matte medium
- Small round brush
- Flat brush (optional)
- Spray bottle with water
- Palette
Step-by-Step Process:
- Mixing Titanium White: Mix titanium white with matte medium to create a slightly translucent paint. This mixture should have a consistency similar to warm honey, making it easy to apply and blend.
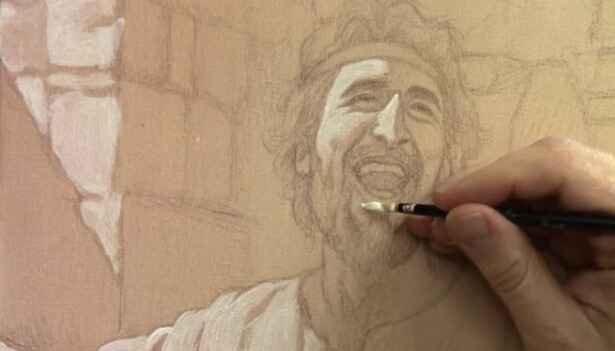
- Initial Application: Start applying the titanium white over the ground layer. Focus on the areas that will have the strongest highlights. For King David, this includes parts of his face, arms, and background elements such as the temple.
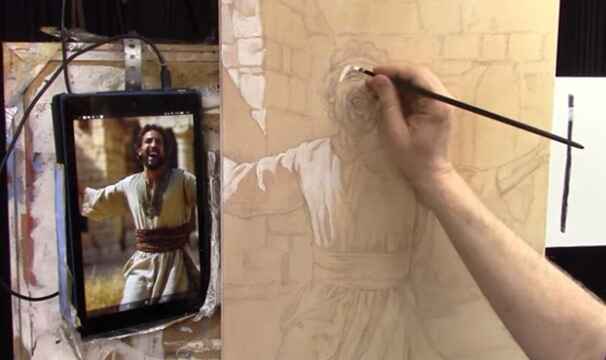
- Working from Left to Right: Since most people are right-handed, it’s beneficial to work from left to right to avoid smudging your work. Begin with the background, applying the titanium white to highlight the bricks and stones.
- Detailing the Subject: Move to the main subject, King David. Apply the titanium white to the illuminated areas of his face and body. Pay attention to the reference photo, ensuring you capture the highlights accurately.
- Blending and Precision: Use brush pressure to control the application. Light pressure will give you thinner, more precise lines, while heavier pressure will result in thicker, more opaque coverage. Blend the edges to create smooth transitions between light and shadow.
Tips and Techniques
- Glazing in Reverse: This technique involves painting light on dark instead of the traditional dark on light. It helps in building up the highlights gradually and achieving a smooth finish.
- Using Brush Pressure: Adjusting brush pressure is crucial for creating varying tonal values. Use less pressure for lighter applications and more pressure for thicker, more opaque strokes.
- Reloading the Brush: Reload your brush strategically to maintain a consistent application of paint. This ensures that the highlights remain strong and the transitions smooth.
- Avoid Reworking Dry Areas: Once an area has begun to dry, avoid going over it again. Reworking dry paint can lead to a blotchy and uneven finish.
- Reference Photo: Continuously refer to your reference photo. Painting what you see rather than what you think you see ensures accuracy in capturing the subject’s features and light effects.
Adding Finishing Touches
After establishing the highlights with titanium white, the next steps involve adding shadows and further refining the details. Once the grisaille underpainting is complete, you can start introducing color to bring the portrait to life. This method not only helps in achieving a realistic and three-dimensional look but also makes the subsequent layers of color more vibrant.
Using titanium white in the grisaille technique is an effective way to start an acrylic portrait painting. It allows you to focus on the tonal values and build a strong foundation for your artwork. By following the steps and tips outlined in this guide, you’ll be able to create a compelling underpainting that sets the stage for a vibrant and detailed final piece.
Read more about my additional resources, tutorials, to learn more and check my free courses. Whether you’re a beginner or an experienced artist, there’s always something new to learn and apply to your paintings. Happy painting!
LEARN MORE
- Sketching Your Painting Accurately
- Beginning a Pet Portrait in Acrylic
- The Mystery of Realism in Painting
- Apply A Burnt Sienna Glaze to a Portrait
- Learn How to Sketch a Portrait Freehand in 45 Minutes
- Adding highlights to your acrylic painting
- 5 Excellent Reasons to Use Aluminum Foil
- Paint Realistic Wrinkles in Acrylic
- Painting Clothing in an Acrylic Portrait
- Paint a Cloudy Sky Acrylic
- How to add Semi-Opaque Highlights
- How to Enhance the Contrast in Your Acrylic
- How to Add Glaze to Your Acrylic Painting
- Paint Realistic Reflections on Eyeglasses in an Acrylic Portrait
- Build Up Depth on Your Acrylic Portrait Backgrounds
- How Do You Do Layers With the Glazing Technique?
- Learn How to Paint Wrinkles in Acrylic
Read more about how to paint a portrait that you can surely be proud of!
I’d love to hear your thoughts on this video. Please share it with your friends and family. Let me know if you have any further questions. I’ll greatly help you.
If you’d like to learn more, sign up for my free email tips and video class today.
Learn How to Paint Acrylic Portraits With My Free Mini-Video Course!Thank you so much for taking the time to read this tutorial and watch the video. That means a lot to me. I hope you find it very helpful in your portrait painting.
Yours for Better Portraits,
P.S. Did you find this post helpful or encouraging? If so, send it in ahead! Let others know with the share buttons below. I’d love to hear your comments. Thank you so much! Also, do you have a question on acrylic portrait painting you’d like answered? Let me know, and I’d be happy to help!
